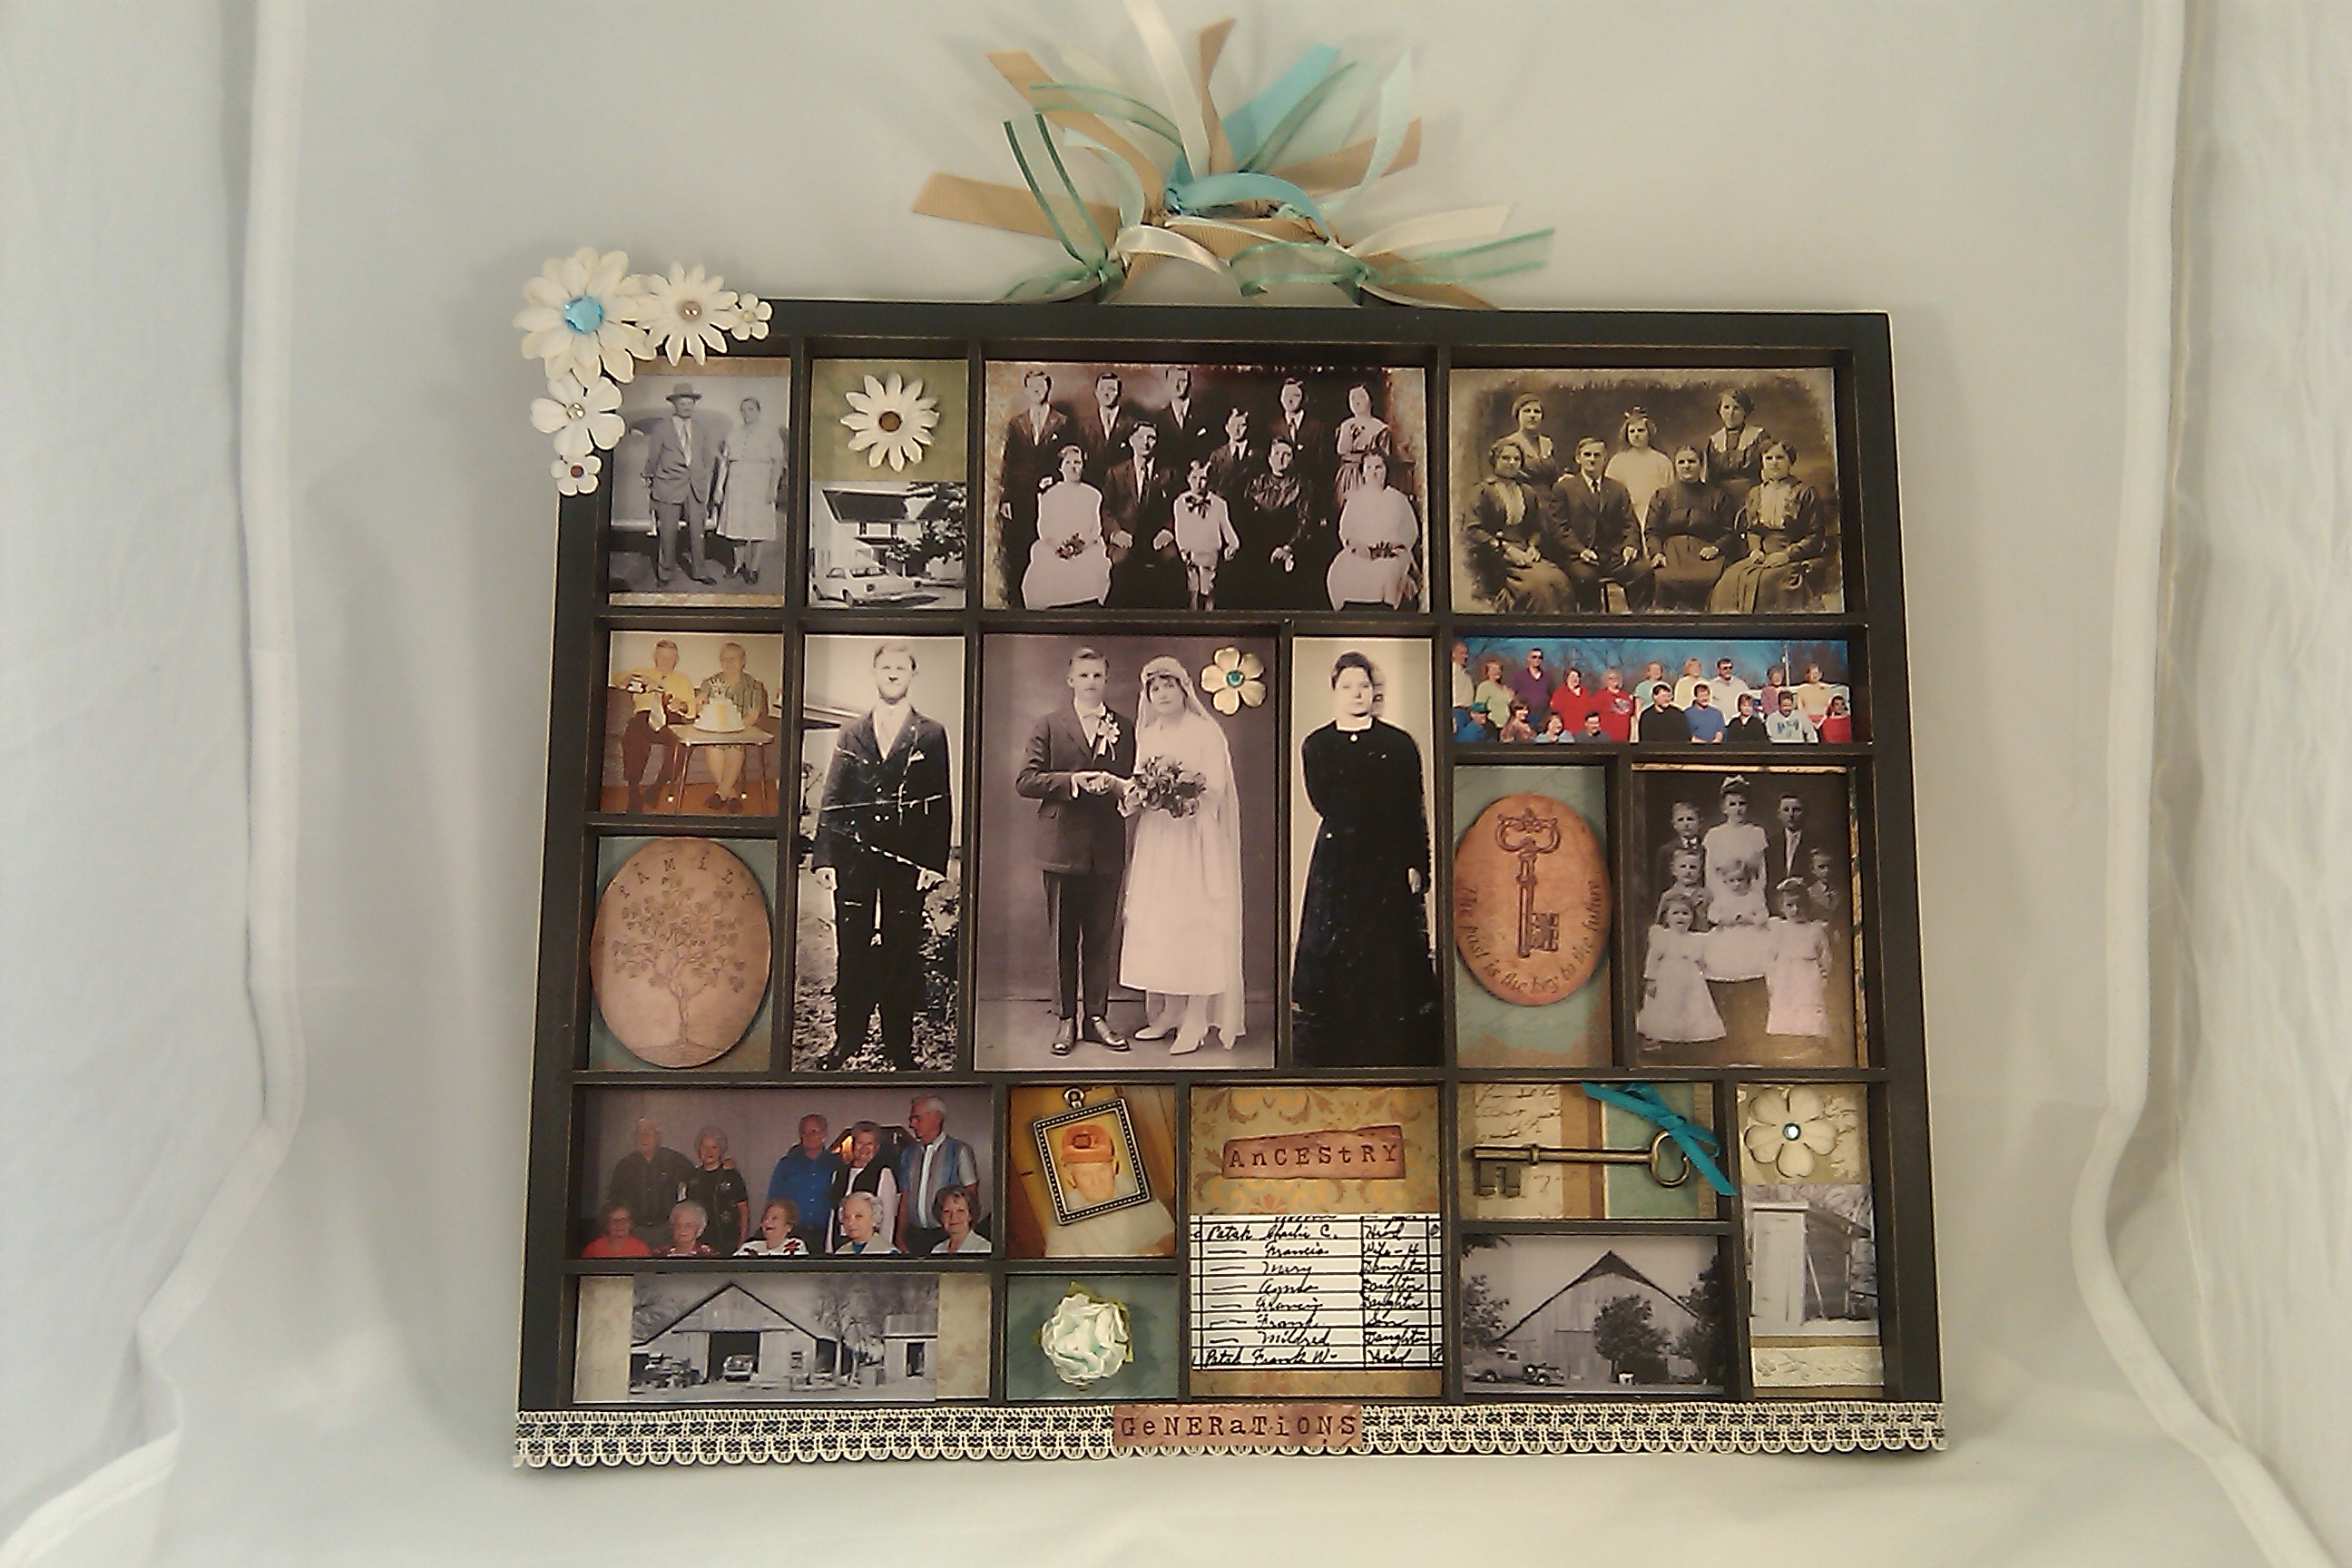
Recently, Genealogy Gems Premium member Mary Ann shared some beautiful family history crafts with us. One is this exquisite family history photo display she made for a cousins’ gift exchange. It’s a collage concept that incorporates pictures with mementos and meaningful embellishments, but in a beautifully orderly fashion.
“This was so easy to make,” Mary Ann wrote. “The hardest part was rounding up the photos I wanted to use, then sizing them to fit the appropriate little openings. I use Photoshop Elements for my photos and digital scrapbooking so I cropped and sized the photos there, put them all into one larger page so I could print all at once, printed a draft on printer paper to make sure the photos were the correct size then printed my good version on photo paper.
“When I made the photo tray a few years ago, I found the tray in my local Archiver’s scrapbooking store. Archiver’s has since closed their retail stores but they sell online. I was looking at their site last night and found the same item for sale that I used in my project. Here is thelinkto the item.
“I cut out my photos, some of which filled the entire little opening, but if they didn’t, I added some scrapbook paper as a background to those. The “generations” and “ancestry” tags, as well as the ovals, flowers and key, are all scrapbooking embellishments. I used little pieces of ribbon under the outhouse photo, as a bow on the key and to cover the “handle” of the tray. I had some leftover lace I used to trim the bottom of the box. I copied a piece of a census record that showed my grandparents’ names and some of my aunts and uncles. I used acid-free double sided tape made for scrapbooking to attach it all. And I found the little frame to put on my grandfather’s photo.”
Mary Ann also hopes to create a photo tray like this for her son’s school photos (she saw the idea online) but hasn’t gotten to it yet. But she got a lot of mileage out of the one she did finish. “I made a total of 6 of these, all alike, and gave the remainders later as Christmas gifts to my mom, an aunt and a couple cousins,” she tells us. “And I was even clever enough to keep on for myself. My aunt told me she cried when she opened it and saw what it was.”
I remember little display trays like this being popular in the 1970s or 1980s, too. I’ve seen them at resale and antique shops, and tucked away in friends’ basements and attics. You may be able to find vintage trays that are less-expensive than the new ones. This inspiring idea made me wonder what mementos, tiny memorabilia, embellishments and even photocopied genealogy records I would tuck into my own version of this project.
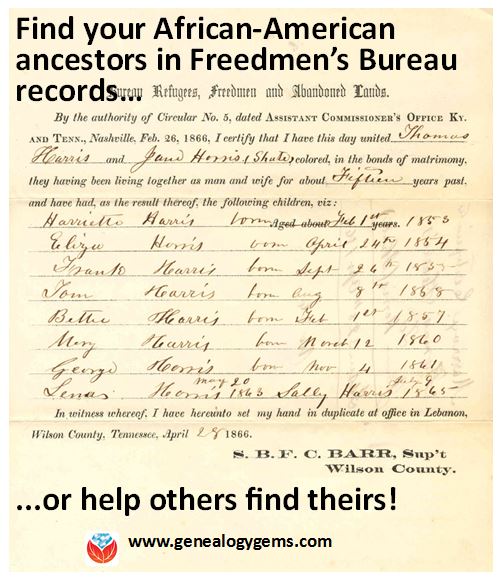
The more I learn about U.S. history and records, the more I appreciate the challenges faced by those researching their African-American roots. In addition to the emotional toll of learning about their ancestors’ hardships, today’s researchers face the practical challenges of finding kin in records that mostly ignored their existence.
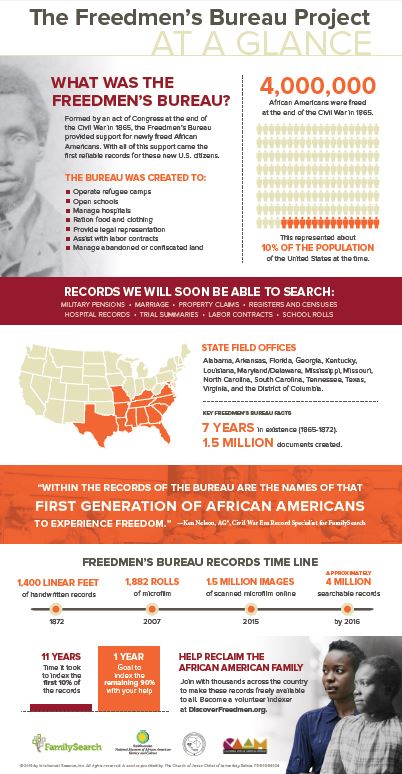
That’s why I’m super excited that the Freedmen’s Bureau records are finally being fully indexed. Scattered records are already transcribed (see the Freedmen’s Bureau Online). But there hasn’t been a comprehensive index of its 1.5 million state field agency documents. These include military pensions, marriage records, property claims, hospital records, trial summaries, labor contracts, school rolls, registers and censuses. Many of the four million African-Americans freed from slavery are mentioned, as are many white Southerners.
FamilySearch indexers began quietly indexing Freedmen’s Bureau records in 2009: the state of Virginia’s records are already searchable. Last week, in observance of the Juneteenth holiday (which celebrates emancipation), FamilySearch issued a call to action. They asked for help indexing the rest of the Freedmen’s Bureau within the year.
“Records, histories and stories will be available on DiscoverFreedmen.org,” says a release. “Additionally, the records will be showcased in the Smithsonian’s National Museum of African American History and Culture, which is currently under construction on the National Mall in Washington, D.C., and expected to open in late 2016.”
Here’s a quick history lesson: The Freedmen’s Bureau was organized after the Civil War to aid newly-freed slaves in 15 states and Washington, DC. For several years it gathered “handwritten, personal information on freed men, women and children, including marriage and family information, military service, banking, school, hospital and property records,” according to FamilySearch.
The richest genealogical records of the Freedmen’s Bureau are in the field office records of each state. Click here to download a PDF from the National Archives about these original records.
Find more tips on finding African-American and other Southern U.S. ancestors here on the Genealogy Gems website. Recent posts include:
Receive a heads-up about posts like these–and get a free e-book on Google searching for genealogy–when you subscribe to the free Genealogy Gems newsletter in the upper right corner of this webpage or our home page.
HMS Alert in pack ice during the Arctic Expedition of 1875. Wikimedia Commons image; click to see image and full citation.
Every man-made object has a story behind it–and sometimes an entire chapter in history. One such object is a bottle of ale recently discovered in a garage in Shropshire, England. As reported by TheBlaze.com, a British auctioneer found the bottle. “It looked interesting, so I took a closer look — and, lo and behold, there on the cap were the words ‘Allsopp’s Arctic Ale,’ then embossed on the seal was ‘Arctic Expedition 1875.’”
Now the bottle is up for auction! Here’s the description from the auction site:
“An unopened bottle of Arctic Expedition beer dated 1875, with original intact label and contents. Allsopp’s Arctic Ale was brewed for The British Arctic Expedition of 1875. The Expedition was an attempt by the British Admiralty to reach the North Pole and included two ships HMS Alert and HMS Discovery under the leadership of Vice-Admiral Sir George Nares (1831-1915). Unfortunately the expedition failed to reach the pole but succeeded in mapping the coast lines of Greenland and Ellesmere Island.”
I wondered whether anyone else has sampled another bottle of ’75 Arctic brew. So I googled it. I found a beer blogger who loves the stuff! From Martyn Cornell’s Zythophile: Beer Now and Then blog post of June 10, 2012:
“One indisputably legendary beer is Allsopp’s Arctic Ale, the powerful, rich Burton Ale, original gravity 1130, north of 11 per cent alcohol, brewed in Victorian times….There are a very few bottles left of the Arctic Ale brewed for the expedition under Sir George Nares which set out in 1875 to reach the North Pole. And this week I drank some….
Amazingly, there was still a touch of Burtonian sulphur in the nose, together with a spectrum of flavours that encompassed pears, figs, liquorice, charred raisins, stewed plums, mint, a hint of tobacco, and a memory of cherries. It was dark, powerful and still sweet….Those frozen sailors on the 1875 British Arctic Expedition, some of whom set a new record for furthest north, traveling to within 460 miles of the North Pole, must have cheered whenever another bottle was thawed out and decanted into their mugs.”
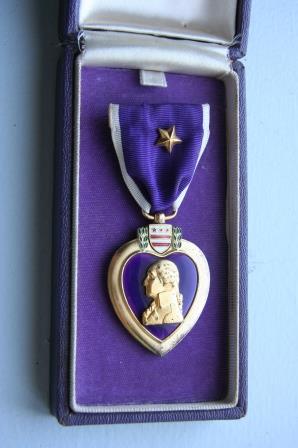
Navy/Marine Corps Purple Heart Medal with gold 5/16 inch star and lapel button in presentation case. World War II. Wikepedia Commons image; click to view full citation.
What history do your family artifacts hold? Click here to read about other family heirlooms, lost and found, trashed or treasured, reported here on our blog, like a post about a Purple Heart medal like the one shown here.
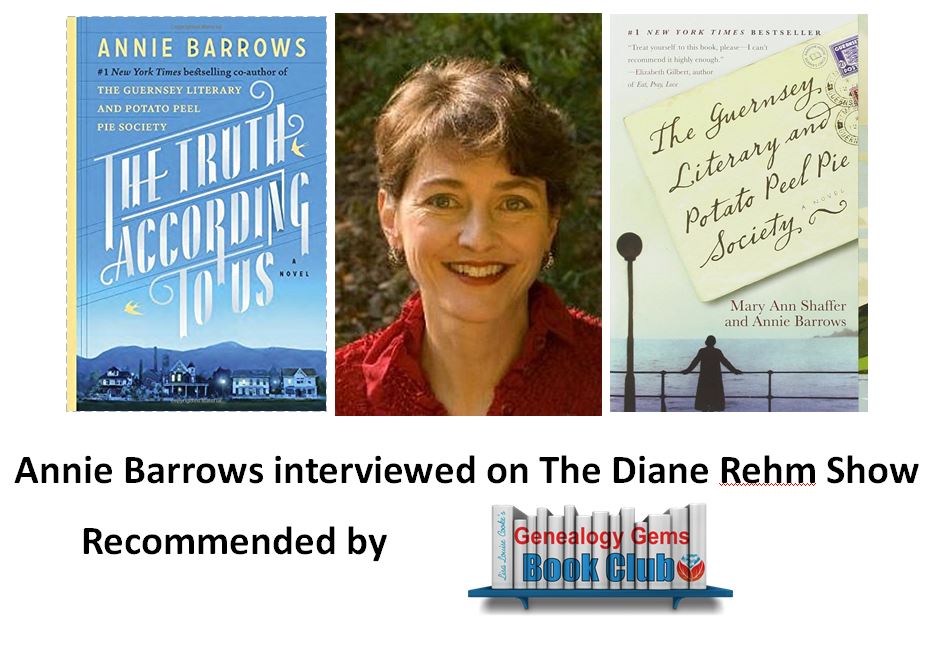
If you’ve read The Guernsey Literary and Potato Peel Pie Society, you know how brilliantly co-author Annie Barrows stitched together letters, conversations and history in her fictional love story and account of the Nazi-occupied island of Guernsey during World War II. I love that book. So I was super excited to hear her talking on The Diane Rehm Show recently about her new book, The Truth According to Us: A Novel.
Of course, Annie read from the opening of her book, which made me put it at the top of my reading list. Then she talked about how history can be so different, depending on who is telling the story and from what perspective. I loved her take on small-town history and family history: how it’s remembered so deeply and passionately by its own, and often so mis-remembered or mis-represented by outsiders.
Here’s the book summary from Amazon:
“In the summer of 1938, Layla Beck’s father, a United States senator, cuts off her allowance and demands that she find employment on the Federal Writers’ Project, a New Deal jobs program. Within days, Layla finds herself far from her accustomed social whirl, assigned to cover the history of the remote mill town of Macedonia, West Virginia, and destined, in her opinion, to go completely mad with boredom. But once she secures a room in the home of the unconventional Romeyn family, she is drawn into their complex world and soon discovers that the truth of the town is entangled in the thorny past of the Romeyn dynasty.
At the Romeyn house, twelve-year-old Willa is desperate to learn everything in her quest to acquire her favorite virtues of ferocity and devotion—a search that leads her into a thicket of mysteries, including the questionable business that occupies her charismatic father and the reason her adored aunt Jottie remains unmarried. Layla’s arrival strikes a match to the family veneer, bringing to light buried secrets that will tell a new tale about the Romeyns. As Willa peels back the layers of her family’s past, and Layla delves deeper into town legend, everyone involved is transformed—and their personal histories completely rewritten.”
Annie did talk about the Guernsey book, too. I hadn’t realized her aunt wrote the original manuscript, then became too ill to do the rewrites her publisher wanted. So Annie took on the task. As the author of the acclaimed Ivy and Bean children’s series, clearly she was up to the task. But she didn’t dream it would become an international best-seller!
Do you use Skype or another video chat service to keep in touch with loved ones? Have you considered using it for long-distance oral history interviews or collaborating on your genealogy with a faraway cousin? Language barriers can sometimes become a problem. Skype Translator offers a solution!
Last December, online communications giant Skype announced the debut of Skype Translator. The service launched with two spoken languages, English and Spanish, and more than 40 instant messaging languages. Customers could access it who signed-up via the Skype Translator sign-up page and were using Windows 8.1 on a desktop or device.
The Skype blog has proudly announced that they’ve added Italian and Mandarin to the list of spoken languages in Skype Translator. “As you can imagine, Mandarin is a very challenging language to learn, even for Skype Translator. With approximately 10,000 characters and multiple tones, this is one of the most difficult languages for a native English speaker to master.” The list of instant messaging languages has also expanded.
The post acknowledges years of hard work and testing required for the Mandarin application by Microsoft researchers and scientists in the U.S. and China. “Skype Translator relies on machine learning, which means that the more the technology is used, the smarter it gets,” stated the initial release. “As more people use the Skype Translator preview with these languages, the quality will continually improve.” Here’s a video demonstrating Mandarin translation:
“The focus of our updates in this preview release is to streamline interactions between participants, so you can have a more natural conversation using Skype Translator,” states the recent Skype release. They describe these key updates:
Text to speech translation:
You now have the option to hear the instant messages people send to you – in the language of your choice
Continuous recognition – Recognized text translation as your partner is speaking
Automatic volume control:
Your partner can speak while the translation is still happening. You will hear the translation at full volume, and your partner at a lower volume, so that you can follow the translation, which will help make conversations more fluid.
Mute option for translated voice:
There is now an option to easily turn the translated audio on or off if you would prefer to only read the transcript.
Want to learn more about using video chat services like Skype for family history? Click here to read tips about collaborating with other family history researchers via Skype. We’ve blogged about how to use third-party apps to record Skype conversations (click here to learn how). Our free Family History Made Easy podcast features an episode on interviewing skills (episode 2) and a 2-part series on how to contact long-lost relatives (“genealogy cold-calls,” episodes 14 and 15).
 Recently, Genealogy Gems Premium member Mary Ann shared some beautiful family history crafts with us. One is this exquisite family history photo display she made for a cousins’ gift exchange. It’s a collage concept that incorporates pictures with mementos and meaningful embellishments, but in a beautifully orderly fashion.
 We’ve got more beautiful ideas like this on our Pinterest boards! Check them out: Family History Craft Projects, Legacy Displays and Heritage Scrapbooking for Family History.