Welcome to this step-by-step series for beginning genealogists—and more experienced ones who want to brush up or learn something new. I first ran this series in 2008-09. So many people have asked about it, I’m bringing it back in weekly segments.
Episode 40: How to Start a Genealogy Blog, Part III: Step by Step
In the last two episodes you’ve been hearing from experienced genealogy bloggers about family history blogging. I hope it piqued your interest and got you thinking about the possibility of doing it yourself. As we’ve discussed, it’s a great way to share your experiences with other researchers and potentially connect with long lost relatives.
Well in today’s episode I’m going to walk you through setting up your own family history blog step-by-step. By the end of this episode you could have your own family history blog up and running and sharing your enthusiasm about genealogy with the world. How does that sound? Are you willing to give it a try? And even if you’re not looking to start blogging today, listen in and plant the seeds for the future.
From the Mailbox:
A long-time listener wrote in this last week about the recent blogging episodes:
“The Transcript software mentioned by Denise Levenick looks great – I downloaded and installed it this morning. I am giving a brief software demonstration at the Greater Portland Chapter of the Maine Genealogical Society’s 30th Anniversary Celebration tomorrow and I am going to let people know about this product.
Episode 38 and Episode 39 have really got me thinking about starting my own blog. It won’t be easy with my 50 hours plus a week civil engineering job, but your podcasts have motivated me. Thank you!” -Will Haskell, Listener to All Your Podcasts
Transcript software is really cool: download the most recent version for free here. And that’s just one example of the kind of great tech tips that Denise Levenick blogs about at The Family Curator Blog!
Follow-up: when republishing this episode, we were curious about whether Will ever started a blog. He did! It’s very cool! Find Will’s Genealogy Blog at http://wchgenealogyblog.blogspot.com/.
Also, listener Anne-Marie had some questions about how to make progress with her Maw-gee research, specifically how to track down their immigration records. She wrote in again to say that she’s going to follow up on our suggestions and let us know what she finds. But she also had some comments about my interview with genealogy blogger the Footnote Maven (Episode 38):
“I have begun listening to Family History and Genealogy Gem podcasts from the beginning again. When I listened the first time I was so novice that I did not always understand what I was hearing. It’s great to have this audio reference guide.”
How to Start a Genealogy Blog: Step by Step
Now before we get started on created your blog let me just say that there are probably countless websites for setting up blogs and certainly countless ways to go about it. My goal in the approach that I’m going to take is to get you up and running in a short period of time for free. This is a great way to get your feet wet, see if it’s for you, and if you decide to get more elaborate with it later you can always do that.
1. Decide what the purpose of your blog is.
When it comes to a genealogy themed blog there are still lots of options – so here are some ideas:
A Research Log
A Surname Focus
Family Traditions, Family Recipes, Photos
Genealogy News
Focus on a certain record type
Provide beginner education
Interviews with relatives
History of an ancestor’s home or community
Have a general all purpose blog
Follow a pattern for each day
And remember the Footnote Maven’s good advice – You can’t be an expert in everything, so don’t even try. To me a good way to stay out of that trap is to stay narrowly focused. If you find yourself having to be an expert in everything you’re blog theme is probably too broad. And of course, be yourself. Do what you do best!
2. Use Blogger (http://www.blogger.com) to create your blog. It’s free, and easy to use.
Blogger is owned by Google so if you already have a Google account than you’re one step ahead of the game. If not that’s the first thing you’ll need to do. Then click “Create Your Blog Now.”
Note: As on any website, the organization and features of Blogger change over time. The following description was current at the time of publication. Use this following descriptions and concepts to guide you through the current version of Blogger.
Name your blog.Of course, the name should reflect what your blog is about, but it’s also good to think of one that is catchy, and one that you can get the URL address for. The URL name you pick has to be something that isn’t already being used, so it might take a few tries.
How to Name Your Blog:
Type in the Title Field
Type the URL you want in the “Blog Address URL” field
click the Check Availability link to see if it is available
Type in the word verification code
Click the CONTINUE button.
3. Select a Design Template:
Scroll through the design templates and pick one you like
Click the select button
Click the CONTINUE button
You’ll get a page that says Your Blog has been created!
Click the orange arrow that says START BLOGGING.
There are a couple of more things we’ll want to do with our blog before we get to the business of actually posting blog articles. First let’s just get familiar with the blog dashboard. This is sort of the “behind the scenes,” an area your readers will never see, but where you will actually do your blogging.
There are 4 tabs along the top: Posting, Settings, Layout and Monetize.
Blog Tune Up: From the Posting Tab….Click the SETTINGS tab. Type up a short description of the blog.
Vocab Word: KEYWORDS
Keywords label your blog so that when readers go searching for a blog to read they will find it. So some good keywords for this new blog that I’m creating would be
Genealogy
Family history
Family tree
Blog
How to
Keywords can be single words or a short keyword phrase such as “family history” which readers will very likely be searching for. Blogger allows you 500 characters.
The rest of your options on this Basic Settings page are mostly about how your content will be labeled and found on the internet. You can take a look through the options but in most cases you will want to leave them on their default settings. When you’re done just click the SAVE SETTINGS button at the bottom of the page. And for right now you can leave all of the other types of settings as is as well. There are about 9 different categories within the Settings Tab that you can tweak, but the default settings on these are just fine for now.
4. Add at least one gadget. Click the LAYOUT tab. I love working with this area because this is where you get to customize the layout and the types of gizmos and gadgets that are on your blog. We don’t want to overdo it but there are some really good ones you’re not going to want to miss.
Blogger will automatically add a couple of gadgets to the sidebar of your blog. They are:
Followers – people who use blogger who subscribe to your blog’s RSS feed.
Blog Archive – This gadget automatically archives your older blog posts.
About Me – This is just a place where you can tell your readers a little more about yourself and include your email address if you wish.
To see what other types of gadgets you can add just click the Add A Gadget link in top side box. That will bring up a window with lots of choices for you:
Search Box
Text
Photos
Slide show
Video Bar
Polls
Lists
RSS feed
Subscription Links
HTML / Javascript
Each one of these is very easy to use and pretty self-explanatory. But I recommend not overloading your blog. Only include, at least to start, the items you really think your readers would get some value from. Otherwise it can just be annoying distraction that gives readers a reason to leave your blog.
How to Add a Picture Gadget to Your Blog:
Cick the plus sign on the right hand side of the page for the PICTURE gadget.
This will bring up a page call CONFIGURE IMAGE.
Give the image a title
Type a Caption
Link to an image on the web OR upload from your computer hard drive.
(To upload from your computer make sure the “From your computer” button is selected and then just click the BROWSE button. Navigate your way to the location of the photo on your computer’s hard drive and select it.) Once the image appears that means it has been successfully uploaded to Blogger.
(If you want to link this image to another website, then you will want to type in the address in the LINK field.)
Click the orange SAVE button and we’re done.
Now you will be back at your dashboard in the Layout mode. You will see that the top box on the side is now labeled as the title you gave your image.
Click the blue PREVIEW button at the top and a preview window will open showing how your blog currently looks and it will include the image you just uploaded.
5. Rearrange Your Gadgets on Your Blog. Hover your mouse over the gadget and your cursor will turn into a cross with arrows. Click and grab the gadget and drag it where you want it and drop it in place. Click the PREVIEW button to see how that looks.
Genealogy Blogging Summary
We’ve made a lot of progress on our blog in a very short amount of time. Take some time this week to take the steps we took in this episode:
Decide on the theme or focus on of your blog
Get a Google Account and create your Blogger blog account with your chosen name and secure the URL address to go with it.
Pick your design template
Add at least one gadget from the choices provided
And move the gadgets you have so far around until they are in the order you want.
Next week we will finish up this family history blogging lesson with adding a few more gadgets and details, doing a bit of pre-planning for our blog posts, publishing your first article, and then talking about how your readers will subscribe to your blog.
Finally, here’s a link to genealogy expert (and blogging guru) Amy Coffin’s blog post, “Another Jones Surprise or Why Genealogists Should Blog.” Next week’s episode will include handouts on Amy’s great ideas for up to a year’s worth of genealogy blog posts by societies or individuals—you won’t want to miss that!
This 1940 “steamer letter” is essentially a lesson in how to be a good mother-in-law: Tell your daughter-in-law or son-in-law what you like about them. Express confidence in them. Respect the privacy of the couple’s relationship. That’s what I see in these words of...
As you may have already noticed, a lot of websites these days host millions of family trees: MyHeritage.com, Ancestry.com, FamilySearch.org, Geni.com, FindMyPast.com, Archives.com and more. There are virtual forests and forests of family trees out there! How can you find a tree that includes your family? How can you be sure it’s yours? How do you know that what you see is accurate?
Get started with these 7 Steps: How to Find Your Family Tree Online:
1. Choose a site from the list above and create a free log in.
Which should you choose?
FamilySearch.org is the only one that offers totally free access to all user-submitted family trees as well as the historical records that can help you with your research. However, the other sites offer a variety of free access options, especially to user-submitted trees.
MyHeritageis known for its international user base (check out its user map here) and multi-language access.
Some sites have different portals that specialize in records from different countries. For example, Ancestry.com (with a U.S. focus) owns Ancestry.ca for Canadian genealogy, Ancestry.co.uk for the United Kingdom and Ancestry.com.au for Australian records. Similarly, FindMyPast.co.uk (U.K. focus) also hosts FindMyPast.com (U.S.), FindMyPast.ie (Ireland) andFindMyPast.com.au(Australia). Check out additional sites for specific countries (including non-English-speaking) here. If your family recently immigrated, look for a site about “the old country.’ If you have pretty deep roots in your current country, or you’re not sure, pick a site that specializes in your current home.
2. Enter the name of one of your relatives in the Search bar.
Each site files its family trees a little differently: some with historical records and some separately. Search trees at FamilySearch here. On Ancestry.com, look under the Search option for Public Member Trees. Enter names of your relatives, along with any other details you know (like a birth date and place or a spouse’s name). Try different combinations, sometimes using the person’s first and middle name, trying a maiden name, entering a nickname, etc. Increase your odds of finding people by entering a range of years (like 1880-1890) for a date and a more general place, like a state, rather than the name of a little town. If you get too many results, enter more specific information.
Which relative(s) should you choose?
One who is deceased, if possible. Records about living people may be restricted for some places (but not all).
If possible, one with a relatively unusual name. They may be easier to spot.
One you know several things about: a full name (including maiden for women), dates and places of birth, marriage and death; burial place; where they lived during their lifetime; names of their spouse(s), sibling(s) and/or child(ren).
One who lived as long ago as possible, to increase the chance that someone has posted a tree. But a grandparent is a great starting point, if that’s as far back as you know. If your grandparent is still alive, ask them their parents’ names, and start with your great-grandparent.
Need to learn more about your relatives first? Read this article on how to gather information about your family.
3. Click on results labeled as “family trees.” Are they “yours?”
Browse the search results. Do any of these names and details look familiar? Everything doesn’t have to be a perfect match for a tree to include your roots. Sometimes different information is handed down through different branches of a family. Sometimes people get their information from sources that don’t match yours. Sometimes people just guess or patch together parts of different family trees without looking closely to see if they’re right.
Tech tutorial: What exactly are you looking at when you look at a family tree online? Before the days of internet genealogy, researchers organized family history findings on their home computers in one of several specially-designed software programs. These programs could generate .GED files (often referred to as GEDCOMs) that would allow researchers using different software to share their findings. Many people have now uploaded their GED files to genealogy sites like the ones we’re talking about–or they’ve just built a family tree from scratch right on the site.
4. Evaluate the accuracy of what you find.
The best way to judge the accuracy of a family tree without researching it yourself is to see what proof is offered. Do you see any records mentioned (like footnotes) or attached to the tree? Common records include tombstone images; government or church vital records (birth, marriage or death records) and census listings. Do you see photos attached? Photos may indicate the submitter has access to family records or albums (bonus!).
If a tree mentions lots of sources, it’s more likely to be accurate–at least for the pieces of information that are sourced. If a tree doesn’t have sources, it doesn’t mean it’s wrong, it just means you don’t know if it’s right.
Sometimes you’ll find a “branch” on a tree that goes back many generations without a single source mentioned. Beware! Sometimes these branches are just copied from other trees. This may particularly be true if a branch is connected to a royal line. Royal lines are well-documented in history and some people have created family trees with the hope of running into royal relatives. These connections may not have been thoroughly researched–they might just represent “wishful thinking.” Again, look for sources.
5. Optional step: reach out to the submitter of promising-looking family trees.
Some sites allow you to contact them through confidential email routed through the site (you may have to purchase a subscription first). You might contact a submitter to meet a possible cousin, share information you have or ask for more details about what they posted. If you contact them, be polite–don’t open with “you got my grandfather’s birthday wrong” or you may never hear back. You may not hear back anyway, if the submitter is no longer researching, their email changed or they have passed away.
6. Google your surname along with the phrase “family tree” or “genealogy.”
See if any personal websites pop up with your family tree (or other family history information) in them. Evaluate the information by looking for accurate details (as far as you know) and lots of sources mentioned. Look for an “About” or “Contact” page to learn more about the submitter of this information.
7. Verify it yourself. Wandering through forests of online family trees may give you the urge to create your own tree. An accurate, and sourced tree! If so, good for you. Keep reading the articles suggested below to learn how to get started!
Artificial Intelligence and Genealogy Elevenses with Lisa Episode 32
In this episode we tackle a few small geeky tech questions about artificial intelligence, better known as AI, that may have a pretty big impact on your genealogy life. Questions like:
Is artificial intelligence the same thing as machine learning?
And if not how are they related?
And am I using AI, maybe without even being aware of it?
And what impact is AI really having on our lives? Is it all good, or are there some pitfalls we need to know about?
We’re going to approach these with a focus on family history, but pretty quickly I think we’ll discover it’s a much more far-reaching subject. And that means this episode is for everyone.
Watch the free video below.
While I’ve done my own homework on this subject and written about it in my book The Genealogist’s Google Toolbox, I’m smart enough to call in an expert in the field. So, my special guest is Benjamin Lee. He is the developer of the Newspaper Navigator, the new free tool that uses artificial intelligence to help you find and extract images from the free historical newspaper collection at The Library of Congress’ Chronicling America. I covered Newspaper Navigator extensively in Elevenses with Lisa episode 26.
Ben is a 2020 Innovator-in-Residence at the Library of Congress, as well as a third year Ph.D. Student in the Paul G. Allen School for Computer Science & Engineering at the University of Washington, where he studies human-AI interaction with his advisor, Professor Daniel Weld.
He graduated from Harvard College in 2017 and has served as the inaugural Digital Humanities Associate Fellow at the United States Holocaust Memorial Museum, as well as a Visiting Fellow in Harvard’s History Department. And currently he’s a National Science Foundation Graduate Research Fellow.
Thank you so much to Ben Lee for a really interesting discussion and for making Newspaper Navigator available to researchers. I am really looking forward to hearing from him about his future updates and improvements.
Artificial Intelligence and Genealogy
Covering technology and its application to genealogy is always a bit of a double-edged sword. It can be exciting and helpful, and also problematic in its invasiveness.
Tools like family tree hints, the Newspaper Navigator and Google Lens (learn more about that in Elevenses with Lisa episode 27) all have a lot to offer our genealogy research. But on a personal level, you may be concerned about the long reaching effects of artificial intelligence on the future, and most importantly your descendants. In today’s deeply concerning cancel culture and online censorship, AI can seriously impact our privacy, security and even our freedom.
As I did my research for this episode I discovered a few things. Artificial Intelligence and machine learning is having the same kind of massive and disrupting impact that DNA has had on genealogy, with almost none of the same publicity. (For background on DNA data usage, listen to Genealogy Gems Podcast episode 217. That episode covers the use of DNA in criminal cases and how our data potentially has wide-reaching appeal to many other entities and industries.)
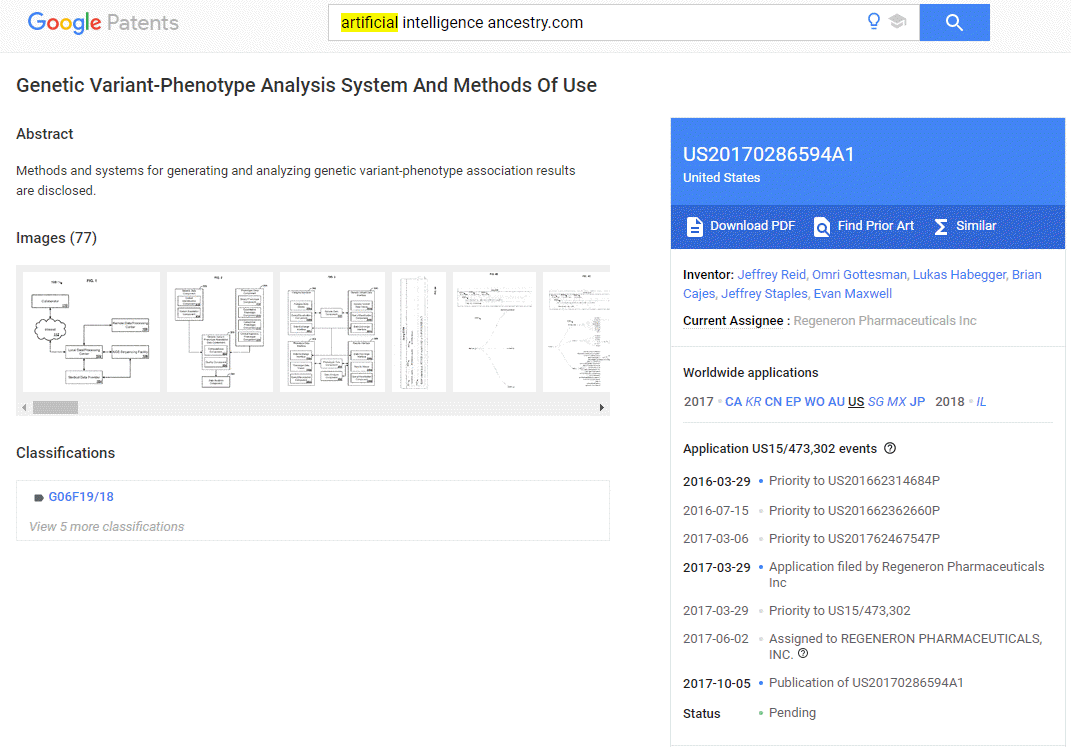
A quick search of artificial intelligence ancestry.com in Google Patents reveals that work continues on ways to apply AI to DNA and genealogy. (See image below)
Patent search result: a pending patent involving AI and DNA by Regeneron Pharmaceuticals, Inc.
AI now makes our genealogical research and family tree data just as valuable to others outside of genealogy.
This begs the question, who else might be interested in our family tree research and data?
Who Is Interested in Your Genealogy Data
One answer to this question is academic researchers. During my research on this subject The Record Linking Lab at Brigham Young University surfaced as just one example. It’s run by a BYU Economics Professor who published a research paper on their work called Combining Family History and Machine Learning to Link Historical Records. The paper was co-authored with a Notre Dame Economics and Women’s Studies professor.
In this example, their goals are driven by economic, social, and political issues rather than genealogy. Their published paper does offer an eye-opening look at the value that those outside the genealogy community place on all of the personal data we’re collecting and the genealogical records we are linking. Our work is about our ancestors, and therefore it is about ourselves. Even if living people are not named on our tree, they are named in the records we are linking to it. We are making it all publicly available.
In the past, historical records like birth and death, military and the census have been available to these researchers, but on an individual basis. This made them difficult to work with. Academic (and industry) researchers couldn’t easily follow these records for individual people, families, and generations of families through time in order to draw meaningful conclusions. But for the first-time machine learning is being applied to online genealogy research data making it possible to link these records to living and deceased individuals and their families.
It’s a lot to think about, but it’s important because it is our family history data. We need to understand how our data is being used inside and outside the genealogy sandbox.
Answers to Your Live Chat Questions About AI
One of the advantages of tuning into the live broadcast of each Elevenses with Lisa show is participating in the Live Chat and asking your questions.
www.GenealogyGems.com/Elevenses
From Linda J: What about all the “people search” sites (not genealogy) that have all, or a lot of, our personal date? Lisa’s Answer: My understanding is that much of the information provided on many of the “people search” websites comes from public information. So while the information is much easier to access these days, it’s been publicly available for years. That information isn’t as accessible to projects like the one discussed in this episode because those websites don’t make their Application Programming Interface (known as API) publicly available like FamilySearch does.
From Doug H: Wouldn’t that potentially find errors in our trees? Lisa’s Answer: Yes.
From Sheryl T: Do these academic researchers have access to the living people on the trees? Or are those protected from them as it is to the public? Lisa’s Answer: They have access to all information attached to people marked as “Living Person.” Therefore, if the attached record names them, their identity would then be known. Click a hint on your tree at Ancestry for example, and the found records clearly spell out the name of the person they believe is your “Living” person.
From Nancy M: How long do the show notes stay available? am looking for Google Books two weeks ago and last week’s Allen Co Library. Lisa’s Answer: The show notes remain available until the episode is archived in Premium Membership. You can find all of the currently available free Elevenses with Lisa episodes on our website in the menu under VIDEOS click Elevenses with Lisa.