by Lisa Cooke | Aug 18, 2015 | 01 What's New, images, Listeners & Readers, Organization, Records & databases, Research Skills, RootsMagic, Trees
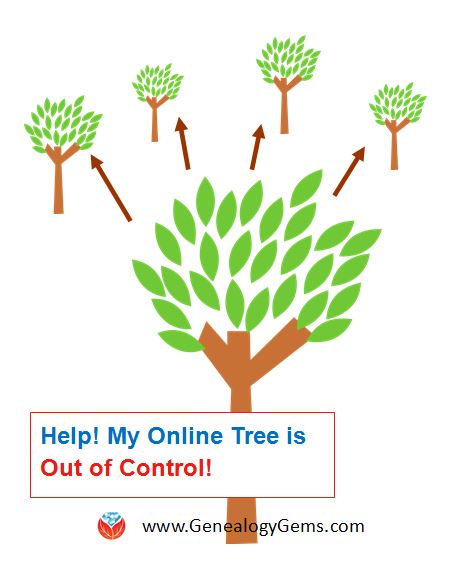
 When you post your family tree online at multiple websites, it’s easy to lose track of changes you make at each one. Maintaining a master family tree on your own computer can help solve that problem.
Recently Gems podcast listener Louis wrote in with a question many of us face. He recently purchased RootsMagic 7 software to keep track of his family tree, but he’s still finding it difficult to corral all his data in one place. Here’s the problem, he says:
“I have my family tree splattered everywhere: FamilySearch, MyHeritage, and Ancestry. I’m afraid of losing control of my tree and would like some advice on keeping things straight. Each of the sites I go on seem to offer different information, so I started posting tree information on different sites. Can you offer any suggestions that I can use to centralize my data across different sites?”
I can fully appreciate Louis’ situation. Here’s a quick summary of how I keep my family tree organized all in one place.
Websites come and go, as we know, so I look at my RootsMagic database on my computer as my MASTER database and tree. This kind of approach lets you post your family tree online but not lose control of it!
When I post GEDCOM files of my family tree on other websites (what’s a GEDCOM?), I do so to try and connect with cousins and gain research leads. With that in mind, I upload only the portion of the tree for which I want to generate those connections and leads. In other words, I don’t put my entire GEDCOM on each site (MyHeritage, Ancestry, etc.) because I don’t want to get bogged down with requests and alerts for far flung branches that I’m not focused on researching right now. To do this I make a copy of my database, edit it to fit my research, and then upload it.
As I find documents and data on these websites, I may “attach” them to the tree on that site, but I always download a copy and retain that on my computer and make note of it in RootsMagic. That way I retain control of my tree and my sources.
 And of course the final step is to back up my computer so everything is safe and secure. I do that with Backblaze (the official backup of The Genealogy Gems Podcast) and you can click here to learn more about their service for my listeners.
In the end, it is my family tree and history. I want to keep ownership of it on my own computer, even when I share parts of it online.
Resources
 Best Genealogy Software: Which You Should Choose and Why
RootsMagic Update for FamilySearch Compatibility
Free RootsMagic Guides
Family Tree Builder for Mac
Thank you for sharing this post with others who may have the same question! Email it, share it on Facebook, pin it, Tweet it–just use our handy social media icons on this page.
(Full Disclosure: Some of the websites mentioned and links provided in our articles are for sponsors of The Genealogy Gems Podcast. They are sponsors because we think they are terrific and use the products ourselves. We include affiliate links for your convenience and appreciate when you use them because they help keep The Genealogy Gems Podcast available for free. Thank you!)
by Lisa Cooke | Sep 13, 2015 | 01 What's New, Apps, Dropbox, images
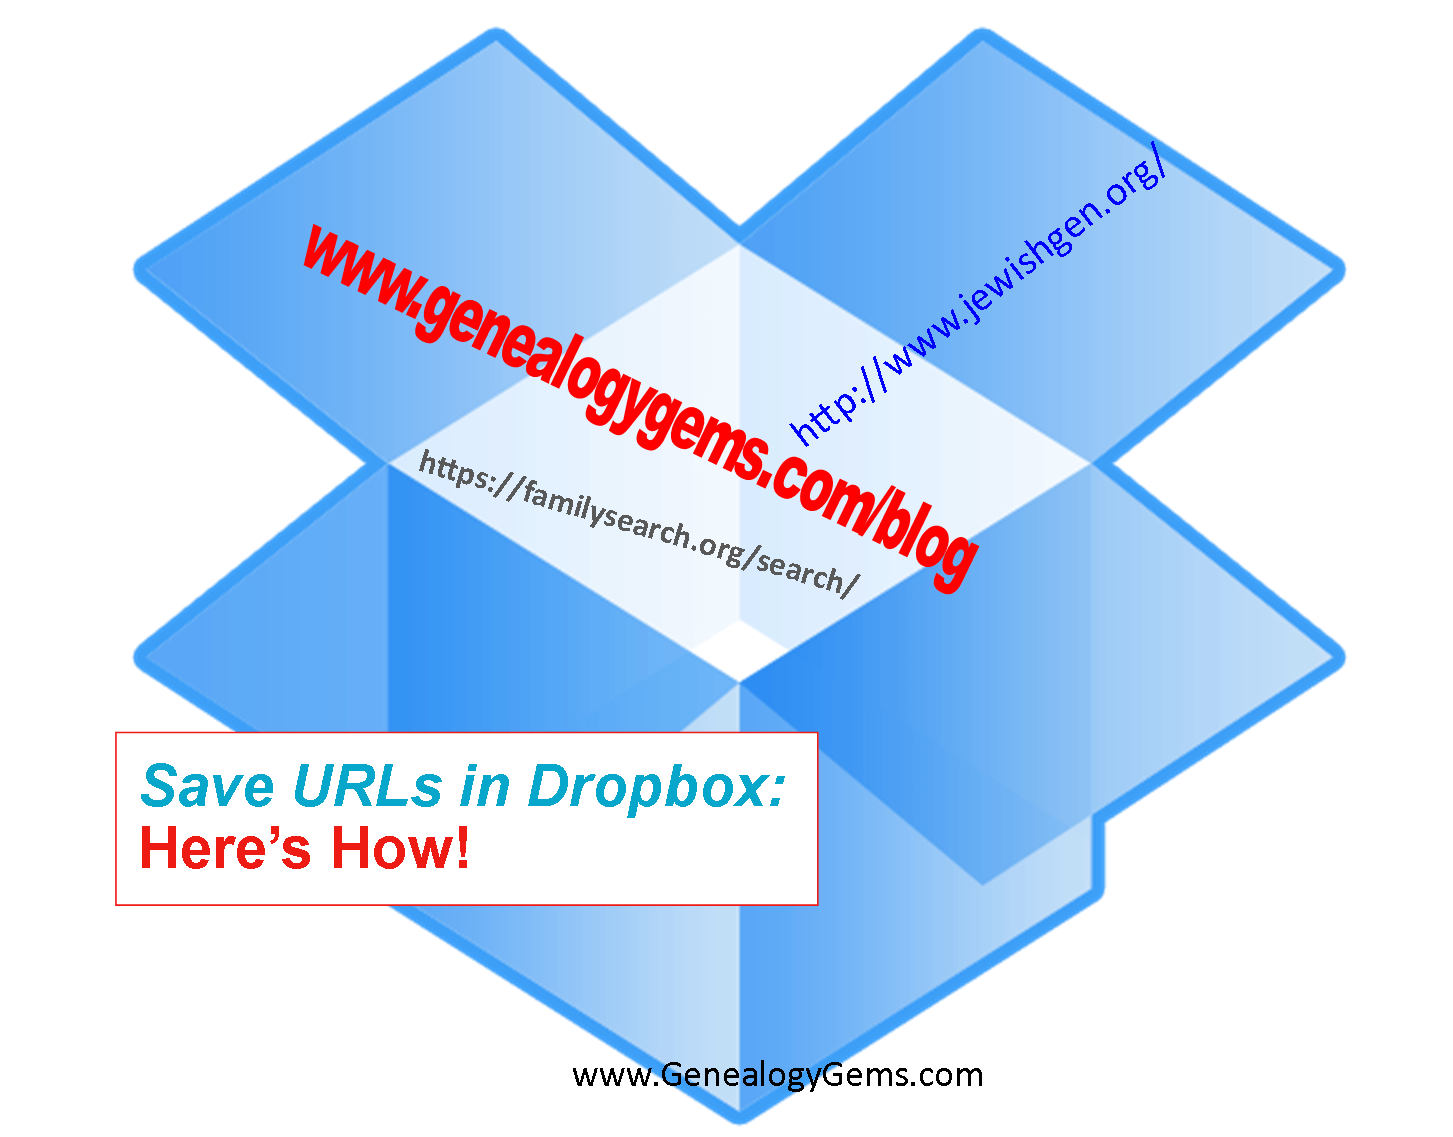
Now you can save the links to your favorite websites in Dropbox. It’s another great way to use Dropbox for genealogy! Here’s how….

Big news: Dropbox recently announced that you can now save web page URLs to Dropbox on the web or on your PC. It’s as simple as drag and drop!
Here’s a link to a quick-read article all about it, and it includes a super short video showing you the feature in action:
Think how handy this would be for tracking genealogy website sources! Those bookmarks we create in our web browsers can get pretty cluttered. A Dropbox folder dedicated just to your genealogy would be a great place to store URLS for those websites you find yourself consulting a lot: a Rootsweb site, the Genealogy Gems blog, JewishGen, and even specific pages within those sites for articles you love.
If you’re a Dropbox user, why not try saving this article URL to your Dropbox? The article we link to above has a video in which they show the drag-and-drop in a web browser, but it works just as well when you click on the URL and drag it onto the Windows Explorer icon on your computer’s task bar. When Windows Explorer pops open, just “drop” onto the Dropbox folder! And if you’re on a Mac, try the equivalent.
I use Dropbox every day. Below I have some great resources for you including an article on the types of items a genealogist could use Dropbox to save and share with other researchers.
Resources
Tips for Collaborative Genealogy: Dropbox for Genealogists
Genealogists’ Guide to Dropbox, a video presentation available to Genealogy Gems Premium members
Dropbox v Backblaze: Does Cloud Storage for Genealogy Replace Computer Backup?
by Lisa Cooke | Aug 27, 2015 | 01 What's New, Digital Archives, Evernote, images, Mobile, Organization, Photographs, Technology
Snagit and Skitch can help you highlight screenshots and other digital images you capture for genealogy. Here’s how!

 Recently Diane from Alberta, CA sent in this question:
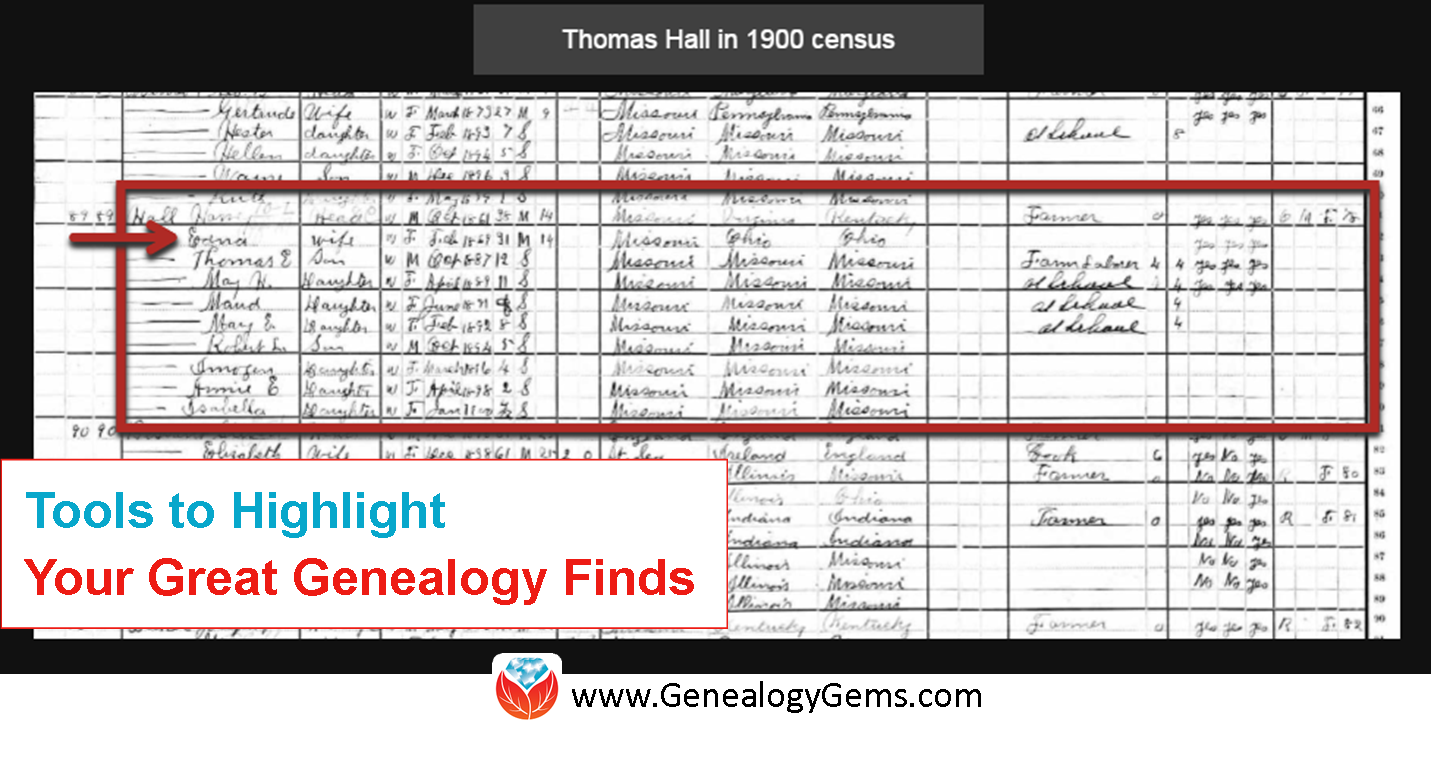
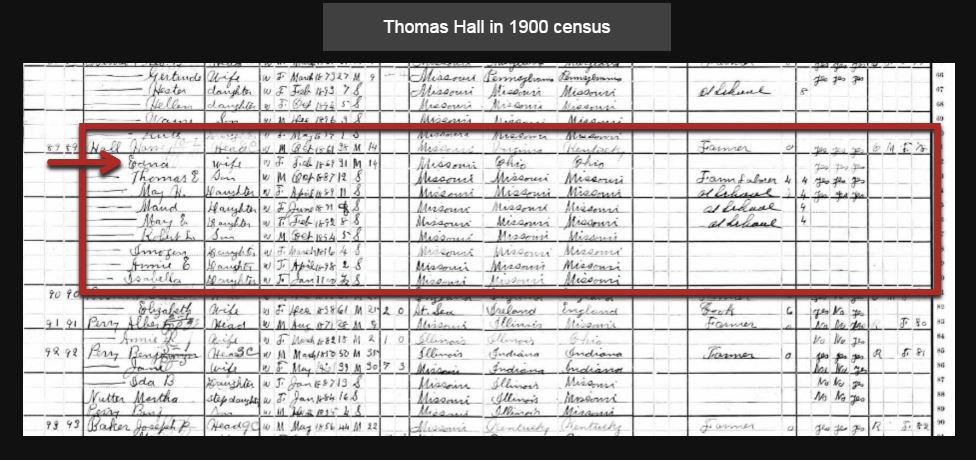
“I am trying to find how to highlight a portion of a document such as a birth certificate. The document has three people listed for the county and prior to adding it to my tree on Ancestry, I would like to highlight my ancestor so he will stand out. Can you offer any suggestions. I tried Evernote without success, also my family tree program. What am I missing?”
I suggested Diane use Snagit 2019, compatible with Windows and Mac software to highlight her documents. In fact, I use it constantly for a variety of genealogical projects. The full-blown software has loads of cool features!
You can also download the free Snagit Chrome extension here. After you install Snagit, you’ll see it show up on your browser page. Here’s what it looks like on Google Chrome (the blue “s” button):
 When you see something on your screen you want to capture, just click on the blue “S” icon. You’ll be asked at the outset to give Snagit access to various cloud storage options so it can store the image for you. Once you allow it access, then you’ll be able to name your file and add your own shapes, arrows and text. Use these to call attention to part of a record; annotate what you learned from it or even mark your ancestor’s face in a group photo.
As far as doing something similar in Evernote: Evernote only allows you to highlight typed text, not portions of an image. However, you can download Skitch and drag and drop the document from Evernote into Skitch. Then you can highlight an image to your hearts content. When you’re done you can Save to Evernote in the menu (SKITCH > SAVE TO EVERNOTE).
 Thanks to Diane for a great question! I hope you’ll all share this post: Snagit is free and makes it so easy to take notes on your digital images, for your own use or to share with others!
Resources
How to Add Text to a Web Clipping in Evernote
Should Evernote Be My Digital Archive?
Annotating and Transcribing Documents in Evernote (What Evernote Can and Can’t Do for Family History)
by Lisa Cooke | May 9, 2015 | 01 What's New, Adoption, Book Club, History, images, Listeners & Readers, Memory Lane, Travel, United States
 We’ve heard from many of you that the best-selling novel Orphan Train by Christina Baker Kline, featured in our Genealogy Gems Book Club, has piqued your interest in that sad chapter in U.S. and Canadian history. So I thought I’d share this comment from Jenna Mills on our Genealogy Gems Facebook page:
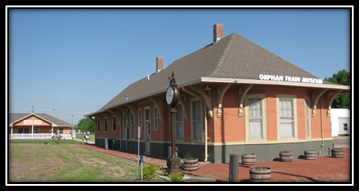
“I’ve become very interested in orphan trains since I heard the interview with the author on your podcast. Fascinating and sad. I’ve since found that that over 250,000 kids are estimated to have been put on a train. 250,000!!!
 The National Orphan Train Complex [a museum] is in Concordia, Kansas, so of course a visit there will be forthcoming. I’m halfway through the book and love it. What has really piqued my curiosity is that my great-grandmother adopted a boy while living in Amherst, Nebraska. The railroad doesn’t go through there anymore but did in that time period. I may be taking a trip down a rabbit hole, but this is so fascinating.”
Thanks, Jenna! We’re also aware of an orphan train museum in Louisiana and this lovely summary from an Iowa historical society about riders who landed in their little town. Recently we pinned an image of an old orphan train rider doll on Pinterest.
Follow Lisa Louise’s board Genealogy Gems Book Club on Pinterest.
 We invite you to follow the FREE no-commitment, no-fuss Genealogy Gems Book Club. Every quarter we feature our favorite family-history-friendly fiction and nonfiction titles AND exclusive interviews with their authors!
by Lisa Cooke | Jun 28, 2015 | 01 What's New, Ancestry, images, Listeners & Readers, Source Citation, Trees
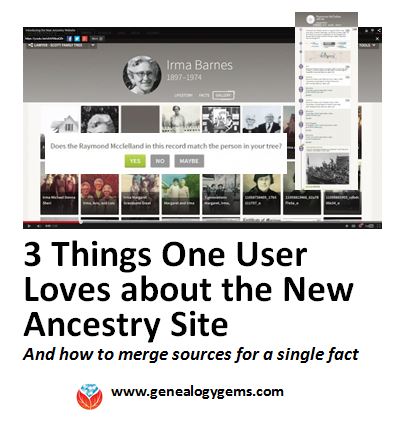
 Recently we reported changes in the Ancestry.com site, now available to all U.S. customers. Genealogy Gems follower Nora then emailed us with three things she loves about the new Ancestry experience, and her instructions for merging facts related to the same life event. Below are her comments; I’ve added screen shots for the sake of illustration that don’t pertain to Nora’s ancestors.
“I’ve been playing around with the new version of Ancestry.com, and have the following comments:
 1. YES, NO, MAYBE SO. “I LOVE that in the “hints”, it now asks you if the facts match your ancestor, and you have “Yes,” “No” and “Maybe” options.
In some cases, it is clearly not your ancestor, but sometimes you just aren’t sure. If you click “Yes,” you get the usual screen where you compare the items in the record to your tree and decide which points you want to use as “preferred” before you save the source to the individual in your tree.
If you click “No”, the hint gets put in the “Ignored” list. Yes, you could always go back and review these again, but you had to dig through all the entries that clearly did not relate to your ancestor. With the addition of “Maybe” there is now an “Undecided” list. If you think it is possible that this is your ancestor, but don’t yet have any additional information that would support an unconditional “Yes, save this to my ancestor” reaction, you can click “Maybe.” Then, when something else shows up in your research that supports that hint, you can search back through the “Undecided” list under hints for that ancestor, and maybe go ahead and save the info to them in your tree.
 THUMBS-UP ON LIFESTORY VIEW. “I quite like the LifeStory view, especially as it gives the option to remove items you don’t want to include. For instance, the 1860 U.S. Federal census shows my ancestor as residing in New York, NY. She was actually visiting her parents with her firstborn, a toddler son named for her father. Her actual home at the time was in California.
Because I entered the census info on Ancestry, her LifeStory suddenly included “current event” items for New York in the years between the 1860 and 1870 censuses. While these are appropriate in her parents’ records, they are not applicable to her, as she returned to California and her husband.
EASIER TO MERGE FACTS. “On each ancestor’s Facts tab, it is now so easy to combine duplicates of life events that came from different sources! I’ve been doing editing there and then syncing with my Family Tree Maker tree. The page shows the list of facts for the individual, the list of sources for that individual’s facts, and the list of immediate family members.
For the ancestor [mentioned] above, there were four separate marriage “facts.” All of the documentation of the marriage date came from other members’ trees. Two of these trees had the information entered in exactly the same format, so they were both linked to the same fact. The other three trees each had the information entered slightly differently from any of the other trees. In order to consolidate down to just one “fact” with multiple “sources,” I did the following:
- Chose which “fact” I wanted to keep (in this case, it was the one with the most detailed information about the event). I’ll call this the “Master Fact.” My “Master Fact” was showing one source. The “duplicate facts” were showing 2, 1, and 1 source respectively.
- Clicked on the first “duplicate fact.” This drew a connector line to the associated “sources.”
- Allowed my mouse to hover over the associated source, and clicked on the EDIT button that appears. At the top of the resulting screen, it listed the “facts” that this particular source is currently associated with. Below, it listed all the other “facts” for the individual.
- In the lower list, I clicked the plus sign next to the Master Fact that I wanted to keep. This associated the current “source” with the Master Fact.
- Next, in the upper section, I checked the “X” next to the “duplicate fact” that I intended to delete. This unlinked the current “source” from that “fact.”
- I repeated these steps for all the “sources” associated with the “duplicate facts.”
- Lastly, I went back to the Facts tab for this particular ancestor. My “Master Fact” was now showing 5 associated sources, and each of the “duplicate facts” showed no associated sources. I was able to click on each “duplicate fact,” select “Delete” from the “Edit” menu associated with that “fact,” and wind up with just the “Master Fact” for my ancestor’s marriage. Doing this really cleaned up the LifeStory view without having to “hide” a bunch of entries.”
Thank you, Nora! I appreciate hearing from you about the “gems” you’re finding in the new Ancestry site experience–and especially thanks for those instructions on associating several sources with the same life event.
 The free Genealogy Gems Podcast episode 180 has tips for backing up your Ancestry data (not just your tree, but sources and DNA), as does this blog post. Make sure you’re always backed up, whether your data lives online or on your home computer. I rely on Backblaze as the official Genealogy Gems backup data provider. Click here to learn why
 When you post your family tree online at multiple websites, it’s easy to lose track of changes you make at each one. Maintaining a master family tree on your own computer can help solve that problem.