You can often use Google Translate for genealogy to help you translate single words or phrases. But what if you need to translate an entire passage or document? Here’s why you might want to use a different web tool–and a list of top translation websites from expert Katherine Schober.
Thanks to Katherine Schober of SK Translations for this guest blog post.
Google Translate for Genealogy–and its Limits
Google Translate is a good tool for translating individual words and short, non-complex sentences. But it works better with basic words rather than long sentences or paragraphs. This tool often ignores idioms, or words and phrases that mean something different than the actual words imply.
Mistranslations of idioms can completely change the meaning of a document and leave you confused about certain aspects of your ancestor’s life.
In German, for example, there are multiple idioms using the word “sausage,” a food that is a large part of the culture in Germany. If you type in the German idiom “Jemandem eine Extrawurst braten,” which literally means “to fry someone an extra sausage,” Google translates it word for word, coming up with the translation result “to bake an extra sausage.” This may leave the non-experienced person confused, thinking their ancestor was discussing cooking a meal. However, an experienced translator would know that this phrase actually means “to give someone special treatment,” and has nothing to do with cooking. (See my blog post, “10 Hilarious German Sausage Sayings to Try on Your Friends.”)
Google Translate can also be unreliable if a word has multiple meanings. For example, think of the word “run” in English. It can mean “a fast jog,” “a tear in your stocking,” “to be a candidate for an election,” and so on. Google Translate could easily pick the wrong English translation of your of your word, leaving you with a falsely translated document or simply very confused.
Beyond Google Translate: Best Translation Websites
Here are three websites I recommend when Google Translate just isn’t up to your genealogy translation needs:
Linguee.com: This is a very helpful translation site. Unlike Google Translate, it shows you words and phrases translated into English by actual translators and not machines. You receive the definition of the word, plus pages of various sample sentences that include your word/phrase in a contextual format (in both the foreign language and in English). This means you can scroll through the examples to see which translation is the most accurate English word for your document.
WordReference.com: This is an online dictionary with multiple language options available. Depending on the word, it may provide sentence examples and other entries where your word is found. This helps you to ensure the translated word is the right option for your text.
Google.com: Although Google Translate can’t always get the meaning right, the Google.com search engine is a wonderful reference. If you can’t find your foreign word on the sites above, try typing it into a Google search with the word English after it. Sometimes you will find forums where your word is discussed by various family historians. If this doesn’t work, try adding genealogy after English, or taking English out and just writing genealogy. Playing around with your search request may very well give you different results. And Lisa Louise Cooke recommends putting quotation marks around the word in order to ensure it appears in every search result. Here’s an example of how that search would look: “Geburt” English Genealogy
I’ve previously recommended top websites especially for German translations on this blog: click here to check it out. Good luck to Sue, who commented after reading that post: “Great article! I can’t wait to try some of these websites. We have a large stack of German letters written to my husband’s mother that look impossible to read. Thank you!”
Katherine Schober of SK Translations specializes in translating German genealogical and historical documents. She has recently joined Lisa Louise Cooke on the Genealogy Gems Premium Podcast: catch her creative, use-in-any-language translation tips in episodes #151 and #152. Not a Premium member yet? Click here to see what you’re missing out on in the Genealogy Gems Premium Podcast: Premium members get a year’s worth of access to all episodes! (Time for a binge-listening weekend??) And if you’d like to learn how to learn how to read the old German handwriting check out her online course here.
Browse-only collections at Ancestry and other genealogy websites are sometimes viewed as inaccessible, but they are actually a hidden treasure. Learn how to access these browse-only collections at Ancestry and expand your family history research.
The good news is that FamilySearch is not alone in offering browse-only content. Ancestry.com also has browse-only collections of digitized records. (Not an Ancestry.com subscriber yet? Click here to learn more. This is an affiliate link and we are compensated if you make a purchase, which supports this free blog. Thank you!)
Knowing how to search and browse records effectively is critical because you shouldn’t just rely on hints. Ancestry, for example, only provides hints from about the top 10% of their most popular databases. That means if you only spend time on reviewing hints, you’re missing a massive amount of genealogical information available in all of the other records.
Typically you’ll be using the search feature to find those other records. However not all records are searchable. That’s because after the long process of acquiring the rights to digitize and publish a genealogy record collection, it takes even longer to get them indexed for a variety of reasons. Thankfully, Ancestry doesn’t always make us wait to gain access to them until the indexing is complete.
The digital images are published without an index. This means they are not searchable by names and other keywords. Therefore, it can take some time to locate a record within one of these collections. But I think you’ll agree it’s more convenient to look through them from the comfort of your own home rather than renting microfilm or traveling to a far off location!
Here’s your checklist for better browsing.
HOW TO FIND BROWSE-ONLY RECORDS AT ANCESTRY
While Ancestry.com doesn’t make it quite as easy as FamilySearch to find browse-only or partially-indexed databases, it’s still very much worth the effort.
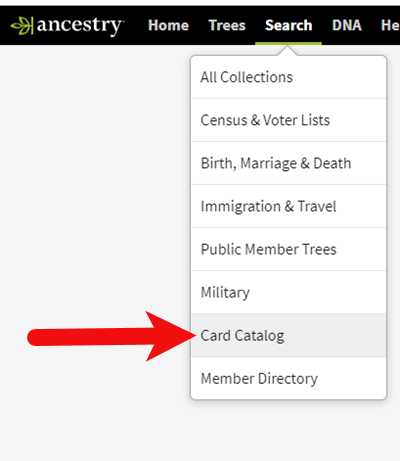
1. Head to the Card Catalog
From the main menu on the Ancestry website, select Search > Card Catalog.
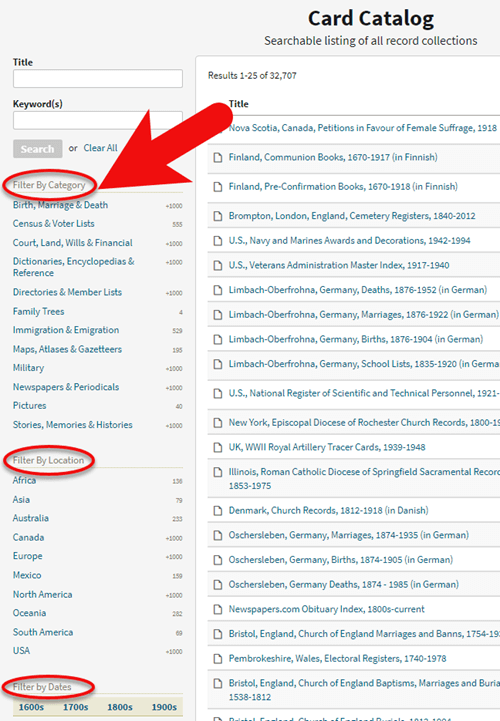
2. Search and Filter
In the upper left corner you can search the catalog by title and / or keyword. However, if you know the type of record you are looking for, such as military records, the best place to start is filtering by that category. If the list is long, you can then search within that category by keywords.
3. Determining if the Records are Searchable
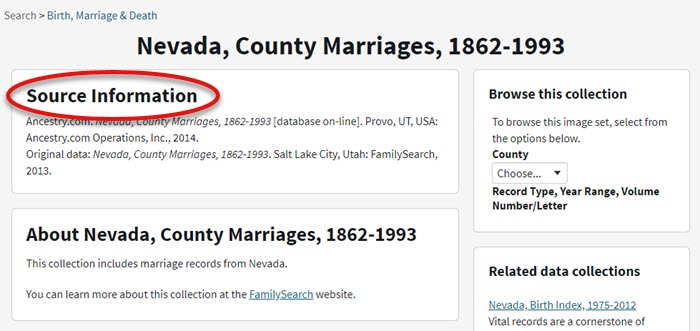
If you don’t see a search box on the left side, then you can assume that this collection has not yet been indexed and therefore isn’t searchable by keywords and other data. Instead you will see typically see the source information box at the top.
HOW TO FILTER BROWSE-ONLY GENEALOGY RECORDS
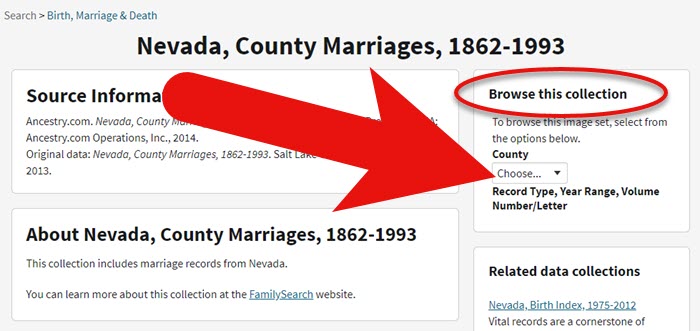
1. Browse This Collection Box
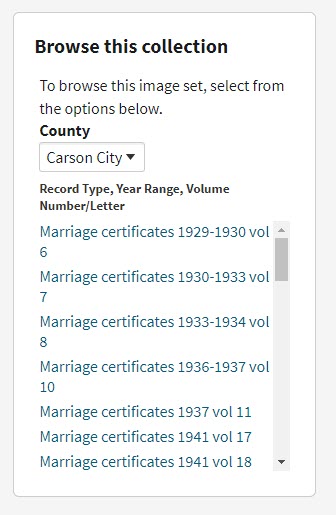
On the right side of the screen you will see a Browse this Collection box. The filtering options presented will depend on the way the collection is organized.
In the case of the Nevada County Marriage database, a drop down menu allows you to filter by county.
2. Make a Selection
As you can see in my example, once I selected a county I can also filter down by record books. So even though you can’t search names, you can often zero in on the portion of the collection most relevant to your search.
Browse this Collection box
HOW TO BROWSE RECORDS AT ANCESTRY.COM
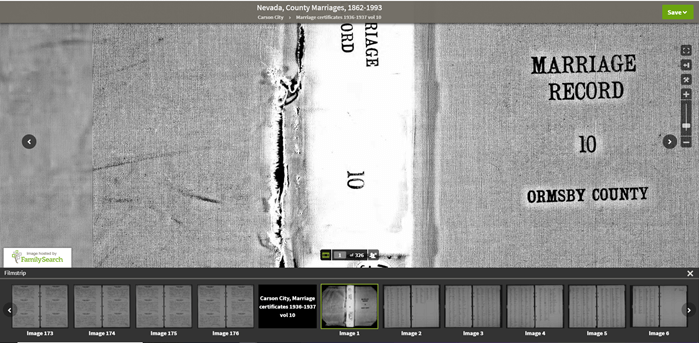
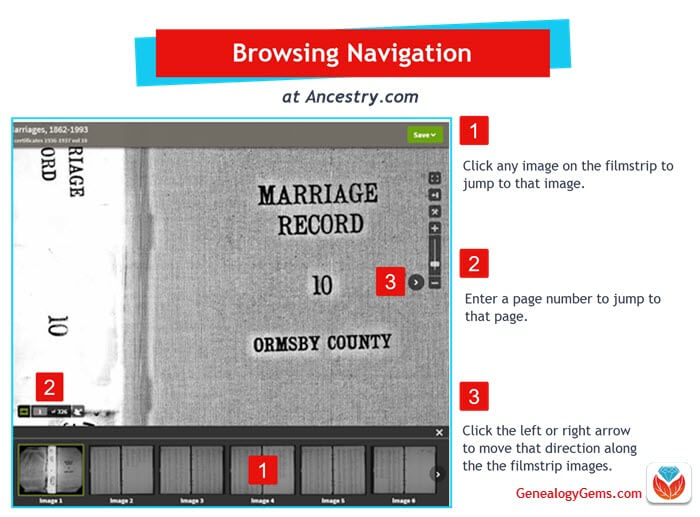
Once you have selected the available filters, you’ll find yourself in the digitized records. They are displayed in a filmstrip layout which will come in quite handy for navigation through the pages.
Navigation is crucial since we can’s search by names and keywords. Let’s take a closer look at the ways you can navigate:
Browsing a digitized genealogy record collection at Ancestry.com
Finding the Filmstrip
if you don’t see the filmstrip view, click the filmstrip icon:
Finding and Using the Original Index
WATCH THE BONUS VIDEObelow to see the next section in action. Click on the sound button to the right of the play button to turn on the sound.
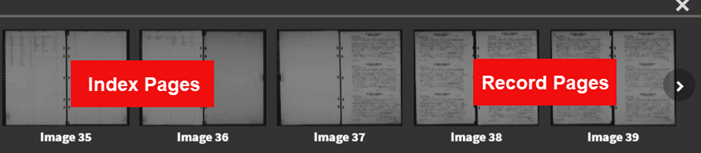
Many records that were originally bound in books like this collection include index pages. In this book the index appears at the beginning. If you look closely at the filmstrip images it’s easy to spot where the index lists are and where the records begin.
So even though Ancestry hasn’t had the chance to index the records yet, they are indexed in the book. This will make the job of browsing for the records you need even easier.
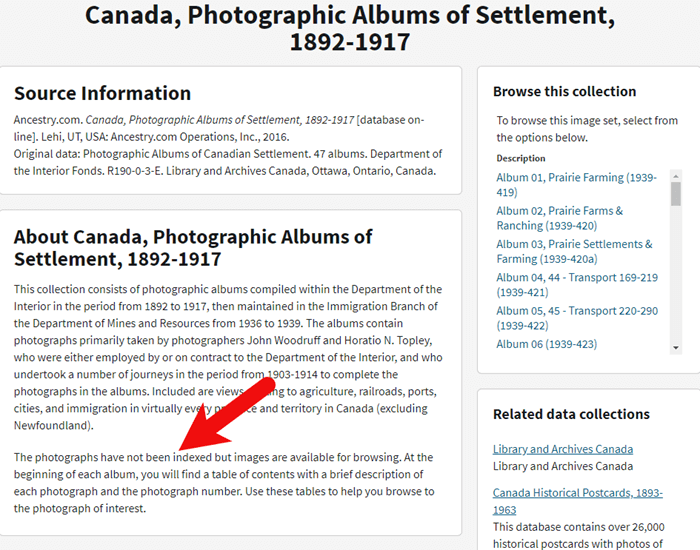
The “About” box on the card catalog entry often includes important information about whether or not the collection has an index. One example of this is the Canada, Photographic Albums of Settlement, 1892-1917 record collection. It is a browse-only series of digitized photo albums by Canada’s Department of the Interior between 1892 and 1917. The collection description includes very useful instructions such as: “At the beginning of each album, you will find a table of contents with a brief description of each photograph and the photograph number. Use these tables to help you browse to the photograph of interest.” As you can see, taking a few extra moments to read about the collection can make browsing it much easier.
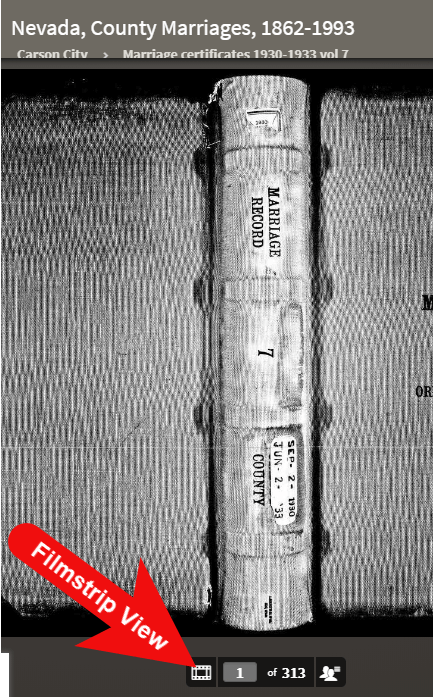
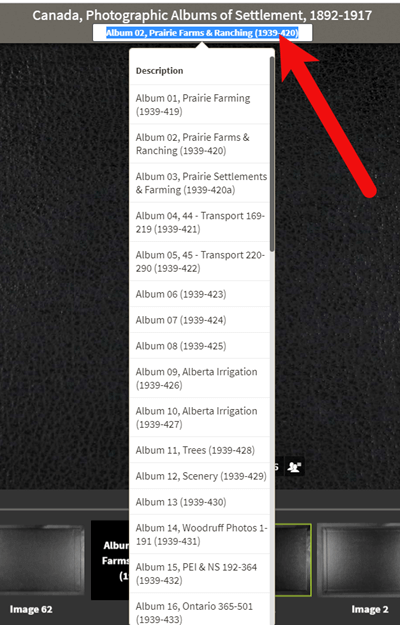
Save Time When Browsing Between Volumes
Remember that Browse this Collection box on the right hand side of the card catalog entry page? (See the Browse this Collection box image 6 images above.) This handy menu is also embedded in the record viewer. If you need to switch to a different book, album or other portion of the collection, you don’t have to hit the back button and start over. Instead, at the top of the viewing page, click the volume or collection you are currently viewing (this appears as a sub-title under the main title of the collection.) A browse structure menu will appear showing you all the other options within the collection. Just click the one you want and you will be instantly switched over. Think of it as pulling a different volume of a series of books off the shelf!
Switching volumes within the collection within the viewer.
Browsing Indexed Records
There will be times when even though a record collection is indexed, you may still want to browse it. Browsing isn’t just for unindexed records. Many genealogy gems can be found by browsing a database that you’ve already searched. You may spot neighbors of interest, other surnames from your family tree, and more. So even when you are working with a record collection that has a search box, look for the browsing option in the right column.
HOW TO FIND THE NEWEST RECORDS AT ANCESTRY.COM
The records most likely to not yet be indexed, and therefore browse-only, are the newest records added to Ancestry. If you’re looking to bust through a brick wall, here’s a great way to find the newest records that just might do it.
1. Go to the Card Catalog
From the main menu on the Ancestry website, select Search > Card Catalog.
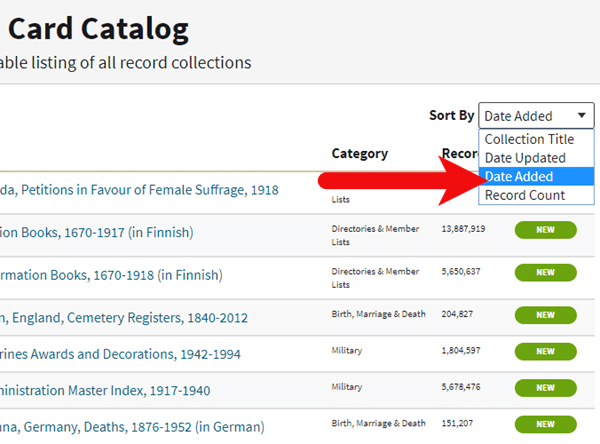
2. Sort the Records
In the right hand corner you’ll find a Sort By menu. Select Date Added.
Select Date Added from the Sort by menu.
3. Newest Record View
The Card Catalog will now be presented in the order in which the records were added. The newest records will appear at the top of the list.
4. Filter the List
Use the filters along the left side of the page to filter the collections by record type, location, and date. Then use the search boxes to target keywords. This will give you results that include your keyword starting with the newest collections.
BONUS PDF AND MORE RESOURCES
Making a small investment of time in getting to know the search and browsing functions of a website can pay off big.
WHAT DID YOU UNCOVER USING THESE BROWSING STRATEGIES?
Please leave a comment below and share the genealogy gems that you uncover using these techniques. And of course if you have any questions, leave those as comments as well and I’ll reply.
This episode’s got a bit of holiday sparkle! Lisa Louise Cooke welcomes Genealogy Gems Book Club author and Victorian lifestyle expert Sarah Chrisman to the show to talk about Victorian holiday traditions, some of which may still live on in your own life. Following that conversation, Lisa shares a fun description of Victorian-era scrapbooking: how it’s different than today’s scrapbooking hobby but also how it reminds her of modern social media.
More episode highlights:
Three success stories from Genealogy Gems listeners: a Google search with great results, a brick-wall busting marriage record and yet another YouTube find for family history (people keep telling us about those!).
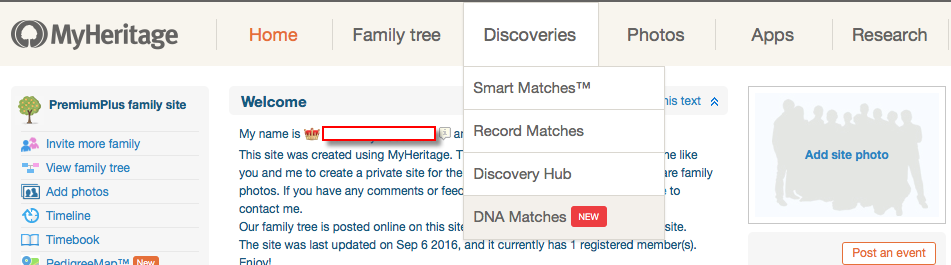
Your DNA Guide Diahan Southard chimes in with what she likes so far about MyHeritage’s new DNA testing service.
An internationally-themed German research conference and a makeover for the Scotland’s People website.
The newly-relaunched ScotlandsPeople website has several exciting new features:
Mobile-friendly web design and an enhanced search function;
A quick search option for searching indexed records by name and an advanced search for specific types of records;
Free access to several records indexes;
More than 150,000 baptism entries from Scottish Presbyterian churches (other than the Old Parish Registers of the Church of Scotland) have been added and more are coming, as well as marriages and burials;
More types of records held by National Records of Scotland are coming, including records of kirk sessions and other church courts;
Explore the site for free, including handy how-to guides for using Scottish records such as statutory records, church registers and census returns.
MAILBOX: GOOGLE SEARCH SUCCESS STORY
From Joan: “I used one of the handy hints from your presentation at the South Orange County California Genealogical Society’s all day seminar in Mission Viejo, CA. I entered some of my common named ancestors, used the quotes, added a time frame and included some key words, like locations. Most of what I found were my own queries and posts. That shows it works!….
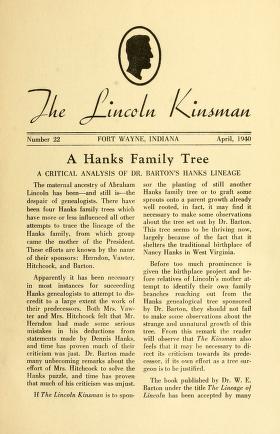
One thing I was amazed at was a multi-page article I found: ‘The Lincoln Kinsman,’ written in 1938. It included a lot of information on the Bush family [which is another of her family lines]. The article even included what I think is my ancestor Hannah Bush Radley.” (Click here or on the image above to see a copy of “The Lincoln Kinsman” at Internet Archive.)
Listen to a free 2-part series on cold-calling distant relatives or others as part of your genealogy research: “Family History: Genealogy Made Easy podcast, episodes 14 and 15.”
BONUS CONTENT for Genealogy Gems App Users:
A handy cheat sheet with 14 tips from that series on cold-contacting distant relatives. It’s updated with brand-new suggestions, including ways to find potential relatives’ names during the research process. The Genealogy Gems app is FREE in Google Play and is only $2.99 for Windows, iPhone and iPad users.
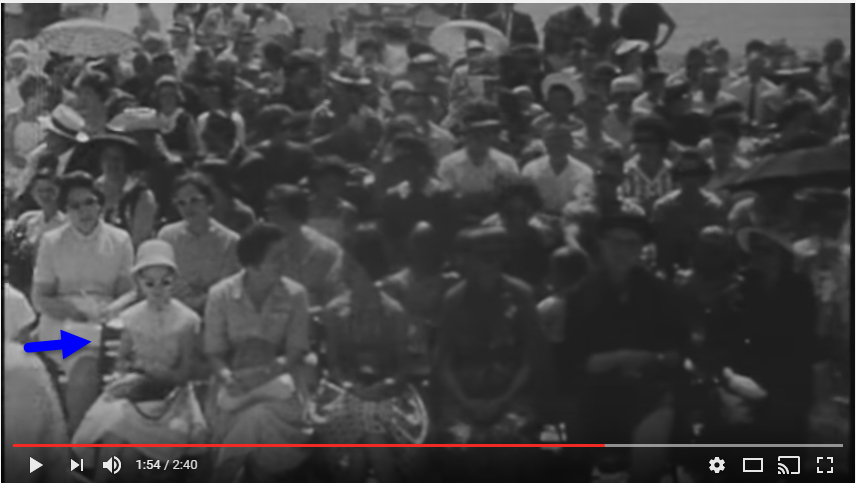
Gay entered “Freeport Texas history” in YouTube and found historical newsreel footage of the opening ceremony of a local water treatment plant. She and the women in her family were seated on the front row. Here’s a screenshot from that footage: maybe this is a stylish young Gay in sunglasses? (Watch the video here.)
Lisa Louise Cooke uses and recommends RootsMagic family history software. From within RootsMagic, you can search historical records on FamilySearch.org, Findmypast.com and MyHeritage.com. By the end of 2016, RootsMagic expects to be fully integrated with Ancestry.com, too: you’ll be able to sync your RootsMagic trees with your Ancestry.com trees and search records on the site.
Keep your family history research, photos, tree software files, videos and all other computer files safely backed up with Backblaze, the official cloud-based computer backup system for Lisa Louise Cooke’s Genealogy Gems. Learn more at http://www.backblaze.com/Lisa.
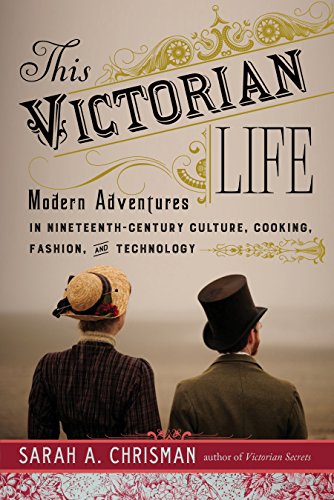
INTERVIEW: VICTORIAN CHRISTMAS WITH SARAH CHRISMAN
Sarah Chrisman lives her life every day as if it’s the Victorian era. Her clothing, household, pastimes, chores and more all reflect the time period.
Listen as Lisa and Sarah talk about the Victorian Christmas tree; gift-giving, crafts, decorating and things that might surprise us about holiday celebrations during that time.
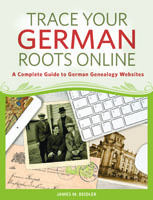
First Wheel in Town: A Victorian Cycling Club Romance. This is from her series of light-hearted historical fiction set in an era she knows well!
Sarah Chrisman joins me again later this month on the Genealogy Gems Premium podcast episode 142 to talk about what it’s like to live every day like it’s the late 1800s. Don’t miss it! Not a Premium member? Click here to learn more about the perks of membership!
Legacy Tree Genealogists provides expert genealogy research service that works with your research goals, budget and schedule. The Legacy Tree Discovery package offers 3.5 hours of preliminary analysis and research recommendations: a great choice if you’ve hit a brick wall in your research and could use some expert guidance. Click here to learn more.
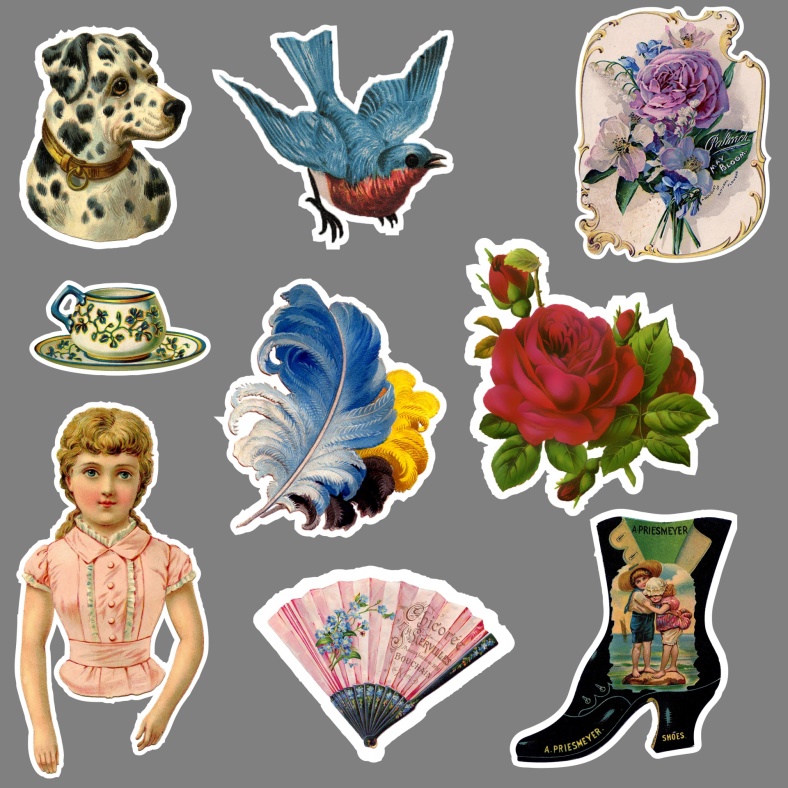
The Victorians coined the phrase “scrapbooking:” they literally pasted paper scraps into books. As an embellishment, those who could afford to bought “relief scraps,” such as the ones shown here. These were like the precursors of modern sticker sheets or die cuts, printed just for the scrapbooking hobby. You could buy colorful images of everything from flowers or children to animals, or angels or Father Christmas. These images were raised or embossed on the paper, which is why they called them reliefs.
Relief scraps could be used as embellishments around other items on scrapbook pages, but sometimes they were the only decoration on a page, arranged in pretty patterns.
I don’t think there is any dispute that the four major online resources for genealogy include Ancestry.com, FamilySearch.org, Find My Past, and My Heritage. Of those four, only Ancestry.com has attempted any real integration of DNA test results into traditional genealogy.
That is, until recently. On May 19, 2016 MyHeritage announced that they will be adding a DNA matching service to their offering, and then on November 7th announced they would be conducting DNA tests themselves. Now, MyHeritage has enjoyed partnerships with 23andMe and Family Tree DNA for quite some time now, but those partnerships have been woefully underutilized and are little more than an affiliate service, where MyHeritage provides a discounted rate to test at those companies.
There is no question that the launch of DNA Heritage fully into the genetic genealogy market is exciting news. In fact, it is something I have been pushing for ? we absolutely need someone to challenge AncestryDNA. Competition is good.
In September they began to provide matching results for individuals who had uploaded their results. As of today, uploading your results is still free, so if you have been thinking about it, you may want to take advantage sooner rather than later. As expected, the matches are only as good as the depth of the database, and it is early in the game, so their database is small, but even now we can get an idea of what to expect from MyHeritage as they take their first steps into genetic genealogy.
One of the most exciting elements of their November 7th announcement is their development of a Founder Population project where they have handpicked individuals to represent their reference population for calculating ethnicities. They plan to launch with 25 population groups, but will likely increase to 100 in a fairly short amount of time. This is a far more advanced ethnicity report than is currently offered anywhere else.
After you have figured out how to download your raw data from your testing company (see my instructions here: http://www.yourdnaguide.com/transferring), and then managed to add it to My Heritage (you have to add a family tree to MyHeritage to do this, see further instructions in their May press release), and waited the requisite time to process, you will receive a notice that you have new DNA matches.
For a full review of the features and ins and outs of where to click and what to look at, please refer to the September blog post from MyHeritage.
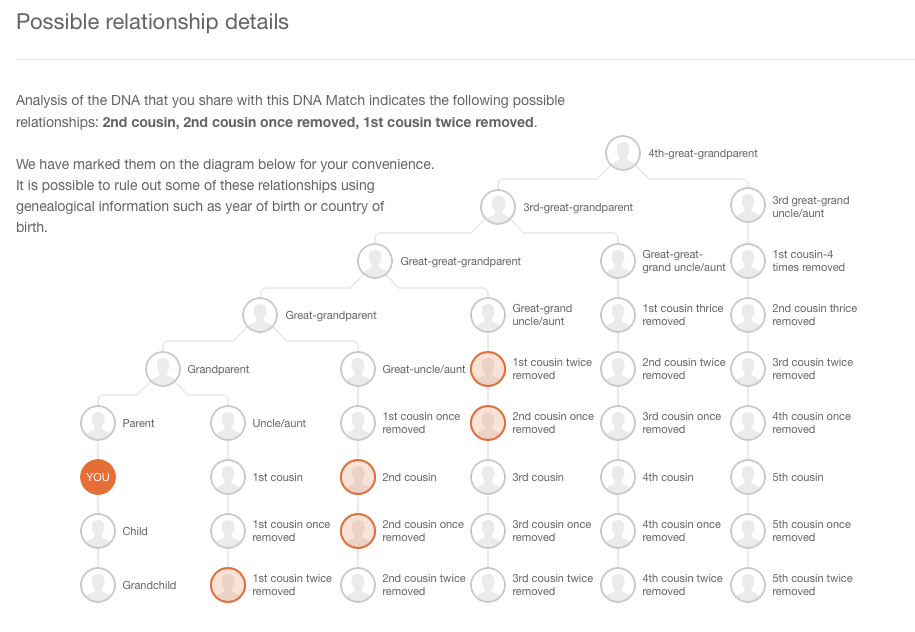
As for my favorite features, I like how they list all the possible relationships that make sense between you and your match taking into account multiple factors like your age, gender, and your genetics instead of a simple, generic range like 2nd-4th cousins. The accompanying chart that visually shows you all possible relationships is also very helpful. You can access it by clicking on the little question mark icon next to the relationship suggestions. I like that these suggestions remind us that our genetic relationships have different genealogical interpretations. Meaning that genetically, a 2nd cousin once removed, a first cousin twice removed, and a second cousin, all fall within a similar genetic range and it is impossible to determine your exact relationship based on the genetics alone.
I also like that they are providing all three genetic descriptors of your relationship: total amount of shared DNA, how many segments are shared, and the size of the longest piece of shared DNA. While this more of an intermediate to advanced piece of your results, it can be important as your relationship analysis becomes more involved.
One unique claim made by MyHeritage in their press release about their matching feature addresses a main concern that genetic genealogists have: the lack of pedigree information provided by their matches. MyHeritage claims that 95% of their DNA samples have pedigrees attached. That is remarkable! However, from my own quick calculation of my matches, the number with pedigrees is more like 60%.
They also indicated that they will soon be doing a bit of pedigree analysis for you by providing a list of shared surnames and locations between you and your match based on the pedigrees you have both submitted. This will certainly be a welcome addition.
According to the November 9th Q and A they haven’t decided yet if the ethnicity features will be available to those who only transfer, and they hint at many more features they have in the works that may only be offered to those who purchase their test.
In short, the MyHeritage site is currently functioning much like the top three genetic genealogy sites (Ancestry, Family Tree DNA, and 23andMe) and like the free tool Gedmatch, offers a meeting place for those who have been tested at one company to meet those who have tested at another, with the added bonus of a promise of new features on the horizon.
Disclosure: This article contains affiliate links and Genealogy Gems will be compensated if you make a purchase after clicking on these links (at no additional cost to you). Thank you for supporting Genealogy Gems!
Bust a genealogy brick wall by learning to speak Google’s language. Proper use of Google’s basic search operators will have you plowing through walls in your research in nothing flat!
Genealogy information is sprinkled across the millions of websites on the web. Whether it’s a digital image of your great-great grandma on a distant cousins website or an out-of-print history book listed in the online card catalog in a library on the other side of the globe. Google can help you find it all.
Gaining access to that information is not as hard as you may think. I’d like to share a question I received recently from a Genealogy Gems Podcast listener, and show you how you can bust a brick wall by speaking Google’s language.
Here’s the email that I received from Ruth last week:
I’m sitting here listening to one of your free podcasts…I’m working, I’m listening, and I’m thinking…about my brick wall James Craig, what I know and what I’m trying to find out!
I know that James Craig was born about 1795-97 in New Jersey and was at Ft. Jesup, Louisiana in 1823, [and] that he was discharged in 1825. I researched New Jersey military records and found a James Craig, from Pittsgrove, Salem, New Jersey, who joined the Army [in] August 1820 for five years [and] he was sent to Fort Scott, Georgia. I read articles that state, when Fort Scott closed sometime around 1822/23, the men were sent to Fort Smith, Arkansas. Do you see the trail I’m following? It’s not hard to make the connection from Fort Smith, Arkansas to Fort Jesup, Louisiana. My problem is that I haven’t found any transfer papers!! So, how do I verify that James Craig from Pittsgrove, New Jersey is my 3rd great-grandfather. Is it possible that there are journals from the commanding officer of each encampment that might shed some light on this?
Thanks in advance for any thoughts you might have on this long standing brick wall!
Tips to Bust a Genealogy Brick Wall
Ruth asked “Is it possible that there are journals from the commanding officer of each encampment that might shed some light on this?” I certainly think it is possible! I would suggest using Google to search the web because such items might be digitized online, or they might be listed on a library or archive website as being available at their location. Either way, you would gain valuable information on how to access the items.
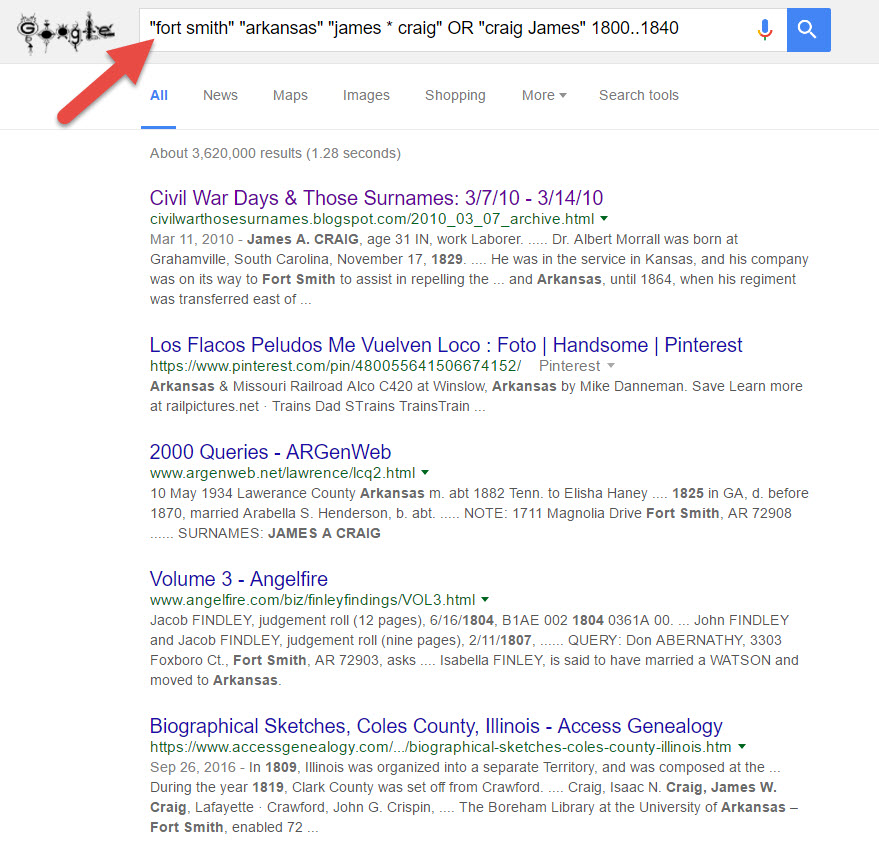
Here’s an example of a search I would run:
This search is based on my Google Excellent Method Search Let’s break down the pieces of this search query:
The quotation marks tell Google that the word or phrase must be in every search result (in other words, they are mandatory.) When used around a phrase, that means the phrase must appear exactly as searched.
The asterisk tells Google there might be a word or two between the words in a phrase, such as a middle initial.
By putting OR between two versions of the phrases, such as last name first and first name first, you cover all your bases. Note that the word OR must be capitalized to work as a Google operator.
Finally, two numbers separated by 2 dots is called a “numrange search” and that tells Google a number that falls within that range must appear in each search result. And of course, four digit numbers represent years to genealogists!
Your Genealogy Google Guru
Google packs a powerful punch for genealogists. Let me be your Genealogy Google Guru and watch my video below for even more helpful tips and tricks. Remember to subscribe to my Genealogy Gems YouTube channel so you’ll get all my upcoming Google video tips. Happy searching!
 I’ve previously recommended top websites especially for German translations on this blog: click here to check it out. Good luck to Sue, who commented after reading that post: “Great article! I can’t wait to try some of these websites. We have a large stack of German letters written to my husband’s mother that look impossible to read. Thank you!”


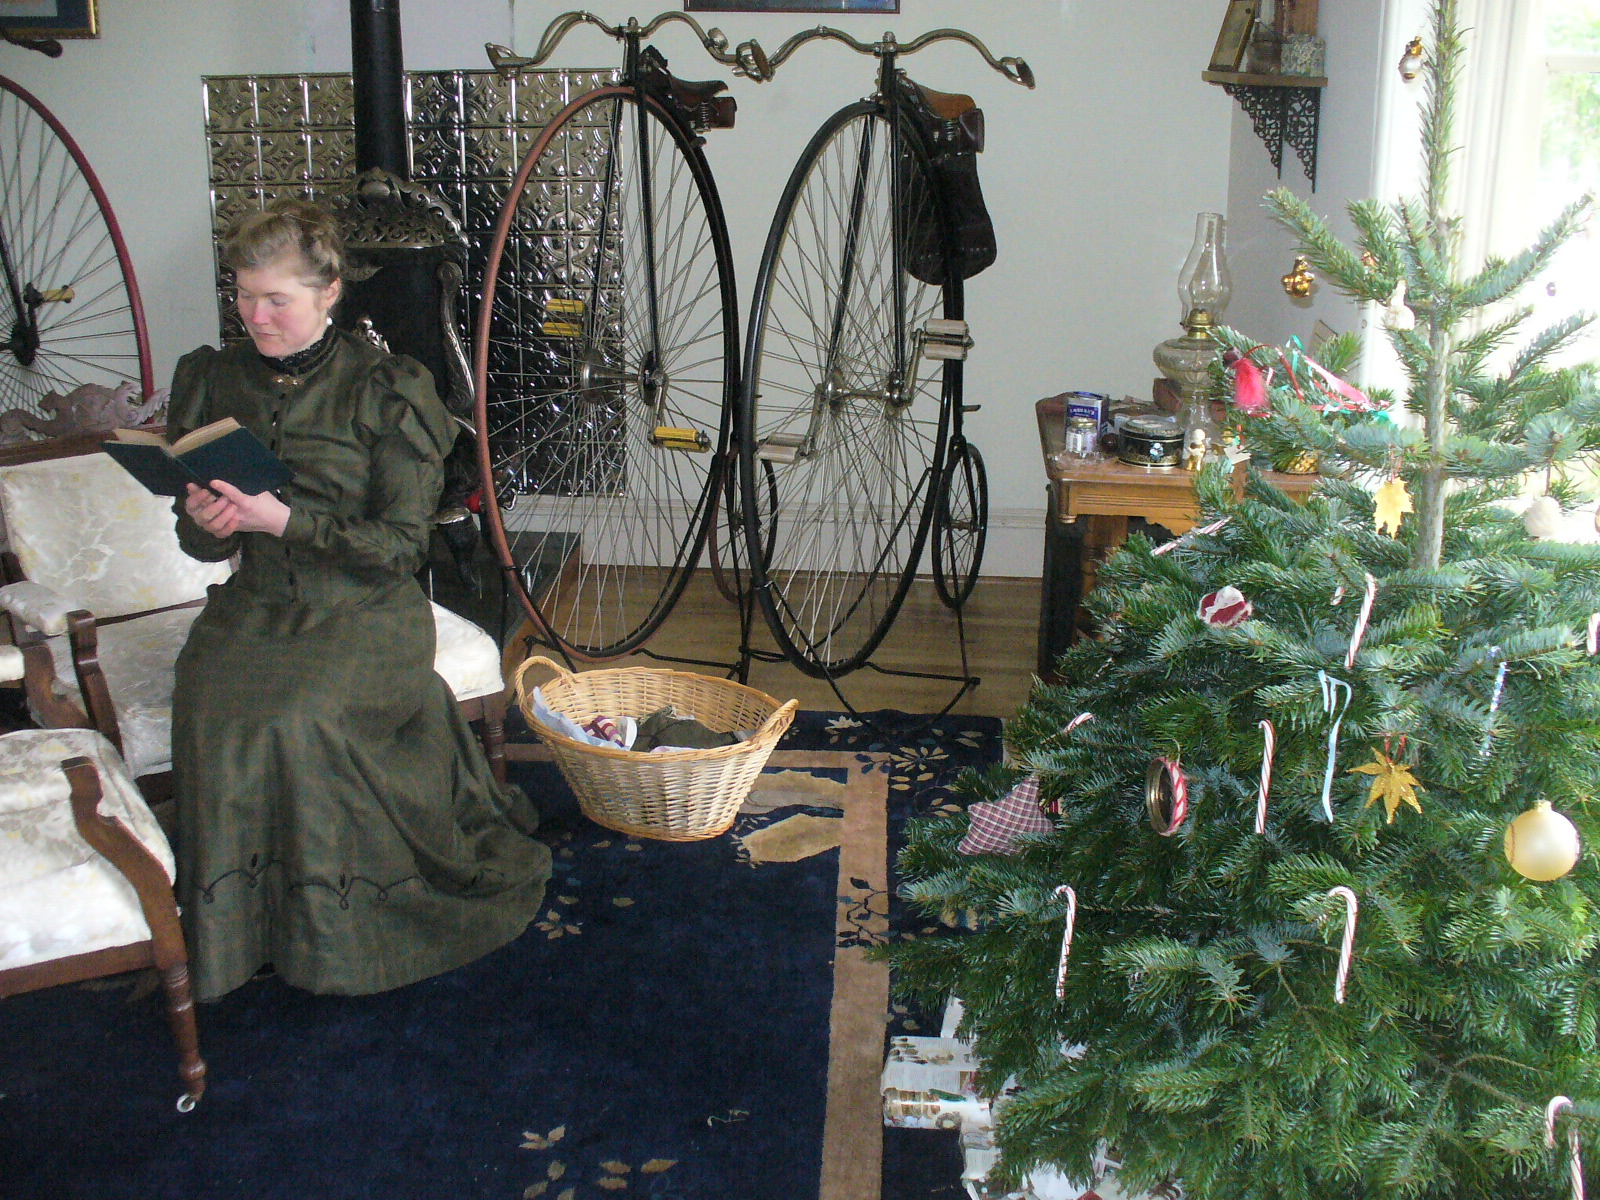
 First Wheel in Town