Have you ever found an address for an ancestor but been disappointed that it is just a Route number and a town name? Have you wondered if it is possible to figure out where they actually lived? The good news is, it is! I’m going to show you how to take a rural “route” address from the early 20th century and find it on an old census enumeration district map.
(This article contains affiliate links for which we may be compensated. Thank you for supporting our free content.)
In a recent video I showed you how to find 1950 Census Enumeration District (ED) maps. These are super helpful and also free. In that video we used the address of an ancestor that we found by hunting through old letters and documents. But for many Americans in the early 20th century that address may have just been a route number and town.
That was the case for my viewer Lisa. She emailed me after she watched the video. She writes, “How can you find the E.D. number when you only have a Route number? My relatives lived in rural Arkansas.”
This is totally doable! Follow allow these steps of this case study and they will help you find the E.D. number and census enumeration district maps, and zero in on the location.
“Route 2” & Rural Delivery
A carrier route is basically the territory one letter carrier can cover on a daily basis. So, there could be a Route 1 or a Route 2 in thousands of places around the country. It just happens that your ancestor was on, say, Route 2 in a particular township area. Although it doesn’t tell us which house, it does dramatically narrow down the place because a daily route was the same and may not have been that large. Once we find that area we can then use other sources to help us try to get even more specific.
The first thing we need to do is gather some details. We need:
The ancestors’ names
The Route number address which includes the town
The county – which is something we can easily find online with a quick search
The year – in this case the address she has is from 1950.
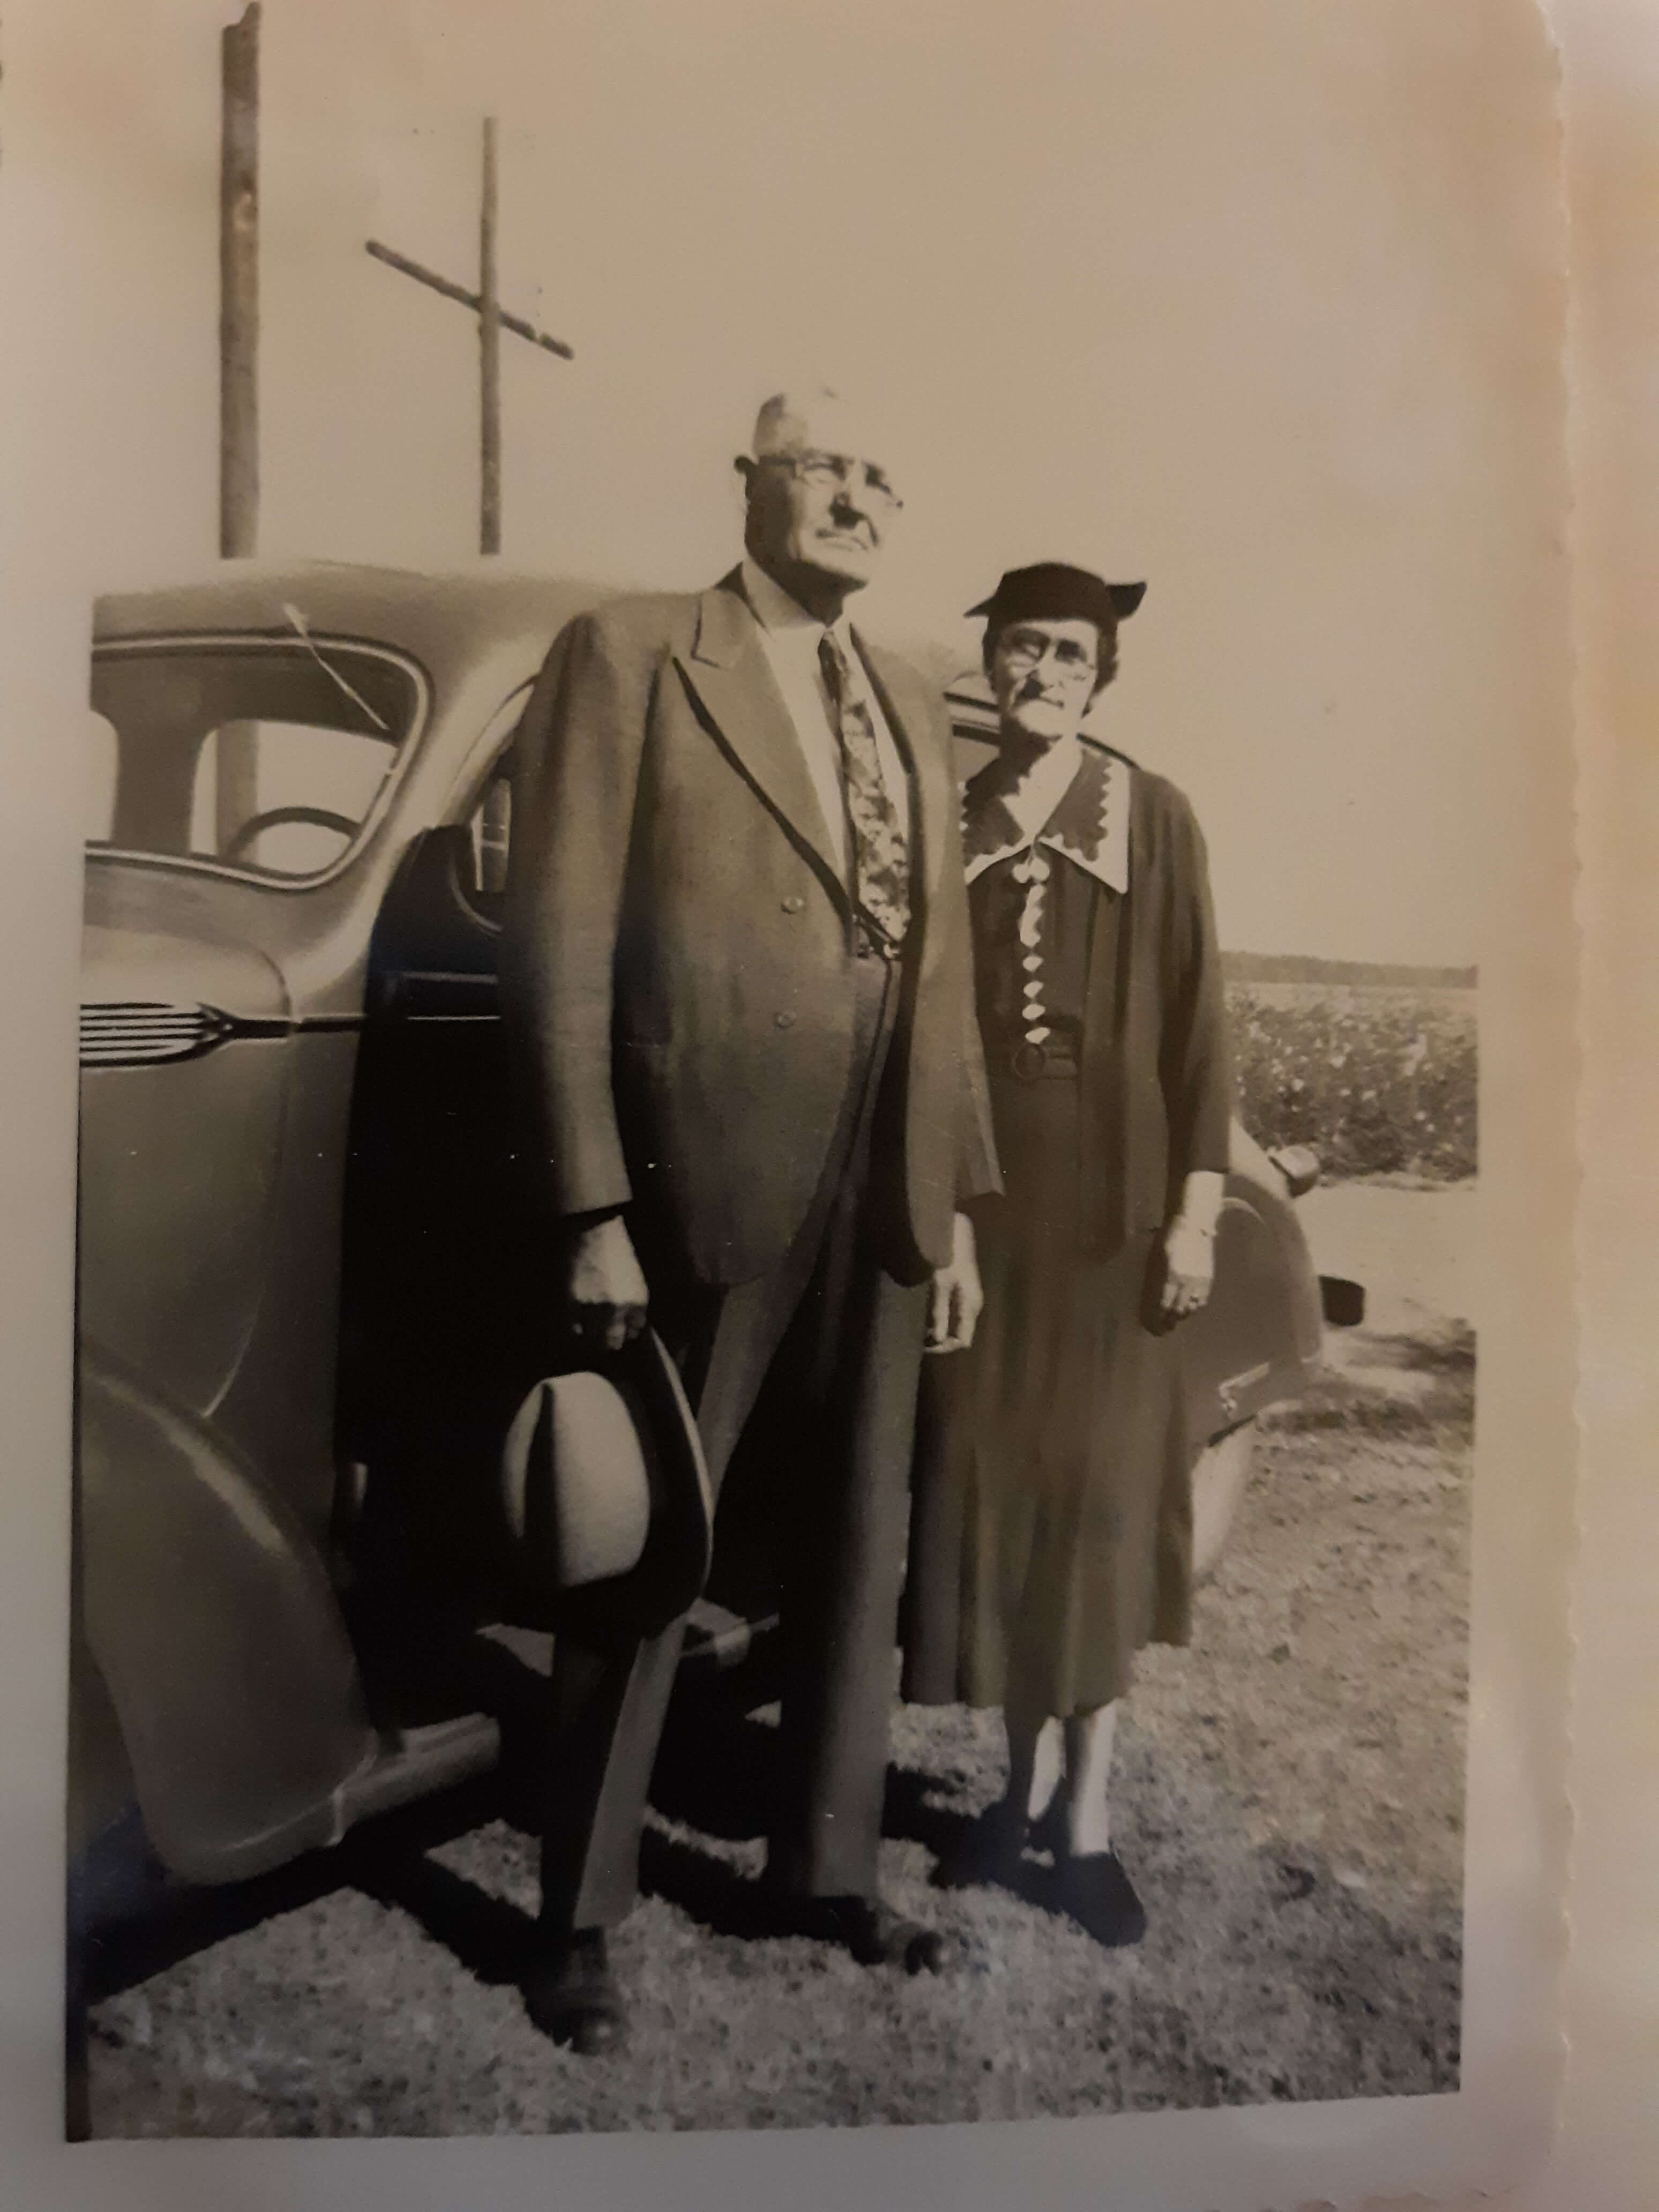
So, here’s what Lisa sent me about her ancestors, the Blazers:
Names: Joseph Madison Blazer and Minnie Blazer
Route number: Route 2
Address: Frazier Pike
County: Pulaski
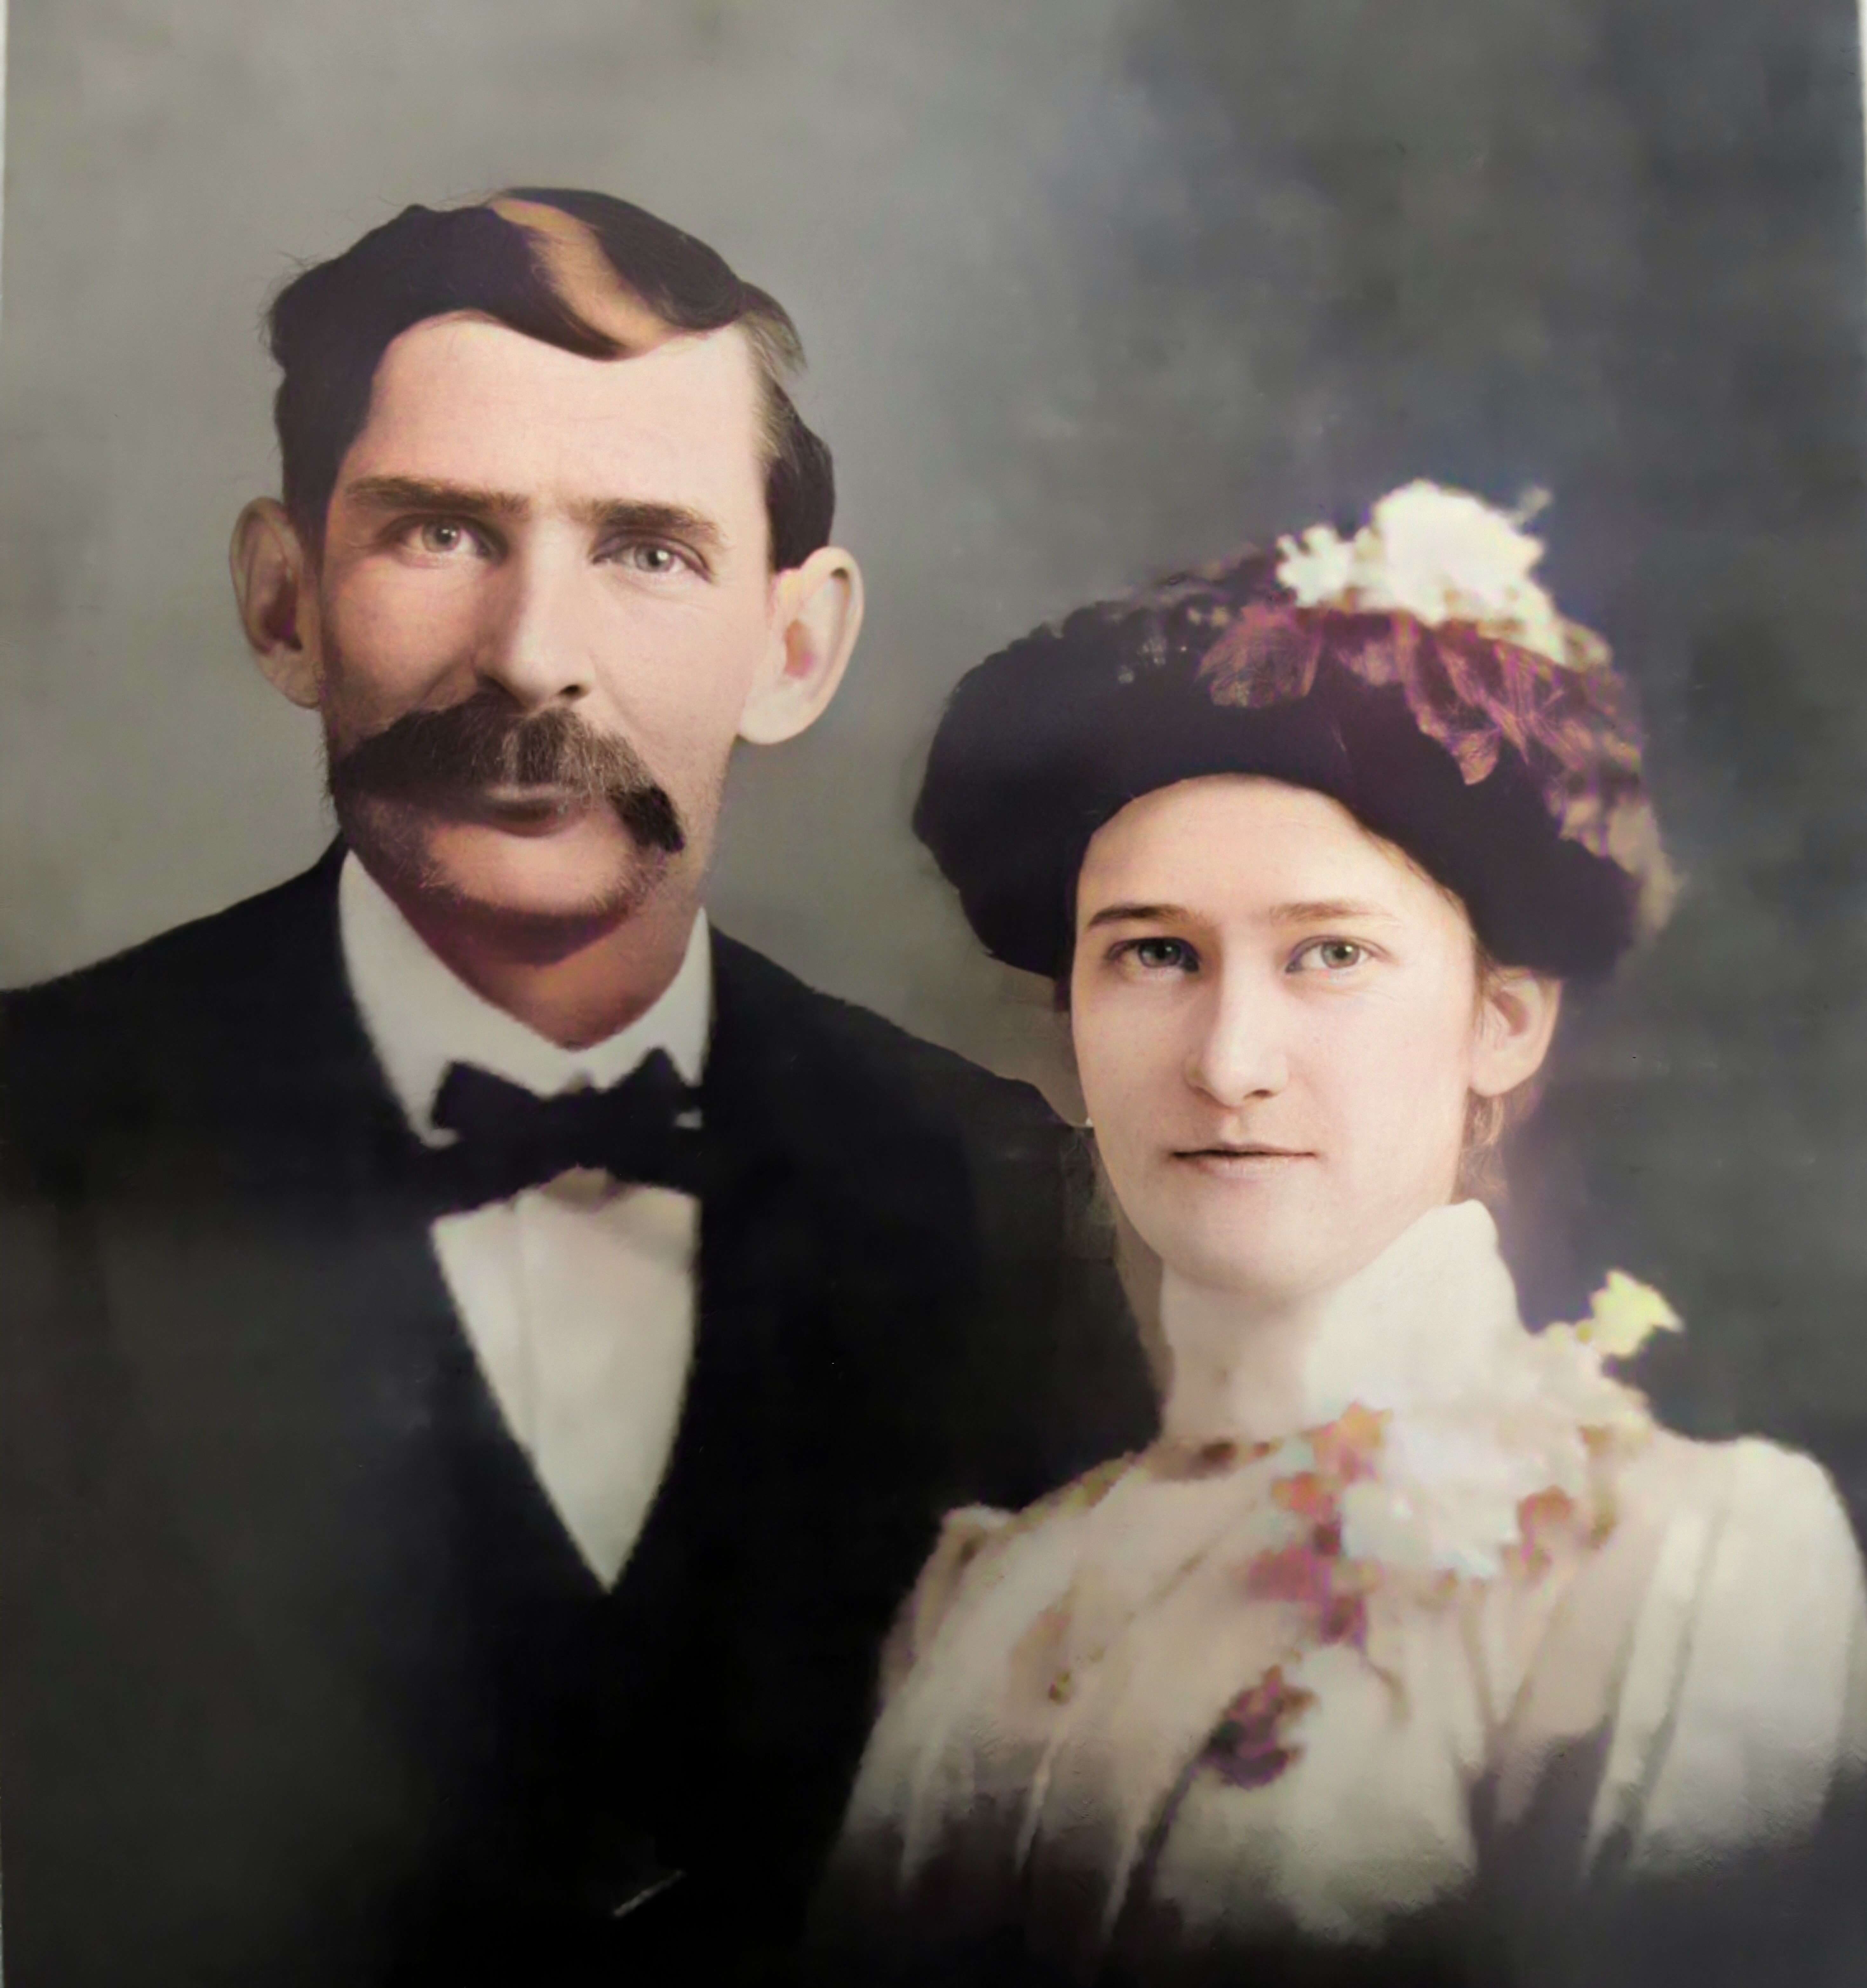
Joe and Minnie Blazer c1950 (Image courtesy of Lisa Egner.)
Step 2: Find the Family in the Census
Now we need to find the family in the census record closest to the date of the known address.
Since the 1950 census hasn’t been released yet because I’m recording this in Jan. of 2022, we can’t yet pull up their record. So, we’ll need to turn to the 1940 census. There’s a good chance that the family was in the same location since folks didn’t typically move around quite as much or as far as we do these days.
The 1940 census is available for free at many of the larger genealogy websites like FamilySearch and Ancestry.
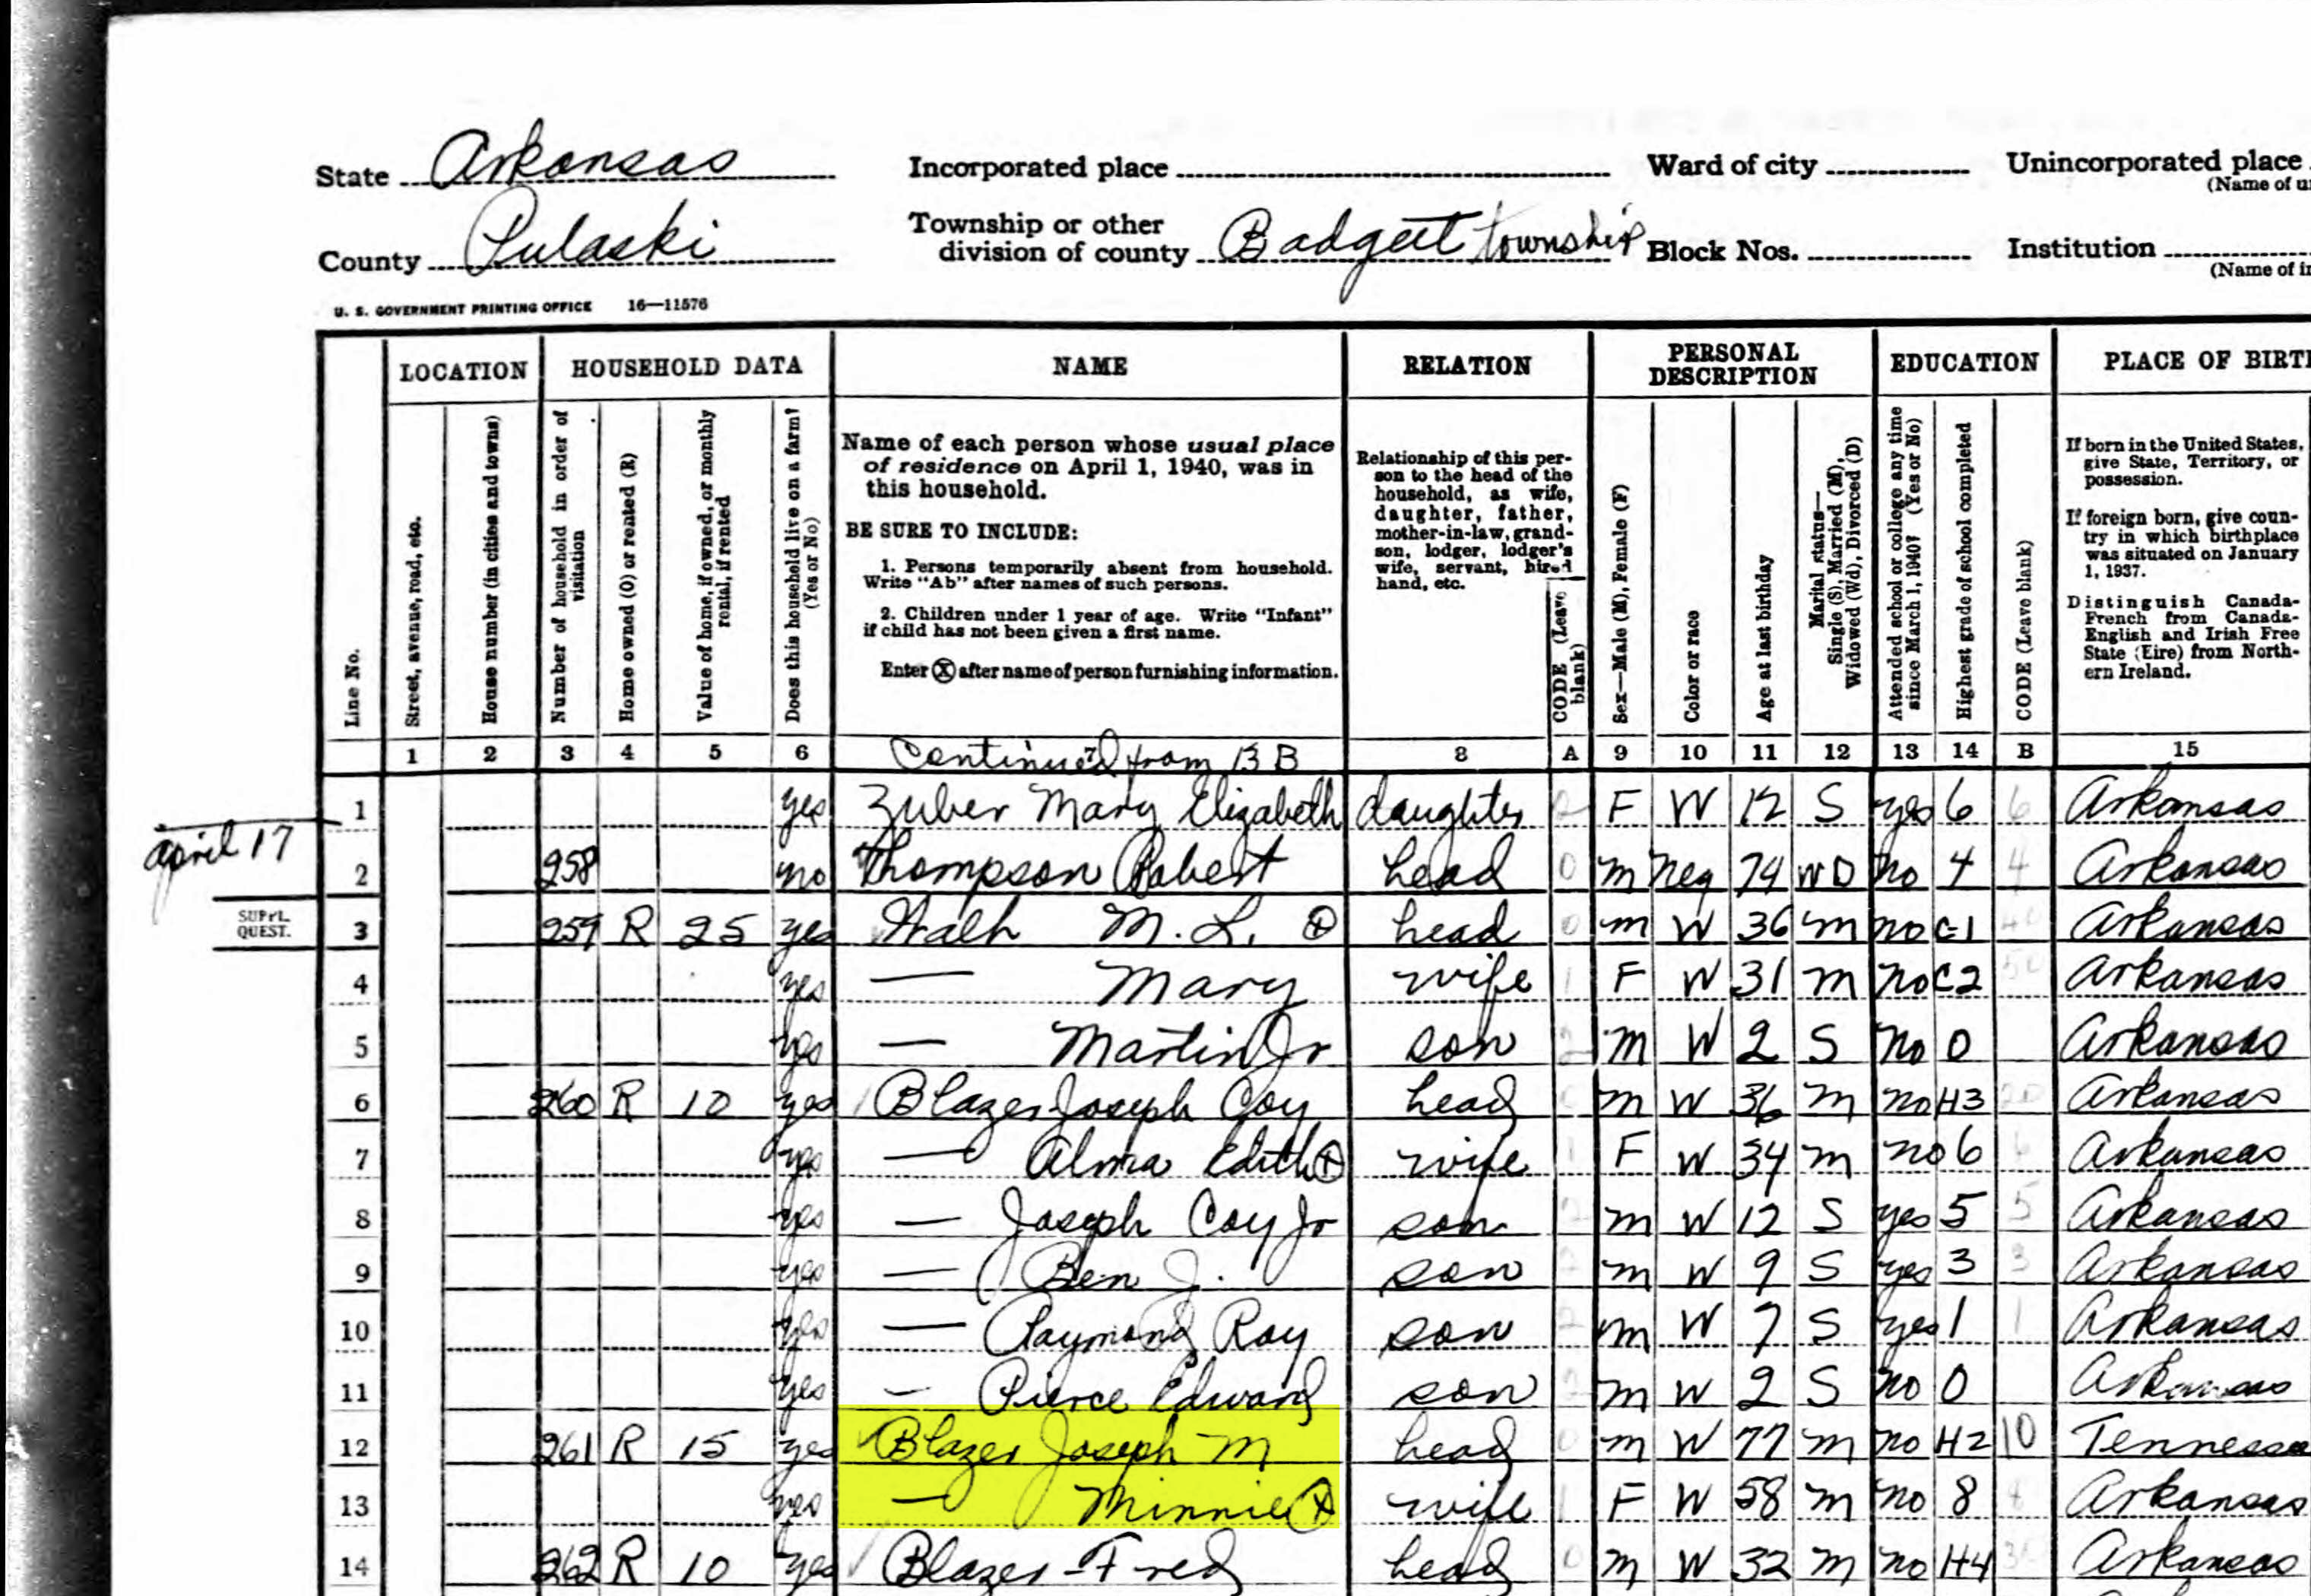
Here’s the Blazer family in the 1940 census, and Lisa confirmed that she believes this is the same place.
On the census record we are looking for three very important things:
the township (Badgett Township)
the ED number (60-2B)
and any address written along the left margin. If you don’t see anything, check the pages before and after that page. (Frazier Pike)
Step 3: Search for the Township
Once you have the location or township, search for them in an online map. I prefer to use Google Earth, but I often also use Google Maps. It doesn’t hurt to check both.
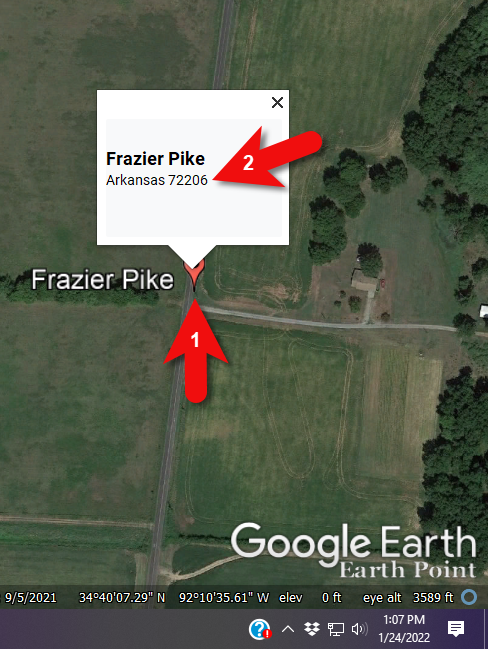
In this case we have two locations to look for: Badgett Township and Frazier Pike. We’ll start with the actual address which was Frazier Pike, Arkansas. Google Earth tell us that it’s a road just southeast of Little Rock, AR. When you click the pin it also tells you the current zip code for the Frazier Pike area, so we’ll make note of that. I’m like to create a project folder (Blazer Address) in my Places panel and then save the location pin in it. I will add additional items to the folder as I find them.
Click the pin to see the zip code.
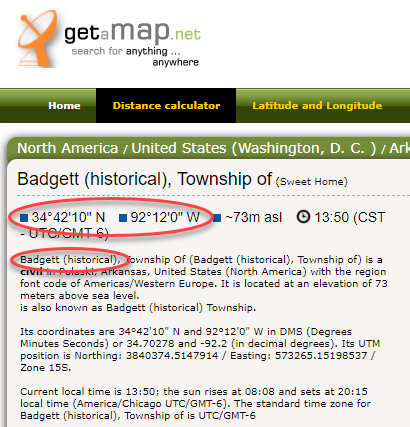
Next, I’ll search for the other location found in the 1940 census, Badgett Township. It doesn’t appear in either Google Earth or Google Maps. That’s probably because it’s been renamed or incorporated. Googling may be able to help so I googled: badgett township arkansas history.
This led me to a website that provided several helpful clues. It says that Badgett is “historical”, meaning that it’s the old name of the town which has since changed. It also provides us with the latitude and longitude of Badgett which we can use in Google Earth to confirm it’s location.
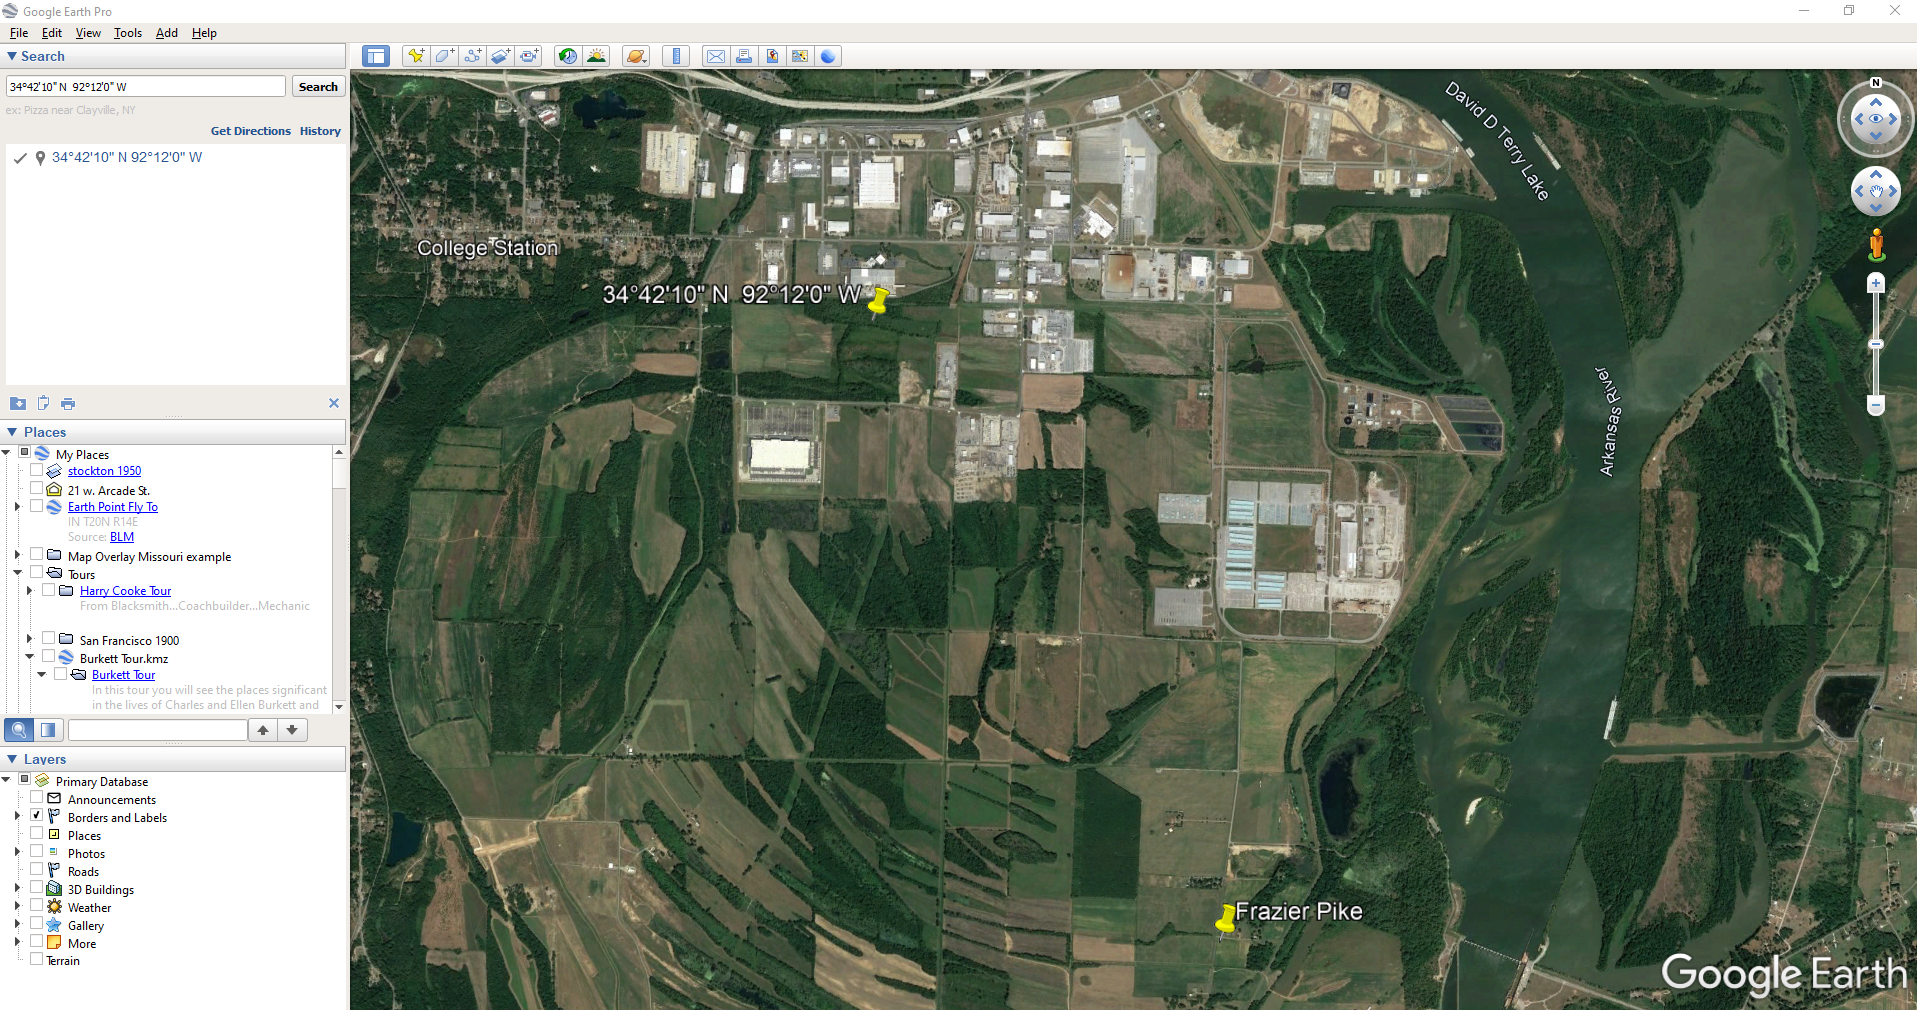
Go back to Google Earth and enter the coordinates (34°42’10” N 92°12’0″ W) in the search box and press ENTER on your keyboard.
The locations are very close.
And indeed, it’s very close to Frazier Pike. (image above)
I also like to look at the image results when googling. The website results are organized by the most relevant images. When I ran a search on Badgett, AR, and click Images on the results page, I see that the first one showed a map showing Frazier Pike. So, they are nearly one and the same.
Another search result was theHome Town Locator website. It says “the Township of Badgett (historical) is a cultural feature (civil) in Pulaski County. The primary coordinates for Township of Badgett (historical) places it within the AR 72206 ZIP Code delivery area.” This confirms that it is historical, the coordinates pin the same place on the map, and the current zip code is the same.
A quick Find on the page search (Alt + F) for Route 2 jumps me to a nice bit of history.
In the section discussing schoolhouses we get a description of the route: “…located in the main red-dirt road called Route 2 in Pulaski County. Route 2 is now known as Frazier Pike.”
Step 4: Find the ED Map for the Closest Census
Next, we turn our attention to the enumeration district or ED number we found on the 1940 census. As you’ll recall, 1940 is the closest available census record to the date of the address, and we found Lisa’s ancestors in that record in Badgett, AR which we now know is the Frazier Pike area in Pulaski county. On that record it says: Badgett Township. ED 60-2B.
We could google for the year of the census and the words enumeration district map. However, there’s a great free tool for finding them over at Steve Morse’s One-Step Tools website at stevemorse.org.
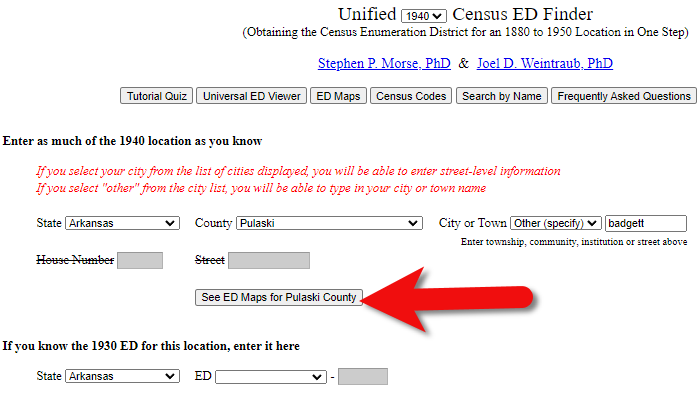
In the menu under U.S. Census select the Unified 1880-1950 Census ED Finder, select the year at the top of the page. In this case we will select 1940. Next, enter the state (Arkansas) and county (Pulaski). You can then select the city or town. However, in the case of rural addresses, don’t expect to find the town listed. If it offers you an “Other” option you can try and type the name of the town (Badgett) in the field provided. Don’t bother entering the route number (Route 2) because that’s not a street address, it’s a postal delivery address.
We could also run this same search on the 1950 census. Chances are you will see more ED numbers listed because the population was growing. Since an enumeration district had to be the size that one enumerator could cover in about a two week timeframe, they were often redivided as they decades went by.
Since we know from the 1940 census that township was in existence, we should receive a list of ED numbers as a result. In this case we got three: 60-2A, 60-2B. and 60-3.
Click the corresponding ED number.
Click the linked ED number that matches the one you found in the census record. In this case, the 1940 census record told us that the Blazer family was in ED 60-2B, so we click that link.
The next page lists each ED. Click the View link for the ED.
Click the View link.
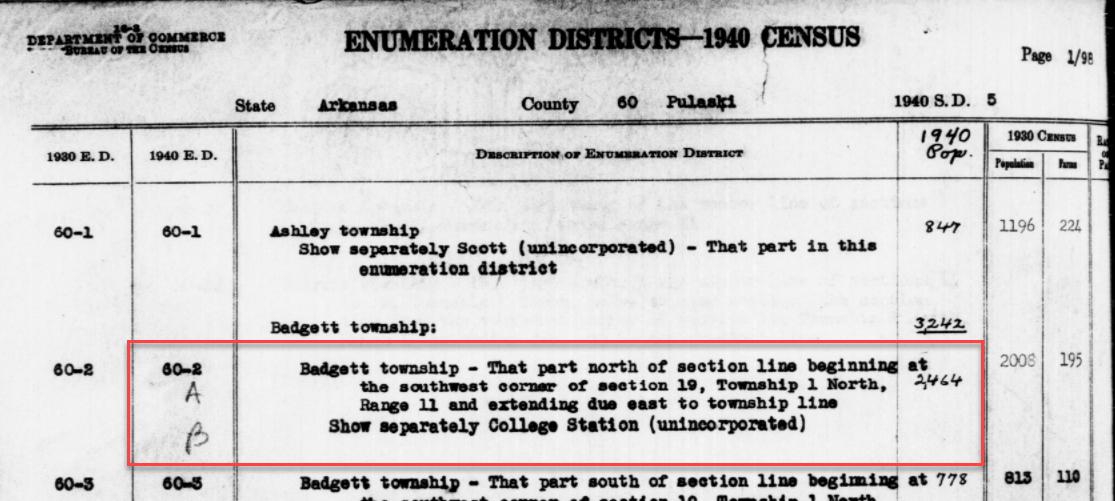
The View link will take you to the exact page for that ED in the ED Descriptions from the National Archives T1224 microfilm from Record Group 29. This description helps even further define the area.
1940 Census ED Description
60-2 A and B says, “Badgett Township – That part north of section line beginning at the southwest corner of section 19, Township 1 North, Range 11 and extending due east to township line. Show separately College Station (unincorporated.)”
This is perfect because its’ giving us the township, range and section! We can use this information to plot it in Google Earth.
How to plot a land description in Google Earth with Earthpoint:
Enter the state, principal meridian (in this case there’s only one choice here thankfully), township, range and section numbers from the census description.
Click the Fly to on Google Earth button.
This may open automatically in Google Earth or you may be prompted to save the file to your computer. Do that and then click it to open. It is a KMZ file so it will automatically open in Google Earth.
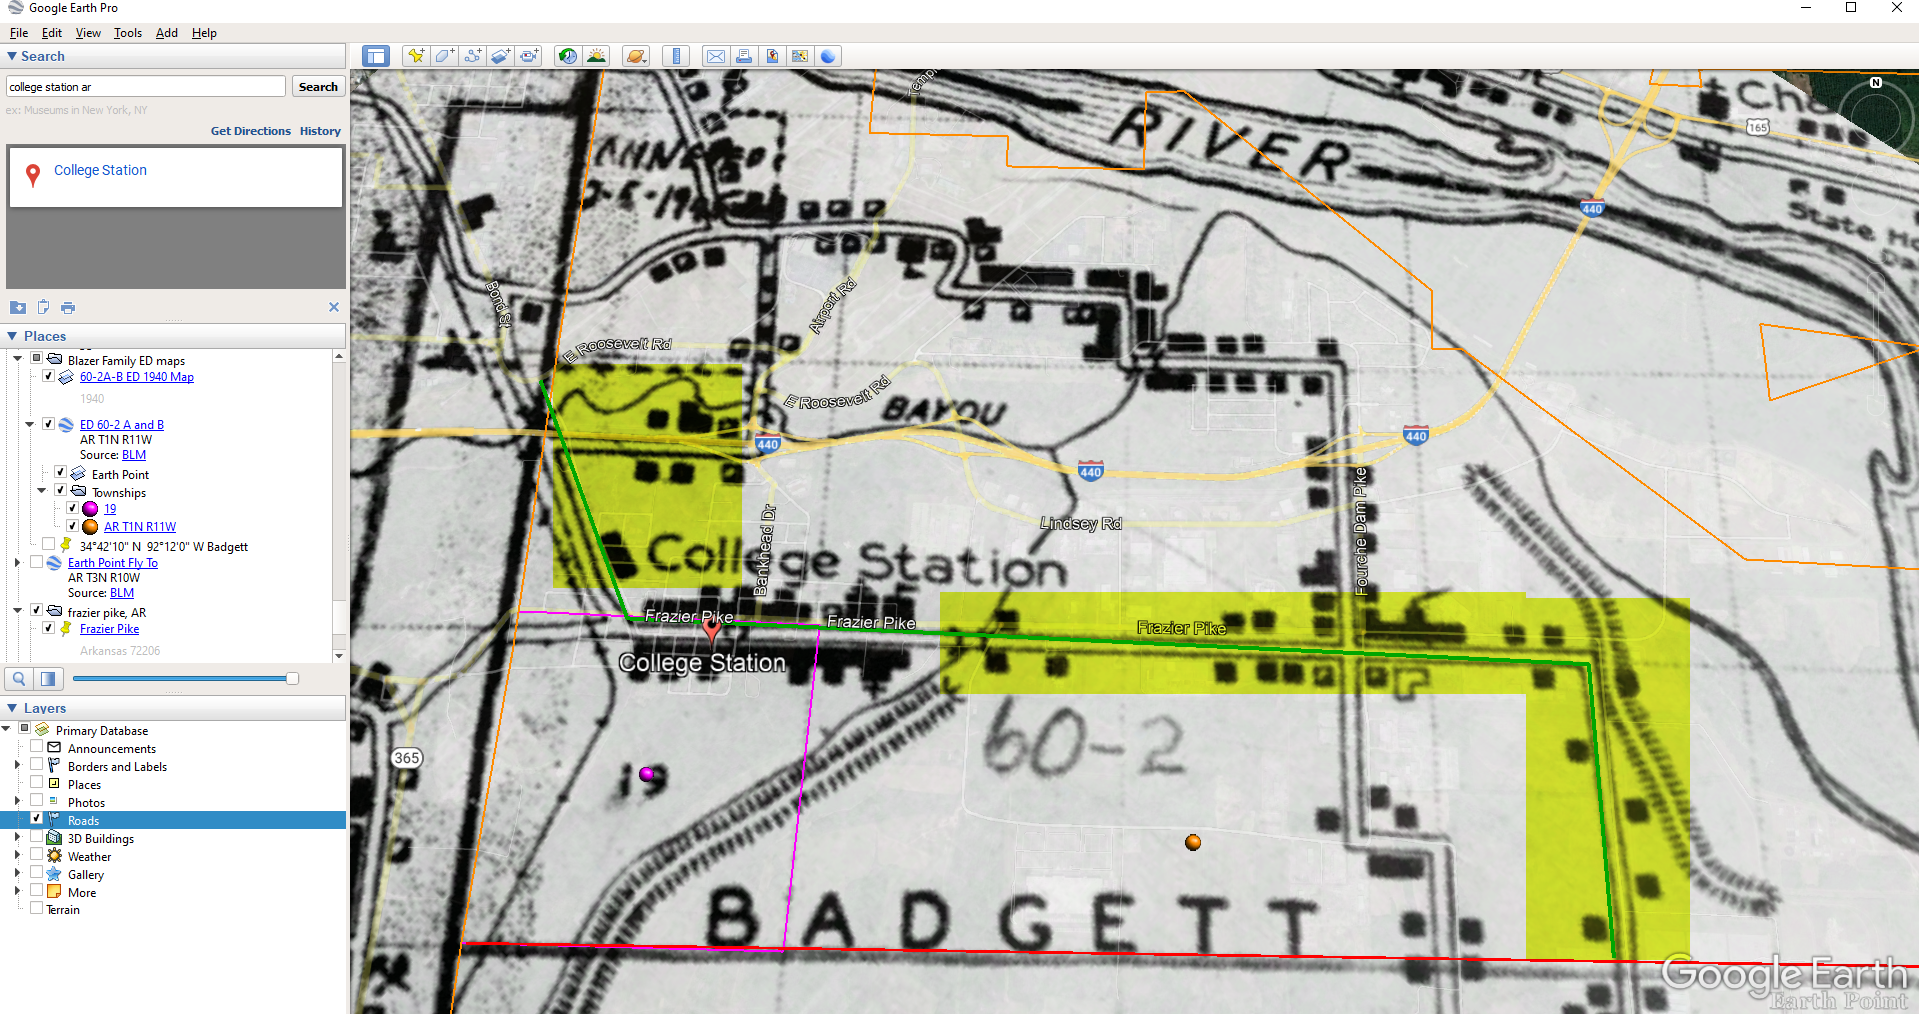
And here are the results! The location is mapped out for you.
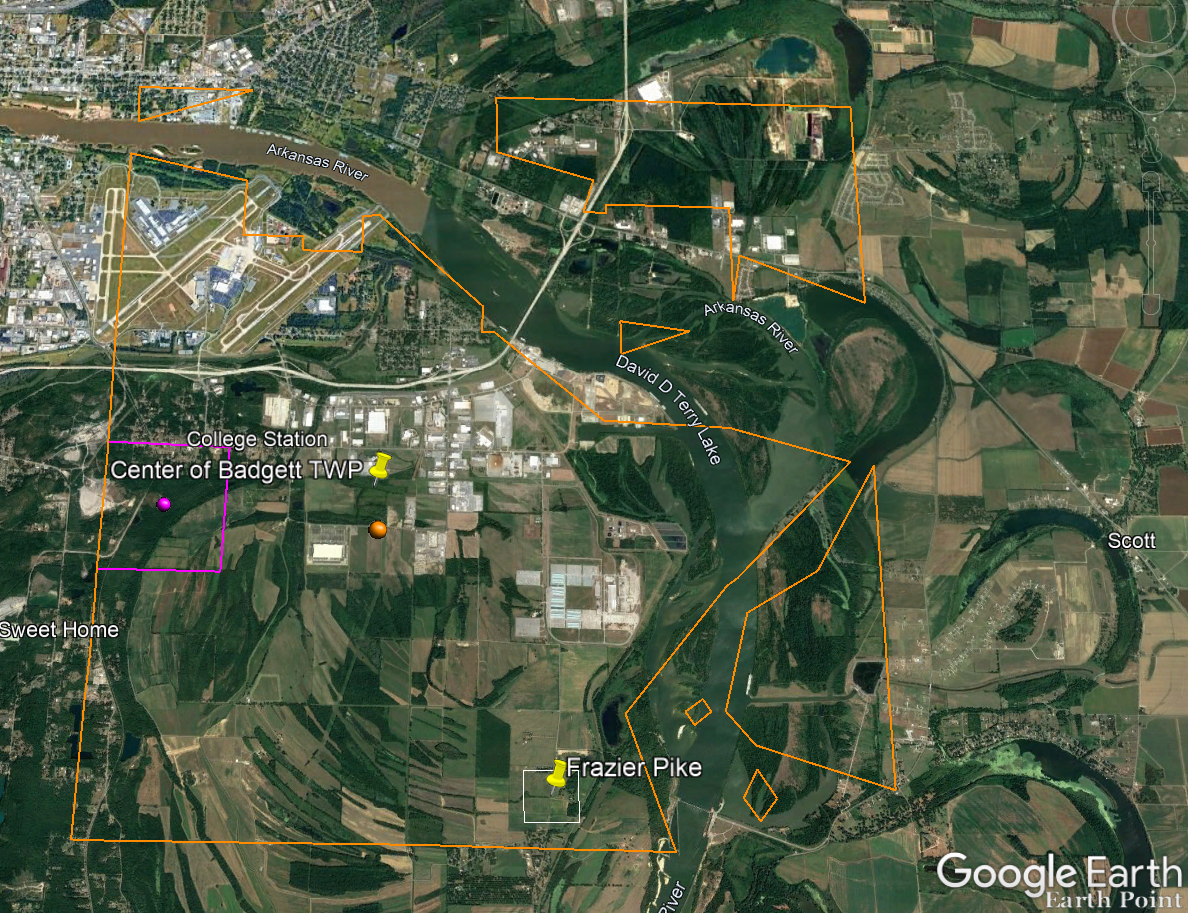
Census description mapped in Google Earth.
Notice I still have my placemark pins for the approximate location of Frazier Pike, and the center of Badgett Twp which we got using the latitude and longitude coordinates. Section 19 is outlined in purple, and the township is outlined in orange.
Since Frazier Pike is a road, turn on Roads in the Layers panel. Now we can see that Frazier Pike is running north and south and our pin is right on top of it.
Now we can use the census description to further zero in on the area. “Badgett Township – That part north of section line beginning at the southwest corner of section 19 Township 1 North, Range 11 and extending due east to township line. Show separately College Station (unincorporated.)”
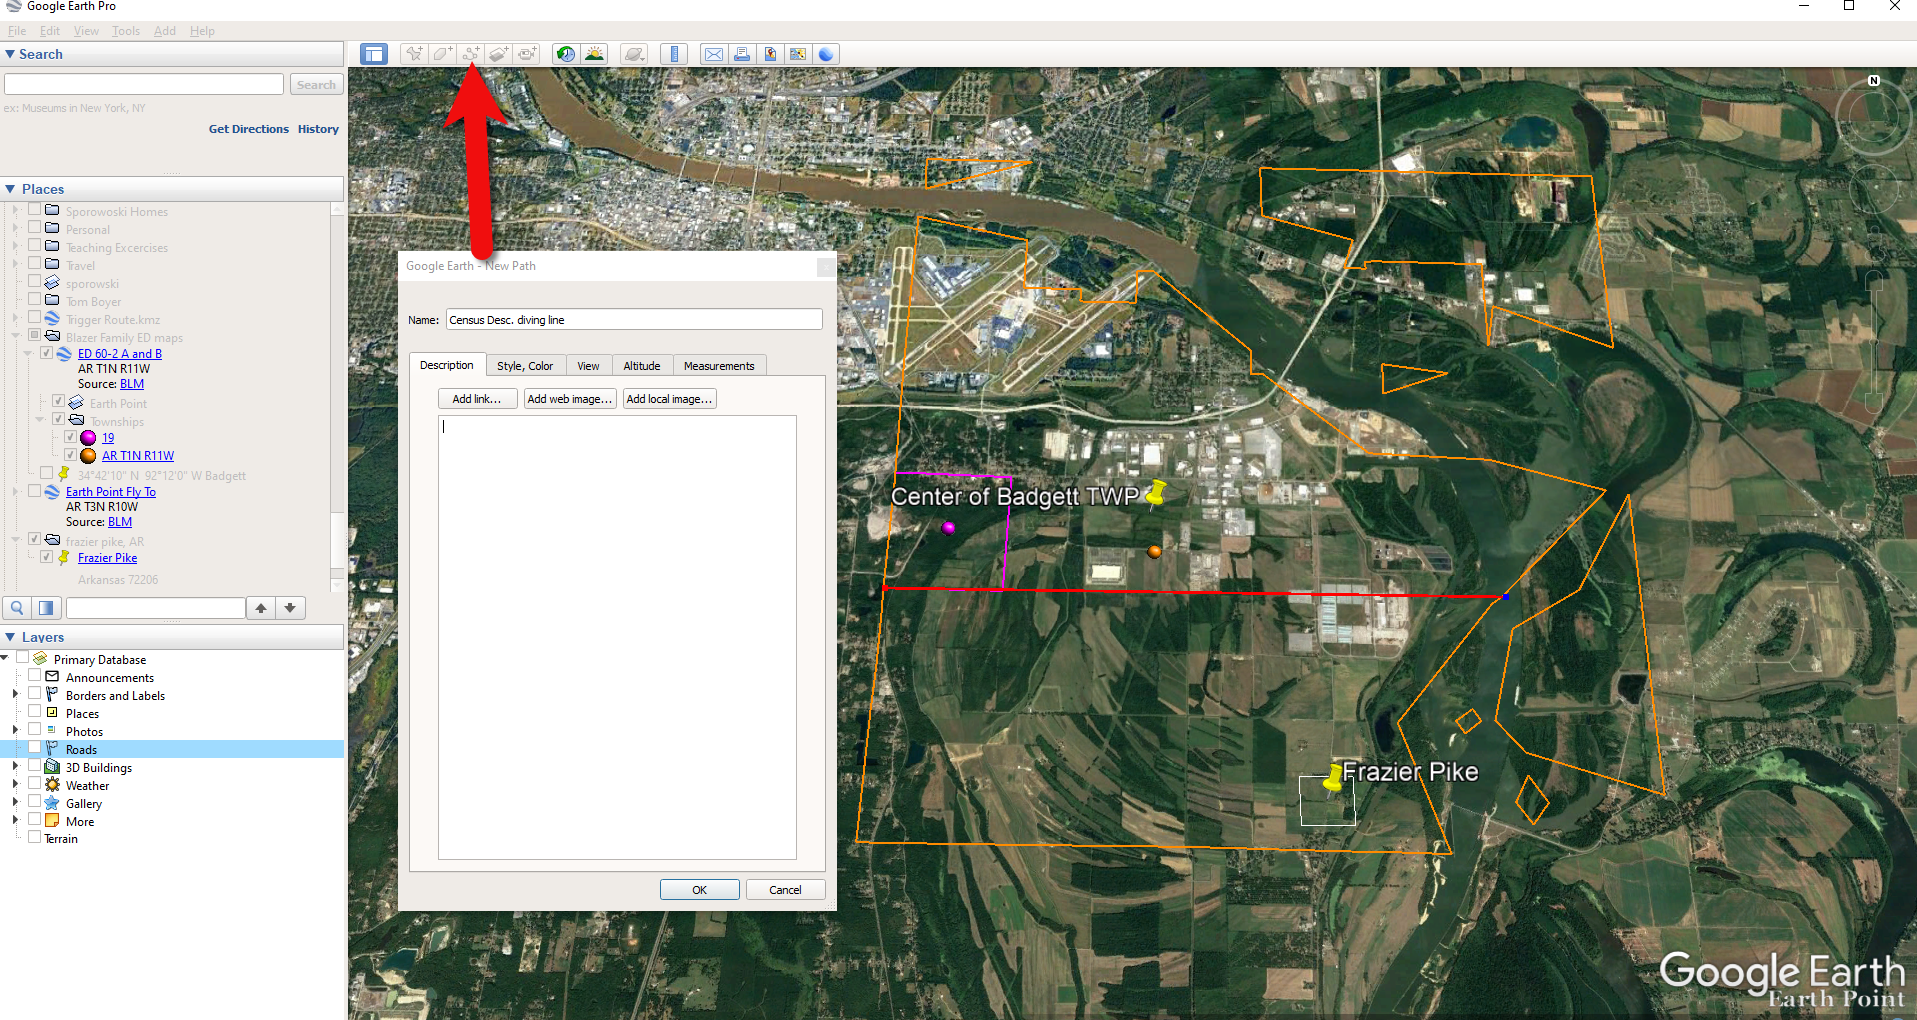
Mark that in Google Earth using the Path tool. Click the Path button in the toolbar at the top oof Google Earth. Click on the southwest corner of section 19 (outlined in purple) and then go east and click the township line (in orange.) Give your path a title and click OK.
Click the Path button in the tool bar.
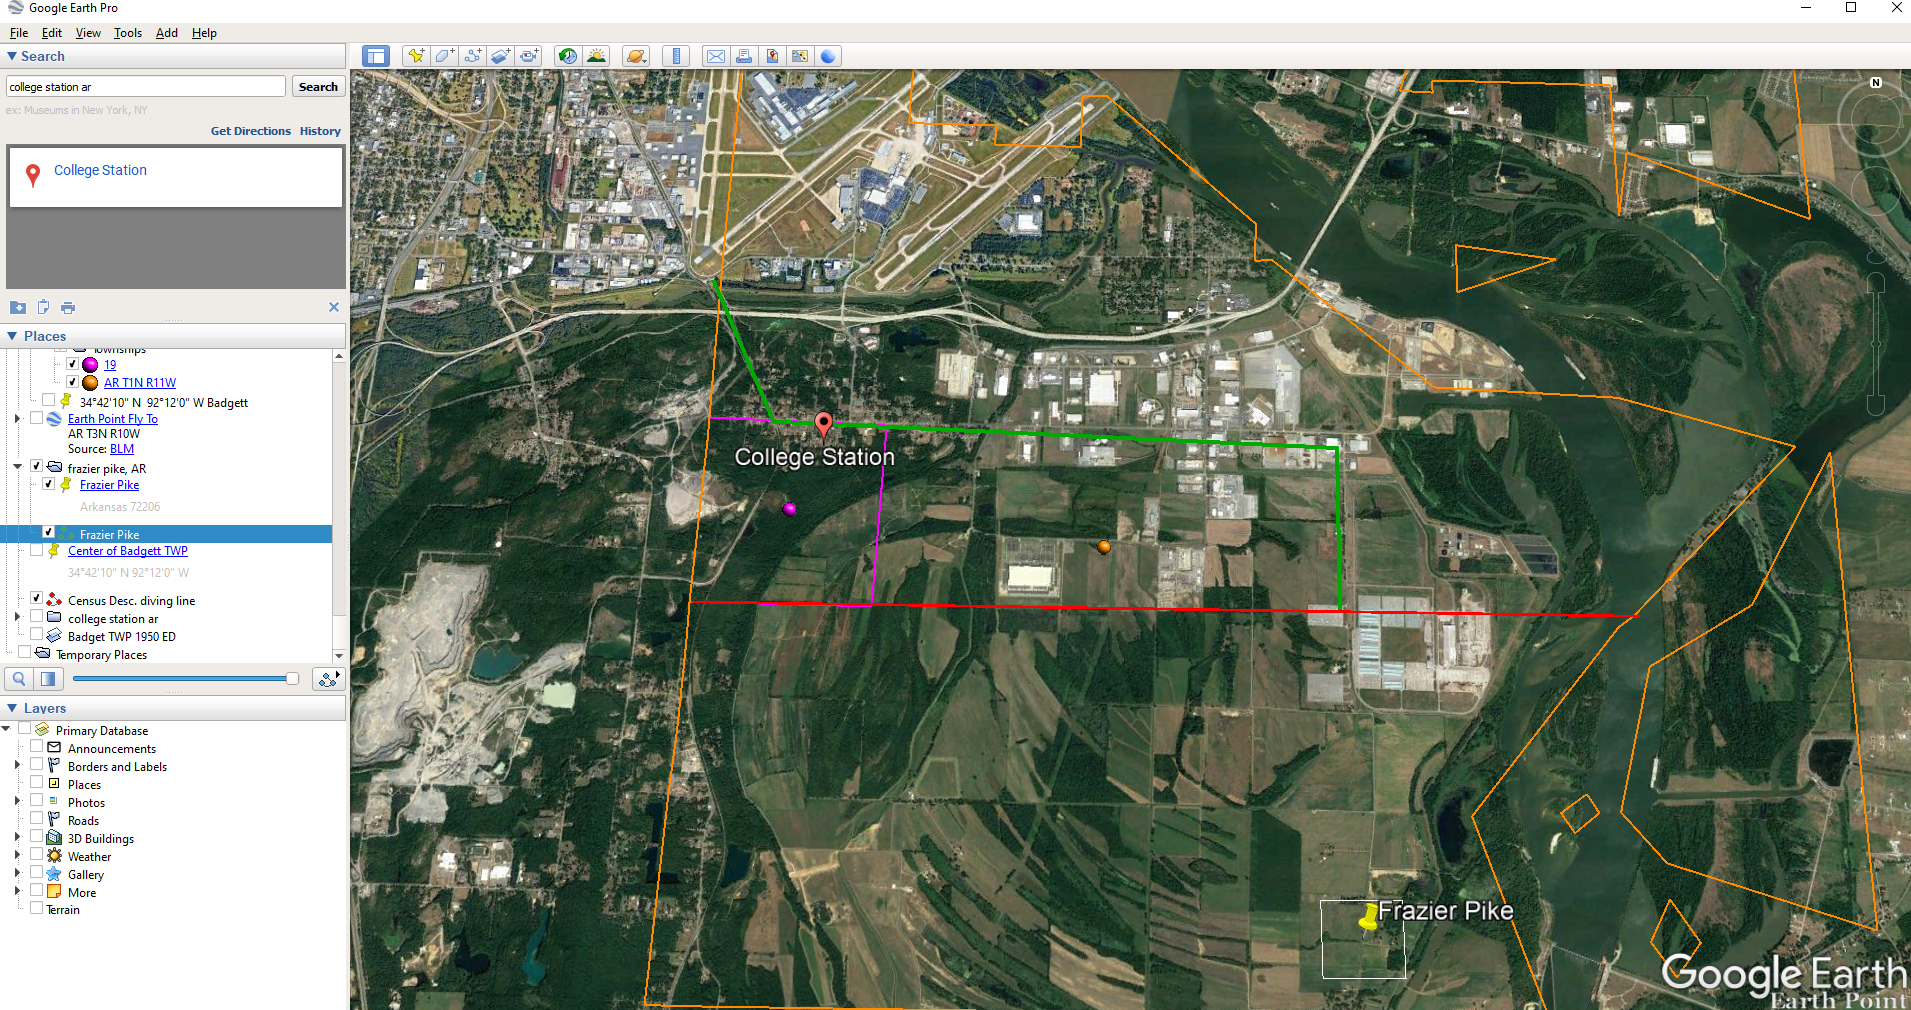
Next in the census description, on the same line as “B” it says “Show separately College Station (unincorporated.)” We can find College Park by searching for College Station, AR in the Google Earth search box.
Next, we want to follow Frazier Pike going north until we are above the section line that started in the southwest corner of Section 19. Use the Path tool again to mark it on the map.
Use the path tool to draw lines in Google Earth.
Get the Enumeration District Map
Now it’s time to head back to Steve Morse’s website and get the ED map for 1940. On the page you started your search, click the See ED Maps for… button.
Click the See ED Maps button.
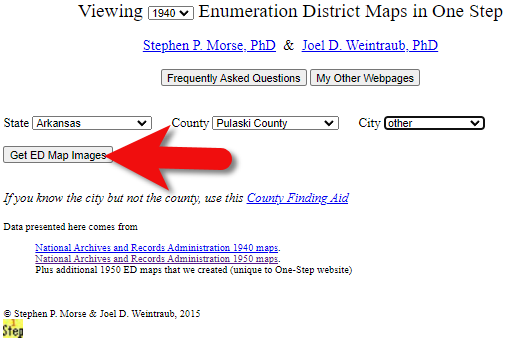
On the next page select the state, county and city again and click the Get ED Map Images button.
Click the Get ED Map Images button.
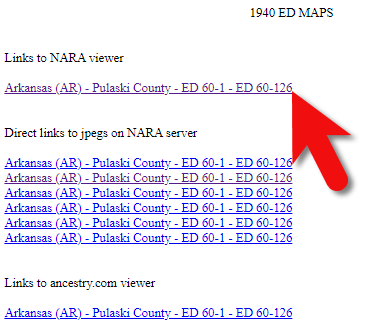
This will take you to a list of all of the available maps. The first link will take you to the National Archives webpage where you can look through all the maps for the area you selected. You could also look through all the individual maps by clicking each of the links listed under “Direct links to jpegs on NARA server”. However, I don’t recommend that will take longer because they are extremely large image files. It’s easier to quickly look through them on the NARA website.
Click the Link to NARA viewer.
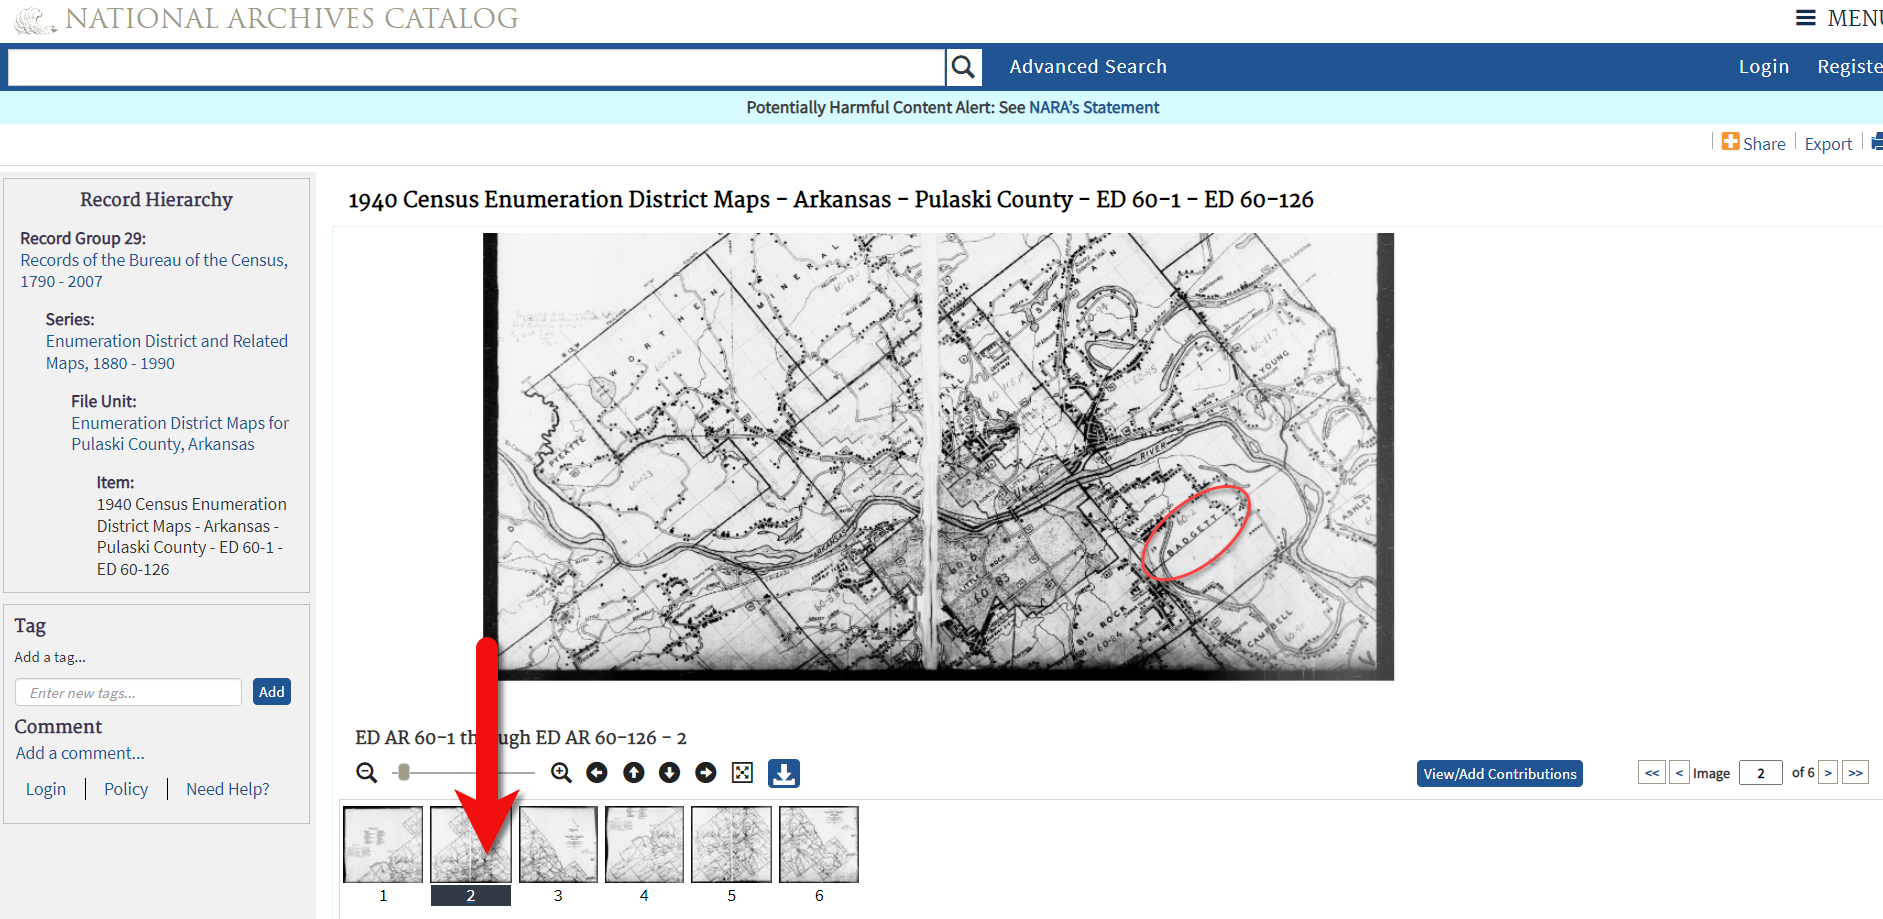
Click the link to the NARA viewer and look for the township name in the map thumbnail images. In this case I’m looking for Badgett. You can do this quickly by clicking each image and then drag the larger map in the viewer around with your mouse. I found Badgett Township in the second map.
Map images at NARA.
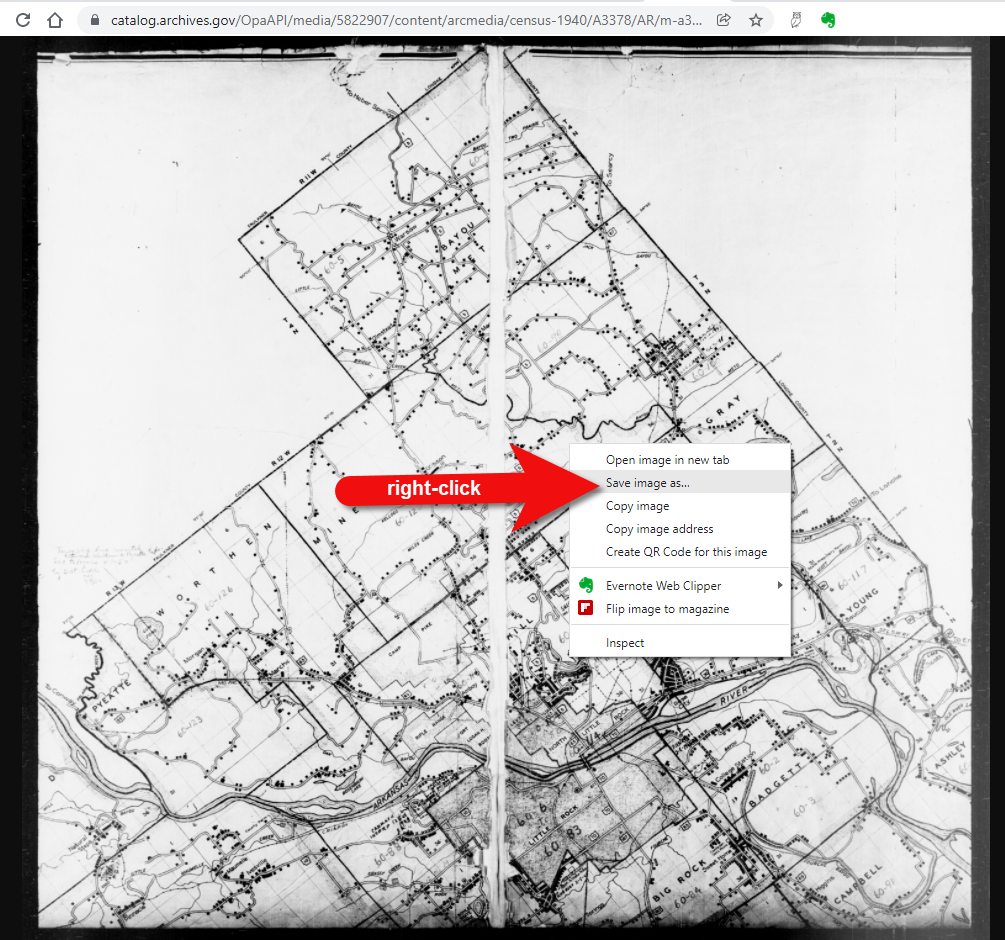
Download the full-sized map by selecting the thumbnail image and then clicking the download button (down arrow.) The full resolution map will load in your web browser. Right-click on it and Save Image As to save it to your computer.
Right-click on the map to save it to your computer.
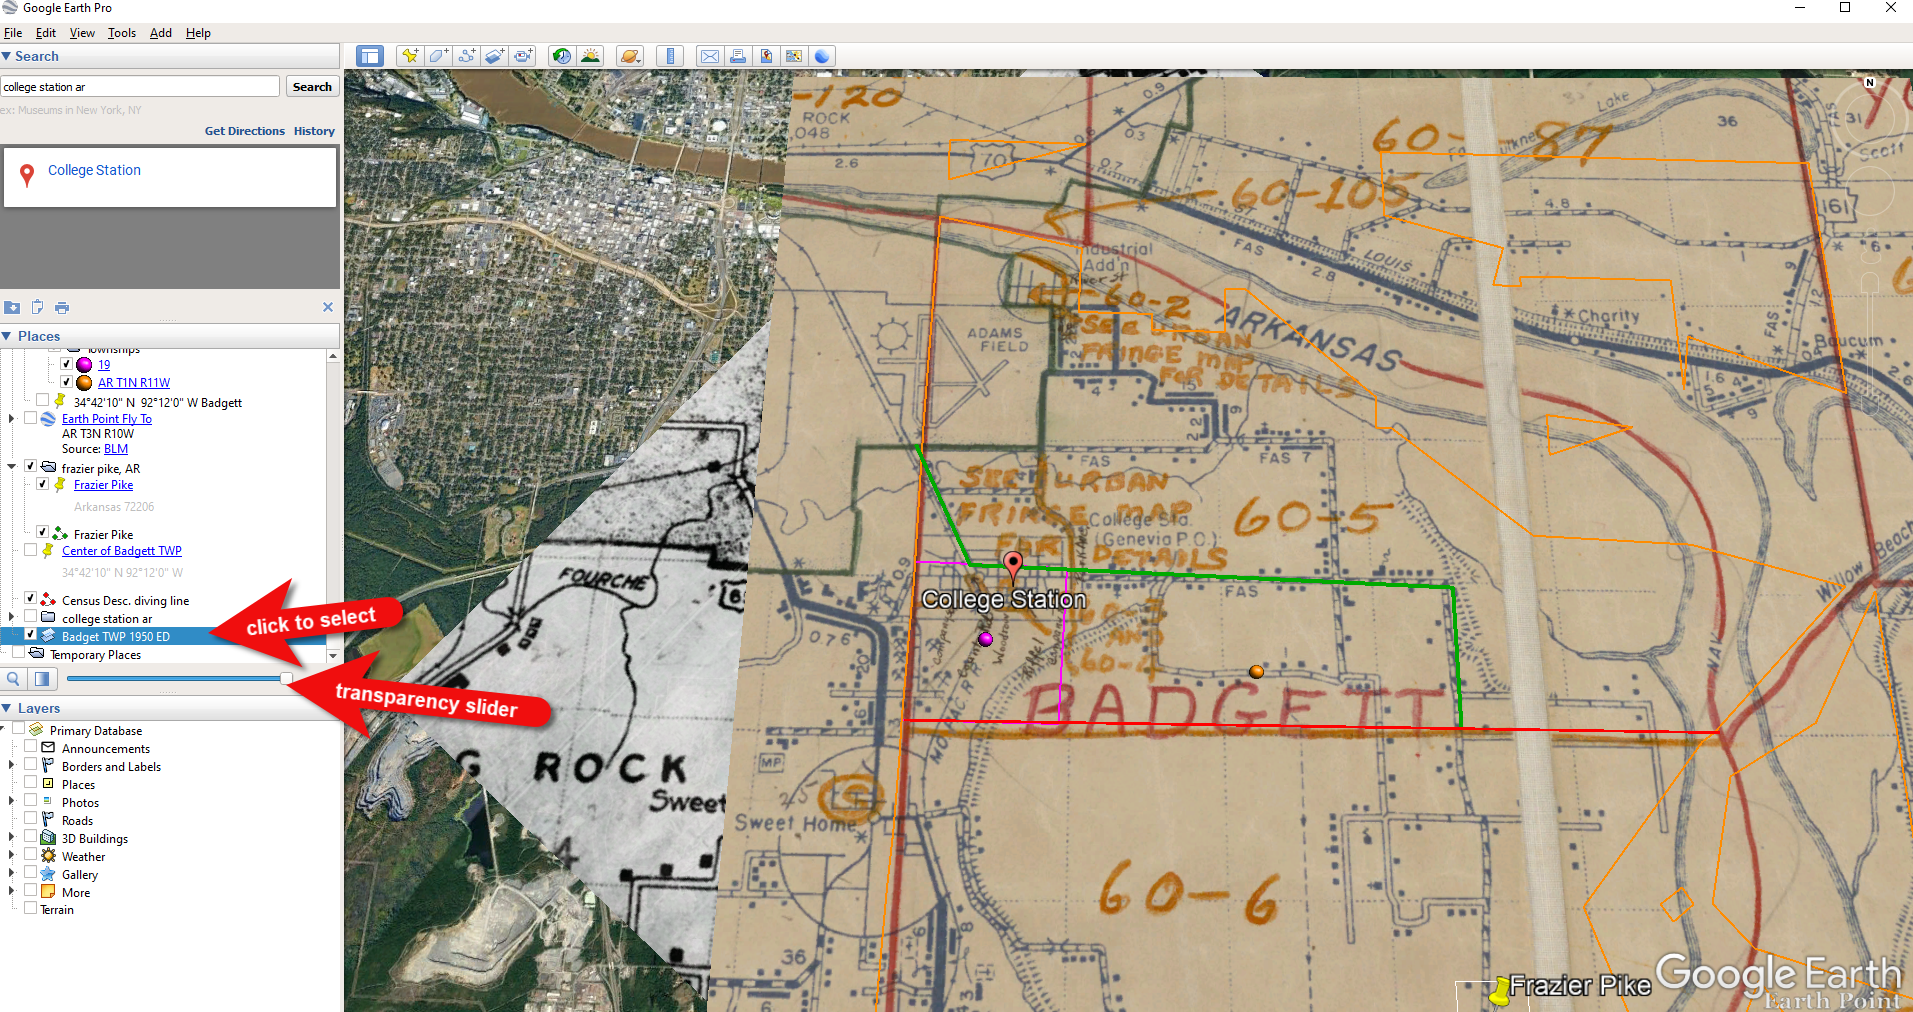
It can help to create a map overlay in Google Earth using this map. (Learn how to do this in the newest edition of my book The Genealogist’s Google Toolbox.) I cropped the image to just include Badgett Twp.
In fact, you can overlay both the 1940 and 1950 ED maps. Click to select a map in the Places panel and then you can use the transparency slide to fade it to reveal changes.
Select the map and use the opacity slider in Google Earth.
Step 5: Follow the Census
The census can provide even more clues about where in an enumeration district an address was located. Using the census record and the census description of the enumeration district, it can help to highlight the area of the map. In this case, ED 60-2 is “that part north of section line” which I marked with a red path line. The Blazers address was Frazier Pike (which I marked with a green line), so this eliminated the northern area and the Fourche Dam Pike road. To make sure that I could eliminate that area, I verified in the 1940 census that Fourche Dam Pike was enumerated separately by running a keyword search of the Pulaski County census records at Ancestry. And yes, indeed folks living along Fourche Dam Pike were enumerated separately and the road was written along the margin just as Frazier Pike was. This gives me a lot of confidence that I’m identifying the right area.
The route highlighted on the census ED map.
As you can see, there are little black squares and other markings on the map. To find out what each of those means we can turn back to the National Archives and download the page from this map collection that includes the map key.
The black squares are “Farm Units”. A farm unit square is not one family , it is the entire farm, including the owner and other families who may live and work on the farm. We also see businesses, churches, the town hall, school houses and more. We may not be able to find the exact home, but it’s possible to get very close. To do that, we need to head back to the census records themselves.
On Ancestry.com , the Blazers appear on Image 27. The filmstrip makes it easy to quickly scan through the images and browse them.
In this case, there are about 33 images or pages in ED 60-2B. The enumerator would start at one end of Frazier Pike and then make her way to the other. The enumerator wrote “College Station Pike” on pages 1 and 2. That isn’t a road today, and I couldn’t find any references to with a quick search. However, all of the other pages say, “Frazier Pike”. My guess would be that the census taker started on the west side – the hub of College Pike – and made her way east. Census enumerators visited homes and farms in a logical path, although they may have criss-crossed back and forth across the road. They listed the order in which they visited on the census form itself. In cities we might also see house numbers listed, but that’s not the case in a rural area. However, you may see pencil dots with visitation numbers written on the ED map. They were instructed to do this in rural areas in the census enumerator instructions in 1940. Unfortunately, the person enumerating 60-2B did not.
We could also look at the types of businesses and buildings shown on the map, and then look through the census records at occupations. We see a “factory/industrial” building to the east so we would look for people working in that environment in the census and see where they are living. We see a denser population in College Station along with a schoolhouse and two churches, so it would be worth looking through the census pages to see where the school teacher and pastors are listed. Folks may not have lived on the premises, but it would make sense they lived near their work.
Wedding photo Joseph Madison Blazer Minnie Mae Peters (courtesy of Lisa Egner)
And finally, we want to look for renters and owners. If a family rented, a capital “R” was entered on the census. Those who owned their property were listed with a capital “O”. Since the black squares are “Farm Units” we wouldn’t expect to see a square on the map for every house. If our hypothesis is that the enumerator started on the west side, we could count the number of owned dwellings listed in the census until we get to the family living in question. Then we would count them on the map, going east. Again, it’s not exact, but it’s a whole lot more than what we knew about the address Route 2 Frazier Pike when we started!
Show Notes: The FamilySearch Wiki is like a free encyclopedia of genealogy! In this FamilySearch Wiki tutorial, discover the wealth of information the Wiki has to offer, and learn the secrets to navigating it with ease. We’ll also cover the number #1 reason people get frustrated when searching the Wiki and how to overcome it.
Watch the Video
RootsTech has set the class video to “private”. You can watch it on their website by going to the video page in their on-demand library. You may need to sign in to your free FamilySearch account in order to watch it.
Enjoy this special free tutorial video which was originally presented at the RootsTech conference. Download the ad-free Show Notes cheat sheet for this video class. (Premium Membership required.)
What is a Wiki?
A wiki is a website that
Allows collaborative editing platform for users
doesn’t require HTML editing
has links to both internal and external resource pages
The FamilySearch Wiki is a lot like Wikipedia. It’s basically an encyclopedia of information. But the exciting part is that it’s specific to genealogy. This means you don’t usually have to worry about including the word genealogy in your searches.
What Does the FamilySearch Wiki Do?
The FamilySearch Wiki is focused on providing information for genealogy research such as:
how to find data
where to find data
how to analyze and use the data
What are the sources of Wiki content?
Original material was added from the old Family History Library research outlines.
User added material in their areas of genealogical expertise. The Wiki is constantly being updated by LDS missionaries and other volunteers as new material is discovered or released.
Don’t worry about Contributor info.
You’re going to see many things about wiki creation and management. Not everything is relevant to you when just wanting to find information. In fact, the majority of the Help section is geared to people creating, editing and maintaining pages. Don’t worry about being a contributor. Enjoy being a user.
2 Ways to Access the FamilySearch Wiki
Going directly to https://www.familysearch.org/wiki. Although you can sign into your free FamilySearch account on this page (in the upper right corner) it isn’t necessary in order to use it.
Logging in at the FamilySearch website. In the menu under Search click Research Wiki. By logging in and you’ll have access to additional features like participating in discussions, posting and creating watchlists.
The FamilySearch Wiki focuses on records, not ancestors.
Keep in mind that the purpose of the Wiki is to explain where genealogical materials are located and how to get access to them. The Wiki does not have individual ancestor information. If you want to find records, start by deciding specifically what kind of records you want. Identify when and where the ancestor lived at the time the record was created. Then head to the Wiki to figure out what records are available and where they can be found.
The Wiki links to:
Materials that available at FamilySearch.org or any other online genealogy website.
Materials that are not available at FamilySearch.org or any other online genealogy site.
Materials that were previously unknown or newly made available online.
Strategies and techniques for finding and researching genealogical records.
Types of Searches
Topic Search: When searching for information on a specific topic such as probate records, type the topic into the Search box. As you type, a list of pages with the topic word or words in the title appears below the Search box. If one of the listed pages is the desired topic, highlight and press enter. If you don’t pick from the drop-down list you will get a results list of every page that includes the topic.
Vital records Search: FamilySearch recommends using the Guided Search for info on vital records.
Location Search in the search box: When only the name of any country, state in the U.S., province in Canada, or county in England is typed in the Search box you will be taken directly to that Wiki page. For example: If Texas is searched the result is the Texas, United States Genealogy page.
Page Title: If you happen to know the exact title of the Wiki article you want, type it in the Search Box.
How to Overcome the #1 Search Problem
Many people will search for something like marriage records, Randolph, County, Indiana, and they will get a list of results. The results don’t look as clear-cut as Google results, and they may not all be on topic. This is where we can get lost. I think probably the number one reason why people give up on the wiki is they get these kinds of search results. They realize, wait a second, this isn’t even Indiana, it’s talking about Kentucky! Why am I getting all these? It can be frustrating.
This happens because we tried to do it ourselves, with our own keywords. Remember, like most search engines, they’ve indexed their content to make it searchable, so that means they’ve already decided how they want to talk about a particular topic. Rather than just addressing marriage record first, the wiki focuses on the location. Where is this marriage record? So, focus first on the place unless you are just looking for general information on a general genealogy topic such as genealogy software.
Pre-filled suggestions will appear as you type because the wiki is going to suggest what it has in the format it has it. Again, you may want to first go to the country, state or county-level page and then look for the record type.
If you’re looking for marriage records but you don’t see them listed it might be that the word marriage isn’t the keyword the wiki uses. Or it might be that the type of record you’re looking for is a state or federal record.
Don’t be discouraged if you don’t see what you want listed in the table of contents. It may just be a keyword issue. Let the work that they’ve already done in organizing their materials guide you. You’ll be more successful and also avoid frustration. The FamilySearch Wiki is just too good of a resource to miss.
Use Google site search to search using Google’s engine and search operators!
Map Search
Generally speaking, the map is the best way to search for records and information that is rooted in a location. Start by clicking the button for the continent, such as North America. From there, select the county from the menu, such as United States, then drill down by state. This will take you to the Wiki entry for that state.
Location-based FamilySearch Wiki Pages
If you’re really new to research in a particular location, start with the guided research link on the location’s wiki page. You may also see links to research strategies, record finder, and record types.
Getting Started section – links to step-by-step research strategies and the most popular records.
The county pages are where the real magic happens because many records such as birth, marriage, death, and court records are typically available at the county level. There you’ll find out how to contact or visit the current county courthouse. Look for Boundary Changes on the page. Use your computer’s Find on Page feature by pressing Control + F (PC) or Command + F (mac) on your keyboard to more quickly find words like Boundary on the page.
Exploring Record Collection Pages
Many record collections have their own page on the Wiki. As you type, these pages will populate in the drop-down list. Example: German Census Records. Take a moment to read through the page and you’ll discover some important information that will save you time and headaches, such as:
When censuses were taken
National versus local censuses and their various levels
Censuses in areas where boundaries have changed over time
Various types of census forms we may encounter
The purpose behind the creation of census records in Germany
The kind of information we can expect to find in the German census
Other types of records containing similar information
Resource articles (including a handout from a past RootsTech)
Wiki articles describing online collections
There are a couple of actions we may want to take before going on to search for records. Here are a few:
Click on the Category to see what else is attached to this category – in this case we see some example images that are helpful in interpreting German census forms.
Click the Cite this page link in the left column if we plan to reference the page elsewhere.
Click Printable Version in the left column if we want a printable or PDF version of the page.
Explore related pages by clicking the What links here link in the column on the left. Notice it also shows if there are any other users watching the page.
Learn more about using Family Search
Videos at Lisa Louise Cooke’s Genealogy Gems YouTube channel:
These days we are all collecting more ebooks than ever before. We also have more devices than we’ve ever had before. Here’s a solution that gives you access to your ebooks from one convenient location no matter which device you are using.
The Advantage of eBooks
While you may love the feel of the pages of a book rifling through your fingers, there is a distinct advantage to collecting many of your genealogical reference materials and books ebooks. They don’t take up precious shelf space in your house!
However, I don’t live in a digital fantasy-land. I’m keenly aware that there are some challenges you may want to avoid:
purchasing an ebook and downloading it to one device, and then trying to figure out how to access it on your other devices
corralling your ebooks from different sources all together
having to pay for an app or web service to manage them
Don’t Reinvent the Wheel
If you’ve ever attended one of my genealogy classes, or watched one of my videos, at some point you’ve probably heard me say that I use Google Books on a daily basis for genealogy. I don’t say that just because the service provides access to over 25 million books, many of them fully digitized and searchable, and downloadable. It also provides you with your own personal library. Let’s take a look at how Google Books and Google Play Books work together to make that possible:
Google Books is a free and powerful service that also allows you to have your own library within it called My Library. As you search for and find ebooks to aid you in your genealogical research, you can save them to your library.
Google Play Books, is sort of the other side of Google Books. It is a vast ebook store that includes a feature called My Books. When you purchase an ebook, it is saved to your My Books. However, it also includes all ebooks that you have saved to your Google Books My Library. Even better, it allows you to upload your own ebooks! This makes it a central clearinghouse for all of your ebooks.
Here’s the bottom line. Think of My Books and My Library as the same thing in two different places: a personal library for your free, purchased and uploaded ebooks. The only reason they have different names is because Google Books has evolved over time into a book store as well. Don’t worry about that. Just know that whether you are searching through Google Books, or shopping in the Play book store, your library is right there with you, no matter what device you are using.
How to Start Using your Google Play Books Library
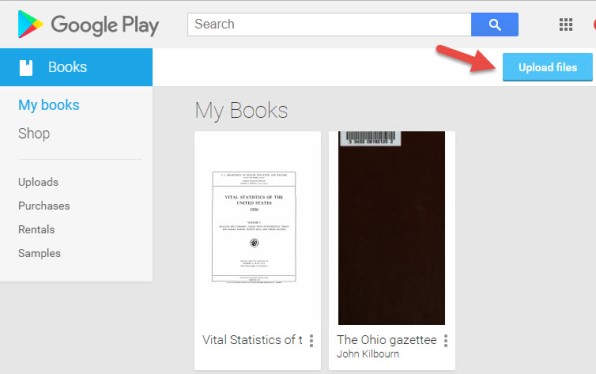
To get started, all you need is a free Google account, which you very likely already have. Go to https://play.google.com/books and sign in. In the menu on the left, click My Books. If you have ever saved a free ebook to your My Library in Google Books you should now see it on your screen.
This library is a place where you can save, upload, and access your digital books from any mobile device. This means everything is conveniently in one place, and accessible from all of your computing devices, both Apple and Android. You’ll have the freedom to read your favorite books on the go, and to access your digital genealogy research library at the drop of a hat.
Yes, there are some other services out there that could also do the job. But if you’re like me and don’t want to invest the time to learn and pay for yet another tech tool, Google Play Books is a great solution, because we are already using Google Books for our genealogy research.
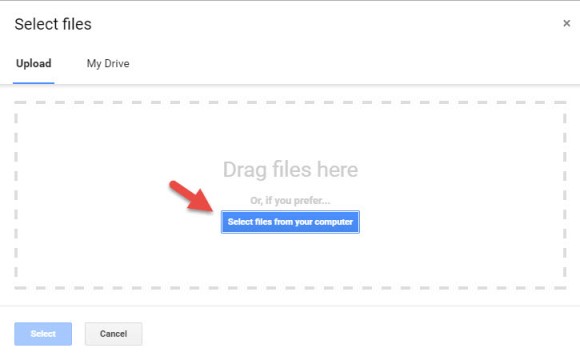
How to Upload Your Own eBooks to Your Google Play Books Library
Let me walk you through the simple steps to putting this free tool to work for you:
1. First, open your web browser and log in to your Google account.
4. Select your ebook files from your computer folders, or drag them into the box shown. You can also click on My Drive to select files from Google Drive. You can choose epub documents or PDFs.
Now, let me stop right here for a second and distinguish between doing this on a computer, and doing it on a tablet or smartphone. What I’m illustrating here is on a computer. I always recommend when you purchase ebooks to download them first to your computer, regardless of whether you plan on uploading them to Google Play Books. However, if you do want to do this on a tablet, for example, there are currently two options from which to pull your ebooks:
“My Drive” which is Google Drive, or
click “Select files from your computer” then tap “More” and select Dropbox.
Trust me, things will work more smoothly if you use your main computer as your hub for downloading, and then upload directly to your Google Books library.
Other things that are good to know:
It may take a minute or two to upload an entire book.
The cover will be the title page, not the actual dust-jacket cover you might be used to.
Currently, you can only search within books you obtain from Google (both free and paid), not the ones you upload.
You can upload 1,000 books into your Google Play Books library.
It’s private. Your books are only visible to you when you login to your Google account; you’re not sharing them with the world.
Your Google Books Library on Your Mobile Device
So now you have found free historical ebooks on Google Books (if you haven’t, take a moment and click here to read my article about using Google Books) and saved them to your Google Books My Library. Then, you uploaded your own ebooks and PDFs to Google Play Books. The final step is to jump on all of your smartphones and tablets and head to the app store. Search for Google Play Books and download the free Google Play Books app to each device. Sign in to the app with your same free Google account, and you’ll have access to all of your ebooks. Your library can now travel with you in your purse or tucked into your pocket.
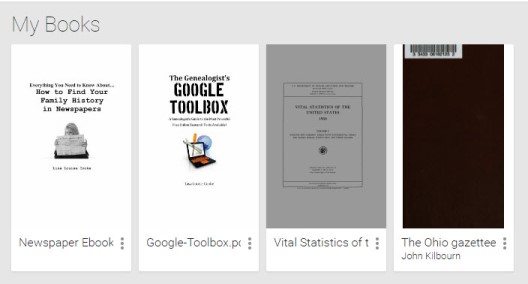
In the app, tap the three horizontal lines icon in the upper left corner, and then tap My Library. You’ll find your ebooks sorted under the following tabs:
All Books
Purchases
Uploads
Samples
By tapping the three uneven horizontal lines icon in the upper right corner, in each category you can sort your books by:
Recent
Title
Author
Those Pesky Variable Formats
eBooks come in several different formats. While I’m not covering in this article how to convert file types or deal with DRM protected books, there are resources available to help you do so.
The answer? Just Google It!
And if you need help figuring out how to effectively Google search, I have a book for that!The Genealogist’s Google Toolbox–the ultimate guide to using all of Google, including a full chapter on Google Books.
PDF – I Love You!
Many white-papers, scholarly works, and quick reference guides come in PDF format, and they upload like a breeze.
PDFs are so versatile, and they play ever-so-nicely with Google Play Books. It’s just another reason to love your Google Books library.
Stock Your Google Books Library
Are you feeling like your Google Books Library has room to fill? All of our quick reference guides are easy-to-upload PDFs, and all of the following genealogy resources are available as digital downloads in the Genealogy Gems store:
For a hand-picked list of novels and other great leisure reading for genealogy lovers, visit the Genealogy Gems Book Club page. I know you’re going to love our suggested best-sellers and best-kept-secrets about family, the search for identity, and fascinating stories in history.
Show Notes: WorldCat.org just got a facelift. That means it’s time to revisit this library catalog website and do these 5 important things so you can effectively use it for your genealogy research.
Video Premiere with Live Chat
Show Notes: WorldCat
If you are interested in finding out more about your family history and you want to build out your family tree, you are going to need records and resources. That’s exactly what the WorldCat website provides.
WorldCat.org is a free website that provides access through its card catalog to millions of materials from libraries around the world. You’ll find items such as:
United States Civil War and other military records
Family Bibles, church histories, and records
Publications such as directories, handbooks, and magazines
Birth, marriage, death, wills, and obituary indexes
Microfilmed genealogy and local history collections
Newspapers from around the world
Photographs
Town histories
probate records
It’s important to keep in mind that not all libraries participate in WorldCat, and they can participate at different levels. Therefore, you’ll find different amounts of information about these different repositories.
The WorldCat website has received a facelift and now sports a new user interface, making it a great time to get reacquainted with this rich resource. Here are five things you should do right now to take advantage of WorldCat:
#1 Sign up for a free account or transfer your existing account.
To use all the features at WorldCat that we will be discussing you’ll need to have a free user account.
To create your WorldCat account, click the Create an Account link and follow the prompts.
If you already have a WorldCat account you will need to transfer it. Click the Sign In link and follow the prompts for transferring. You can transfer your favorited libraries and lists. However, because of the new website, the following data will not be transferred: profile picture, reviews, saved searches, watched lists, interests, and tags.
Transferring can take quite a while. Leave your browser open until it completes. In fact, when I transferred it never showed complete, so after about an hour I refreshed the page and attempted to sign in again. I was prompted to create a new password, which I did, and was then able to access my account and my transferred data did appear.
Sign into your account whenever you visit the site so that you can take advantages of the many features offered, including our next item, Lists.
#2 Create and Search Lists
Lists are a great way to organize the wide range of resources you can find through WorldCat. I like to create lists for surname and subject research.
How to Create a WorldCat List:
After you run a search you will receive a list of results. Click the List (bookmark) icon on any item
Click the List icon
The add Item to List box will appear. In this box you can add the item to an existing list or click the Create List button to create a new list.
Name the list, enter a description and indicate whether it is public or private.
Click the Create button to save the list.
You can find all your lists by clicking on your account icon (upper right corner on desktop) and select My Lists
In addition to creating your own lists, you can search the public lists of other WorldCat users. Click Lists in the menu to browser popular lists. To search for a list by keyword, go to the search bar and select Lists from the drop-down menu, and search by keyword. When you find a helpful list, click the Follow button.
You can have up to 50 lists with up to 500 items.
#3 Discover Libraries
The best way to discover libraries near you is to add your location. Click the Update Location icon just under your account profile icon. Enter your town or zip code and libraries will be prioritized based on their proximity to you. If you’re going on a research trip, try changing the location to the zip code of the place you are traveling to, and then search for libraries and materials.
To browse libraries near you click Libraries in the menu. Add libraries to your list of favorite libraries by clicking the star icon on the library entry.
You can find your list of favorite libraries by going to the account icon and selecting Favorite Libraries.
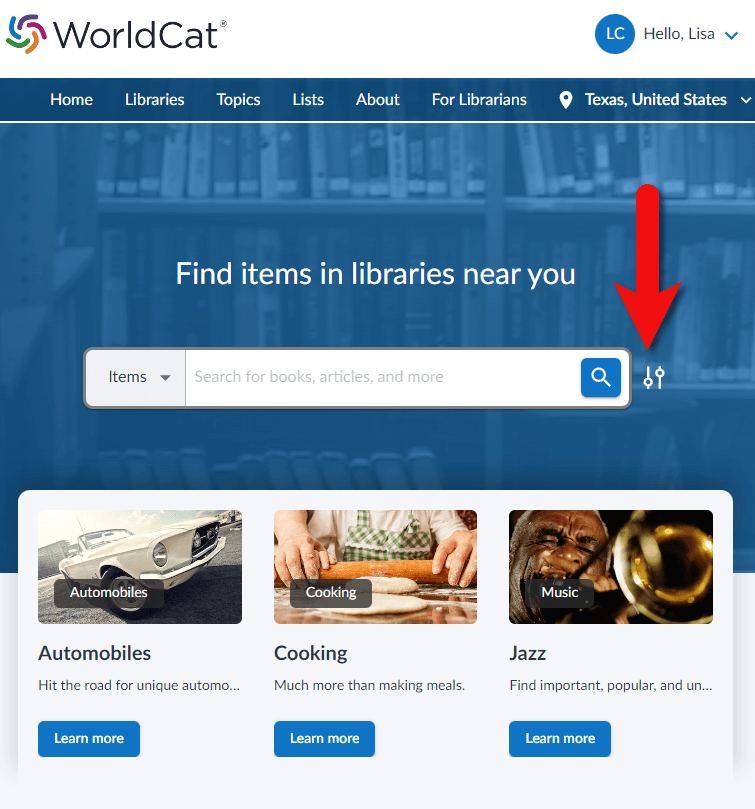
#4 Use the Advanced Search Feature
The best way to search for items is to use the Advanced Search feature from the beginning. Click the Advanced Search icon to the right of the search box. (See image below)
Click the Advanced Search icon next to the search box
Start your search by selecting the type of thing you want to search from the first drop-down menu. For example, select Keyword and then type a word (such as a surname) in the field next to it. To the right of the field, select what you want done with that keyword, AND, OR, or NOT. This will include, exclude or make the keyword options. Then go to the next line and do the same thing. You can set up to three parameters.
Next add a year range if desired. For example, 1900 to 1950. Then select the type of materials you want in the results by clicking Format. For example, you could leave it on All Formats to receive all types of materials or select just Newspapers.
You can also narrow your search by language. Once you’ve made all your selections, click the Search button.
On the results page you have the option to adjust the filters in the left-hand column.
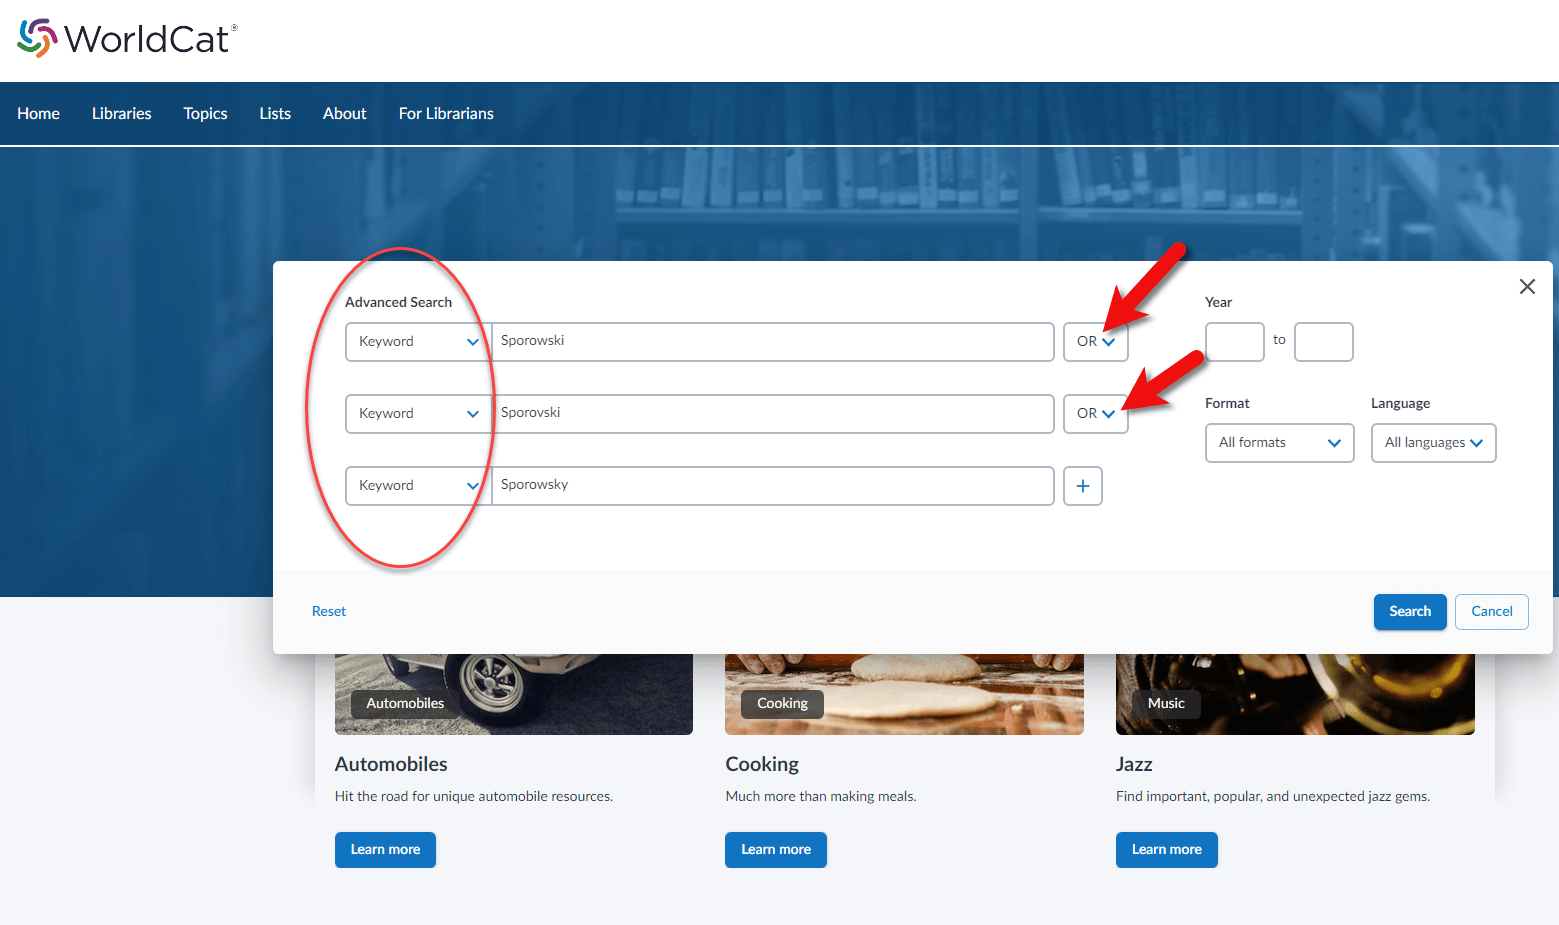
#5 Search Name Variations
As you search for family surnames, it’s important to understand that it will not automatically search for name variations. Either search for variations in separate searches or use the Advanced Search using the OR or the AND feature. (See example below)
How to search for name variations at WorldCat
More strategies for getting great search results at WorldCat
Search for family names by entering the family name followed by the word “family” (e.g., “Mansfield family”)
Search for specific people by entering the person’s full name (e.g., “Emily Mansfield”)
Search for organizations by entering terms to describe the organization (e.g., “Lutheran”)
Search for geographic locations by placing name in combination with the abbreviated and full state name (e.g., “Union City IN” and “Union City Indiana”)
You can then narrow your search by returning to the main search page and entering more specific search terms such as “Mansfield family bible”.
Include multiple search terms in one search (e.g., “Lutheran” and “Union City IN”)
Final Thoughts on the New WorldCat
Like with any change to a website, the new WorldCat takes a little getting used to, and there are a few bugs that still need to be worked out. However, by doing these 5 things you’ll have access to millions of rich resources that can help you climb your family tree.