In this blog and video series I’m showing you how you can create captivating videos about your family history quickly and easily with Animoto. In this final installment we will put the finishing touches on your video and produce it.
In Episode 1
…we laid a foundation for the family history video that you are going to create. Watch Episode 1 here.
You may notice when you previewed your video that the timing needs a little adjustment because its moving a little too fast or too slowly. You can fine tune the speed at which the images are shown and the length of the song by clicking the Gear icon in the upper right corner of the editor (just above the images). In the pop up window you can trim the song and slide the lever to change the pace. When you’re done, click Save and preview the video again to see the changes. Sometimes adding or subtracting images will also help perfect the pace.
Settings
Before you produce your video, be sure to click the Settings button and take a moment to review the title of your video, how your name appears as the producer, and add a date if you want. You can also add a description, which I highly recommend because it helps the people you share the video with understand what they are about to see.
Call to Action
Another really cool feature in the settings is the Call to Action button. A Call to Action invites your viewers to do something, such as:
visit your family website or blog
visit your family Facebook group (which is a really neat idea, especially when you’re organizing a family reunion)
complete a questionnaire about the family history
There are so many ways to engage your viewers! Animoto allows you to add a Call to Action button to your video at the end that you can link to any where you want to take them on the web.
To add your Call to Action, click to check box for Show Call-to-Action button. Then type in a name to label your button such as Visit our Family Reunion Facebook Page. In the field next to URL, type in or copy and paste the website address. For example: www.genealogygems.com. Click the Save button, and your call to action will appear on your video.
Producing Your Video
After making your edits and previewing your video one last time, you’re ready to produce it. Click the Produce button, which will take you to the Produce Video page. Here you have one more opportunity to edit the title, producer name, date, and description.
On the side bar you can select the resolution size of your video. Producing your video can take a few minutes and depends on the length of your video. The good news is that Animoto will conveniently send an email to notify you when it is ready.
Your final produced video will appear on its own page where you can view it again. You’ll see another link along the side for Video Settings. Click it and you will find additional settings that can now be customized. One important setting is Privacy Options, which lets you to designate whether or not you want to allow viewers to comment on your video or be able to share it on social media. When you’re done, click Save to go back to the video page.
Sharing your Family History Video
Your family history video is now ready for sharing, and there are loads of options available. You can share by:
Email
Facebook
Twitter
sharing a link to the video
uploading it to YouTube
You can also post it on your own website by copying the Embed code and pasting it into the source code of a webpage on your website. Click the More button and you’ll find many more social media options for sharing your video. I would also highly recommend that you download a copy of the video as well to your computer for permanent storage.
Continuing with Animoto
Once your free trial is over you will have to subscribe to Animoto if you wish to continue creating videos. There are many options to choose from so you can find the one that fits your needs.
If you only need to make one or a couple of videos at a time, you could do all your planning before making a purchase. Then you can purchase one month’s Personal use of Animoto. If you have several or ongoing projects, purchasing the 1 year subscription saves quite a bit compared to the monthly subscription. Plans include unlimited HD video creation and sharing. Click this link to go to Animoto and click Pricing at the top of the page for all your options.
Think of the Possibilities!
You could create videos for:
weddings
birthdays
holidays
graduation parties
family reunions
retirement parties
genealogy society events
your genealogy website or blog
tutorials and classroom teaching
your facebook page
…the possibilities are endless! Click here to start your free Animoto trial. And I’d LOVE to see your family history videos! Comment below and include a link to your video.
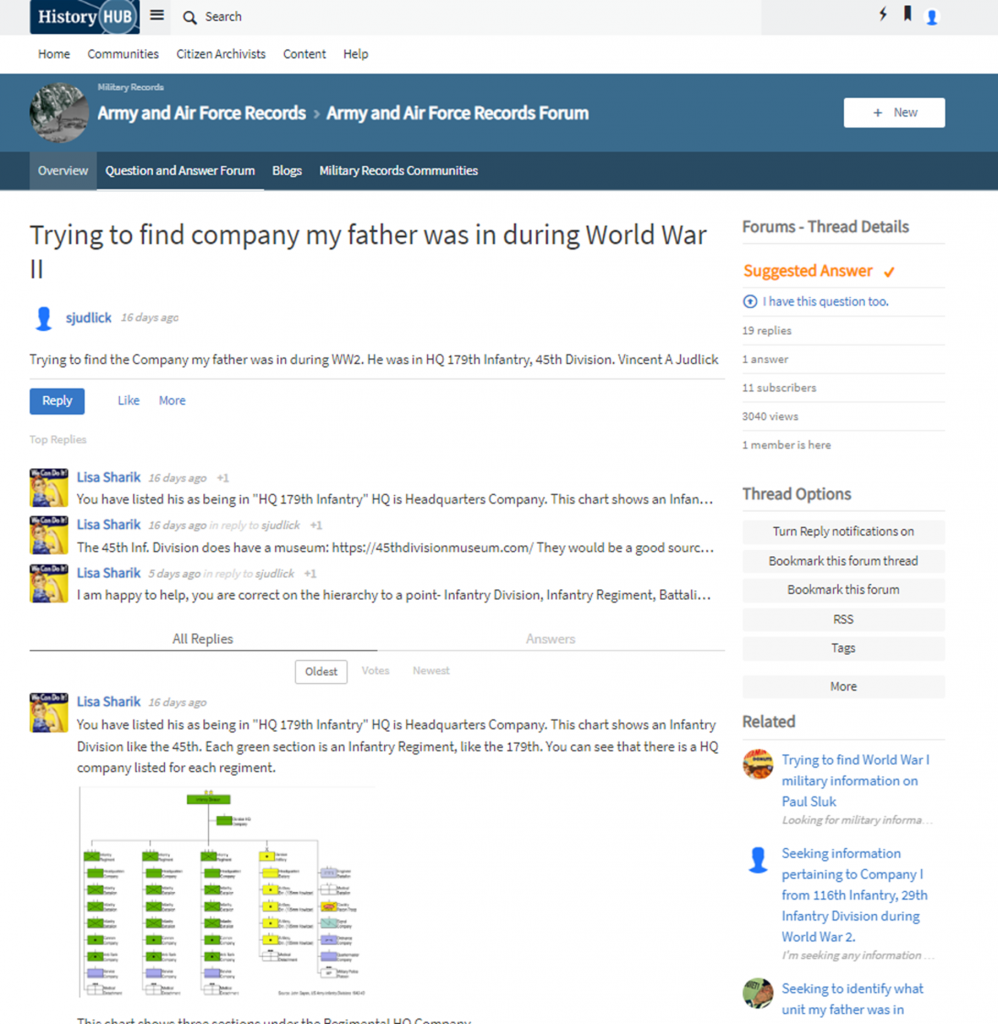
Show Notes: Are you trying to work on a genealogy brick wall, and you think the records you need might be at the National Archives? In this video, I’m going to show you a new way that you can get answers and hopefully get the records quickly.
The National Archives is a great place to do that, but as I’ve mentioned before in this video, their website can be a bit daunting. However, I’ve got some good news. They have updated the website, and tucked away in that update is a special area where you can ask questions and get answers from many different sources including the staff at the National Archives.
It’s called History Hub. This updated platform is a place where the staff will actually answer your questions. You’ll also get responses from other archivists, librarians, museum curators, genealogists, and history enthusiasts. We all have areas of expertise and a wide array of experience, and the new History Hub makes it easier to help each other.
Before you can ask a question or help answer a question, you’ll need to register for a free History Hub account. To do so, click the Create your History Hub account now link on the home page. Type in the account name you want, enter your email address and a password and click the box to agree to the terms of service.
If you are a returning History Hub user, you will need to reset your password and re-accept the community Terms of Use when you first log in.
Be aware that accounts that have not been used for over 1 year are automatically deactivated. So, you can email them at historyhub@nara.gov and they will reactivate your account.
Searching History Hub
Searching for answers at the History Hub is pretty simple and easy to do. You can enter your question in the “Ask” field on the History Hub homepage, or within a specific community. And we’ll talk about communities in just a second.
Let’s first ask a question. There’s a very good chance that someone else has already asked a very similar question to the one you have and there may already be a lot of contributions that will have the information you need.
Go to History.gov and type your question or some keywords into the Ask box. Don’t click the Ask button just yet. Give it a second to show you any potential answers that are already on History Hub. They will appear as a list below the Ask box.
Again, those answers will build up over time, so if when you ask your question you don’t see a similar answer, that’s OK. Go ahead and click the Ask button now and you’ll be taken to a page called Ask a Question in Researchers Help where you can write up your question. Include any relevant information you already know, such as names, dates, and places, and also mention specifically where you’ve already looked. That’s going to help them help you.
You can also add Tags to your question so that if someone searches for a tag, your request will also pop up. And be sure to check the box at the bottom so that you’ll be notified when someone replies to your post.
There are a couple of things to understand and keep in mind. First, all questions are public. So don’t post your phone number or other personal information about you or other living people.
Second, all questions are reviewed and moderated to make sure they comply with History Hub’s Terms and Conditions which again you can read when you sign up for your account. They only moderate and answer questions on weekdays during regular business hours, so patience is a virtue here.
In addition to the Ask a Question box, you’ll find a search bar at the top of the page. This search field searches the entire History Hub website. It’s very similar to the Ask a Question search bar in that once you enter your search terms, you’ll want to wait and let it populate possible answers that are already on the website. It will show you Forums, blogs and communities where your terms are being discussed.
You’ll also find a link to Advanced Search in the bottom right corner of that prepopulated list. This gives you a place to filter down in several creative ways which is very handy if you’re looking for information on a pretty broad topic or one that has had a lot of activity on History Hub.
History Hub search example
They even give you an RSS feed for your specific query. So, if you use an RSS reader to follow blogs and podcasts, you could add this link to it to sort of bookmark this search and keep up to date on the activity on this topic. If you don’t use a Feed Reader currently, but that sounds interesting to you, check out a feed reader like https://feedburner.google.com/ or just google Feed Reader.
Browsing History Hub
Even if you don’t have a specific question, History Hub is worth browsing. There are a couple of ways to do that.
Top Questions where you can look through the most popular questions and topics. This also includes threads from related forums. Use the filters underneath the title of this section to focus even more.
Activity Stream which features the most recent conversations.
Explore Communities. History Hub currently hosts 19 communities, including “Researchers Help,” Military Records, Genealogy, and more. To see them all, click on Communities at the top of any page on the History Hub website.
At History Hub you can not only ask questions, you can also answer them. Since all of us have expertise in our own areas of genealogy, History Hub encourages everyone to share their knowledge and experience with other users who are new to archival and genealogical research. So, you can help out a fellow genealogist by clicking Reply at the bottom of their post and sharing what you know about the topic.
Notifications, Updates, and Subscriptions
As I mentioned before, this site is building up content over time. So, you’re probably going to want to follow topics, and History Hub offers a couple of ways to do that.
Forum Updates & Notifications
If you’re interested in following a particular topic, such as Census Records, or Army and Air Force Records, you can get updates by email and on the platform for all new questions and answers in that specific forum. To do that, click on any community’s Question and Answer Forum tab, then click the Turn Forum notifications on link in the sidebar of that Forum’s homepage.
Subscribe to Community Updates
You can also receive daily or weekly email updates within a specific community, including new blog posts and questions. To do that on any Community Overview page, click “Email digest options” in the right column sidebar.
Getting Help with History Hub
History Hub Help Files: Getting Started. Again, this website is newly revamped, so they are still working out the bugs. You can report any problems or ask questions in theTechnical Help and Support Forum.
Show Notes: Discover more than 100,000 old family photos on Dead Fred. Founder Joe Bott explains how to find photos of your relatives on this free website.
Video Premiere and live chat
Watch the Video
Show Notes
Would you like to find more old family photos? One of the secrets is to search places where other distant relatives (and even people not related to you) are uploading old photos – hundreds of thousands of photos!
In this video, Dead Fred founder Joe Bott explains how to find photos of your relatives on his free website. Joe will also provide some of the back story on how he ended up devoting his life to helping families find their photos, and how in the world he decided on this most unusual name for his website!
From Joe: “I’m sitting down here in my little niche, scanning photos and putting them on my website so people can find them. That’s what I do for retirement now. I post photos, put them on the internet and wait for somebody to come knock on my door and say, “Hey, I know who that is! That’s my great, great whatever!” It’s happened already about 3000 times since I’ve started. Actually 3,157 times, just to be specific.”
What Does the DeadFred Website do?
“You take your photographs taken before 1965, and the people in the photographs have passed on. You can put them on there. It’s free to use. There are instructions on how to post your photos. Where it says Post Your Photos, click on that and just go ahead and do it.
When you post your first photo, you’ll receive a password in your email. You use that to manage your postings.
You can post as many photos as you’d like. Now, I might take a day or two to get it up on the website because I check every photo that comes in to make sure there’s nothing untoward. Because they do pop up every once in a while.”
After you post the photo, other DeadFred users will search the website, and that’s how old family photos can get reunited with descendants.
It’s also useful if you want to learn more about a photo. When you post your photo, include additional comments and questions. When you’re logged in you can post a sticky note.
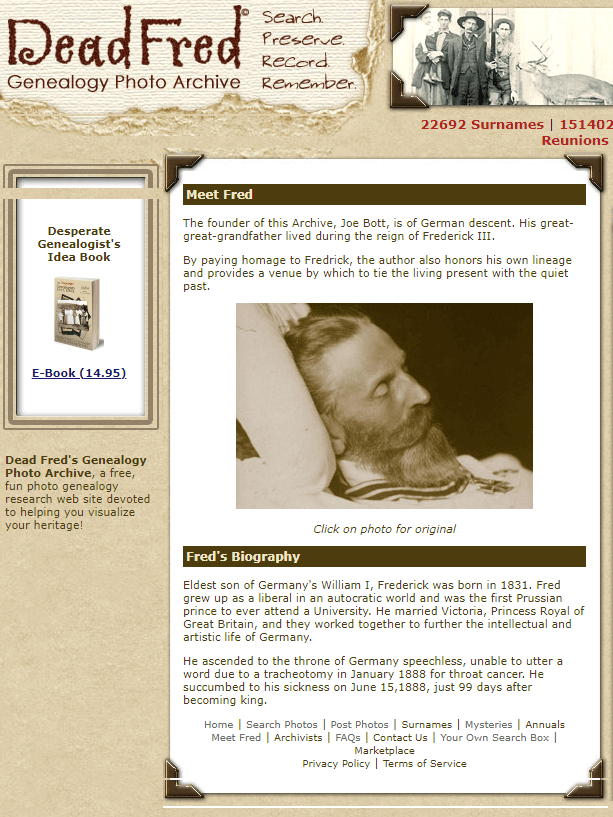
Why was the website named DeadFred?
“People often ask me why it is called DeadFred, and that gives me the opportunity to tell them that Dead Fred is a photo.”
The photo Joe is referring to is of Frederick the Great, who died in Germany. “The young man had cancer of the throat and died. My great great grandfather was living during that time in Germany, so that’s sort of the genealogy connection to it.”
The reason behind the name DeadFred
Joe and his family were sitting around a table trying to figure out what to call the website. He had purchased the photo of Frederick the Great on ebay and it came in the mail. “We opened it up and one of my sons, I have four boys, one of them said, ‘Well, we’ll just call it that, Fred.’ Everybody seems to like it. That’s the story.
“That photo of Fred is on my website…Just scroll down on the right-hand side and you’ll see him.”
Has Joe always been fascinated with old photos?
“Not always. In fact, I didn’t know I was fascinated with photographs until 1965 while I was in the Navy. I was in Newport Rhode Island, and I was walking down the street and it started to pour, I mean really pour, and I didn’t want to get my suit wet, my sailor outfit. So, I ran into this antique store. I hadn’t looked like I was going to buy something, but I found something. I found this photo album, and it just totally amazed me. And it most likely said, “buy me!” and I had to. I didn’t have a lot of money back then. I don’t have a lot of money now, but I didn’t have a lot of money back then either. And I bought it for $18. Now $18 in ’65 was a lot of money, especially for a sailor that has just joined the Navy. So, I bought it. And that was my first album. I have it sitting up here on my cabinet. But that’s how it started. I just said, wow, look at this. I couldn’t get my eyes off it!”
Reuniting Photos with Families: A Success Story from Joe
“When I was working. I was driving up to Iowa. And I stopped in store at the antique store. I found some photos in a box – a whole family – and I bought it. I worked out a deal. I learned how to do that over the years. I got a good deal on it. I went home and I scanned the photos. They were from Saskatchewan, Canada.
I got a phone call, or I actually got an email. I eventually got a phone call from a woman from South Saskatchewan who says “that’s my whole family. My grandparents, their aunts and uncles, the cousins, the whole shebang!” And apparently, now this is in the 1980s, late ‘80s, early ‘90s, and those pictures were taken 100 years before. The family left Saskatchewan and they moved to Iowa and farmed there until they all died out. There wasn’t anybody to take the photographs. So, there were the boxes, so I bought them, and I put them up on the website. Somebody from Saskatchewan said they knew who they were. And they sure did. Then I sent them home. That was an exciting moment for me right there.
Now there’s a lot of stories like that. There are stories where people cry when they find their photographs. There are cases when somebody is dying, and there’s a picture of a wife or a mother and their family wants to show them a picture before they die. So, there’s a lot of stories to be told. I could write a book about people that have found photographs. I sent out a couple every week now. Matter of fact, I just sent one of a baby, which was great. The baby has died now, got old and died at the age of 88, and I sent it out to his grandson. Yeah. My mind’s getting older, so I can’t remember as much as I would like to as far as names and places. But these kinds of things, they stick in your head.”
How to Post Photos on DeadFred
The first step in submitting a photo to DeadFred is to make sure it meets the guidelines. Currently, they accept photos that are earlier than 1965 and that, for privacy reasons, the people in the photo are deceased. Make sure to identify the photo in some way. This could mean including a country, date, state, etc.
Scan your photo in JPG format. Per the website, for best results, scan at 150 dpi resolution or higher and save at 72 dpi.
On the home page, under the Tools column on the right-side, click Post Photos in the menu. Under Step One, read the directions, check the box for the Terms of Service, and click the Choose File button to locate the photo file on your computer. Then click on the “Upload Image” button.
Your photo will receive a unique record number. Follow the prompts on the page, type in the identification information in the proper fields, and then submit.
You can expect your photos to appear on the DeadFred website typically within 3-5 days of being uploaded.
4 Ways to Search for Photos at Dead Fred
Every photograph on DeadFred website is unique, as is the information associated with the photo. That’s why there are 5 ways to search for them. Here’s how:
1 Surname Search
There are two options for searching Dead Fred for photos by surname. Option 1: Quick Search Field and Option 2: Linked first letter of the surname.
2 Detailed Search
On the home page, click the link for the Detailed Search. This will take you to a form that you can complete. The more information you can enter into the Detailed Search form, the better your chances of finding a match.
3 Search by Photographers
Of important note on the Detailed Search form is the Photographer field. Many old photos, particularly cabinet cards from the late 19th and early 20th centuries include the stamp of the photographer. Sometimes you’ll find a tremendous amount of detail about the photographer on the backside too. Use this information to conduct a photographer search.
Searching by a photographer is a great way to find other photos potentially related to your family’s history. Take a look at the photos you already have for the family you want to search for and make note of the photographers. Then, conduct a search by entering the surname of the photographer in the Photographer field. This will retrieve all photos listing that photographer’s name.
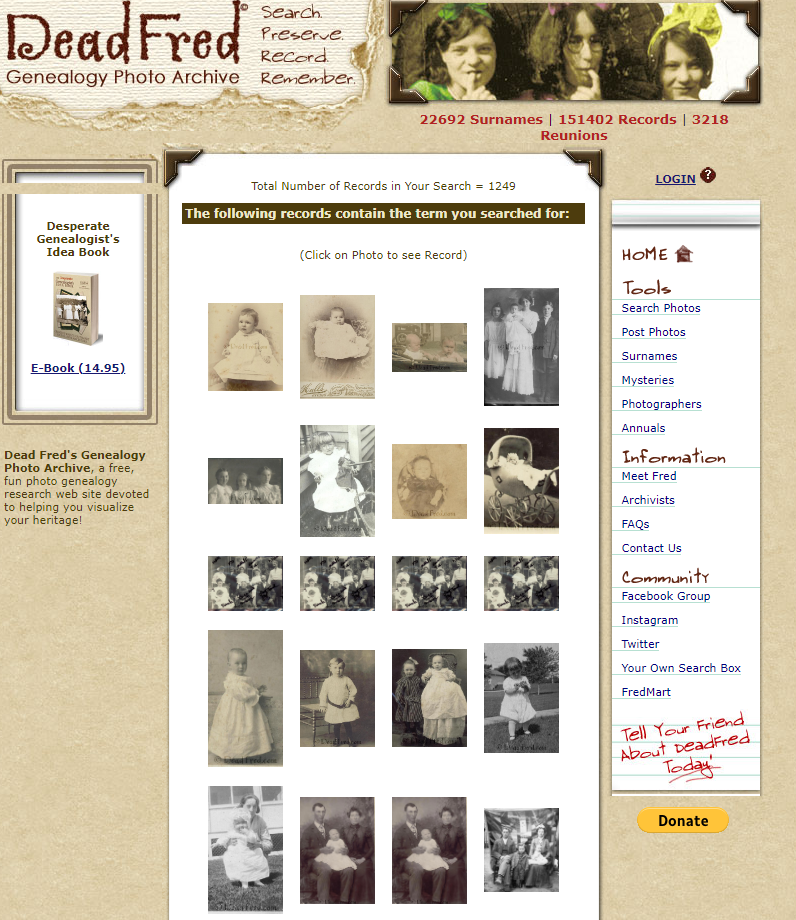
4 Keyword Search
Many DeadFred users include surnames that are related or associated with the photograph in the Comments field if they are not certain of the subject’s identity. You can take advantage of this in your search by using the Keyword search field on the home page of the website. For example, search on the word baby and you’ll get all the photos where that word is mentioned in the Comments.
Keyword Search results for baby
Accessing DeadFred Photos
When you click a photo on the search results page, it will take you to that photo hosted on the Dead Fred website. Notice that the page URL ends in .jpg indicating this is the image file itself. You can right-click on the image for usage options.
What Has Replaced Random Acts of Genealogical Kindness? It’s a question on many family historians minds, include Genealogy Gems Podcast listener Richard who wrote in with this question:
“Many years ago Bridgett Schneider hosted the Random Acts of Genealogical Kindness website (RAOGK). This was one of the best sites to get assistance from people willing to give back at a free or very nominal cost (reimbursement). I know someone has attempted to create the same type of page using Wikia (RAOGK wiki) and I have just started working with it, but there are not many volunteers for this site yet.
I was a volunteer for the original RAOGK and will attempt to do the same with the wiki page, but I was wondering if you could point me in the right direction for any other types of pages like this. I depend on others so much because my parents’ families are from all over the U.S. My father was career Navy, joining in Minnesota going to Colorado, where my parents met, then moving to Washington DC area, Florida and back to DC. My mom’s family are all from the Minnesota and Oregon areas, so traveling to find information is not always easy. Any pointers would be greatly appreciated.”
Here’s the scoop on RAOGK:
You’re right, no other website has really taken hold to replace RAOGK. And that’s because Facebook has filled the bill. Genealogists are joining in droves, and many create Facebook accounts strictly for their genealogy efforts. You certainly don’t have to have personal information posted in order to take advantage of the “genealogical crowd sourcing” ability of Facebook.
By “friending” other genealogists you start to build a group of ‘genealogy friends’ you can turn to with questions. But when it comes to specific areas, I go to the Facebook search box and search for Facebook groups on the topic I’m interested in.
For example, I am researching the Munns, Bax and Dixon families of Margate, Kent, England. A search or “Margate History” brought up a fantastic group devoted to the history of Margate. They have amassed an unbelievable amount of shared info, photos, postcards and documents. Not everyone is a genealogist, but everyone is interested in the history of Margate. It’s the first place I would go to post a question or request for help, and inevitably someone will have the answer or be in a location where they can help me.
Although the Margate group is “history” focused, you can also search adding the word Genealogy to your location search for a group.And if you don’t see a group that meets your needs, create one! From your Facebook account:
1. on the left side of the page under GROUPS click “Find New Groups”
2. Here you can join groups (Facebook will likely recommend some based on your profile interests)
3. In the upper right corner click the green + CREATE GROUP button
4. Give your group a name and select whether it is public or private
5. Start posting content to your group page
6. Start promoting the page on your profile page while also friending other genealogists and soon you will likely have a vibrant group that can assist each other based on a shared interest.
Bottom line: Facebook is the new RAOGK. And the upside is that Facebook expands the resources to folks who may be in a position to help through a shared interest while not necessarily being a genealogist.
I hope that helps. Let me know how it goes, and thanks for being a part of the Genealogy Gems community.
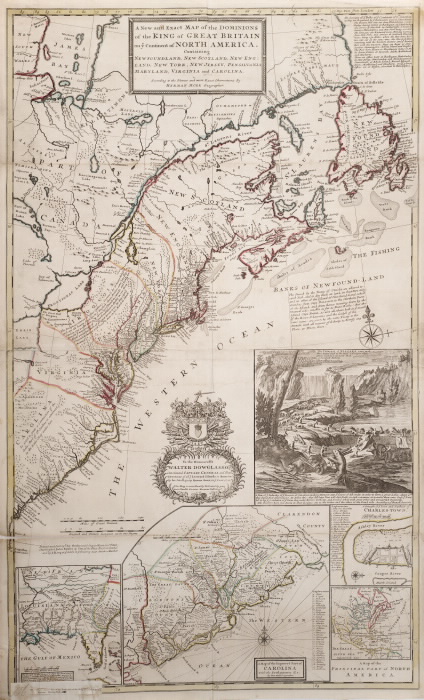
The Beaver Map, 1715. By Special Collections Toronto Public Library. Flickr, via Wikimedia Commons.
Recently I’ve seen two calls for volunteers to help “georeference” old maps. Basically, you’re tagging the maps in a way similar to tagging photos of people on social media sites. This makes finding old maps online easier and more accurate. It also allows sites to overlay the old and new maps. “Some places have changed significantly or disappeared completely, creating a puzzle that reveals an exciting contrast,” explains the British Library.
These two sites are asking for volunteers:
The British Library Online Gallery.The British Library is asking for volunteers to help georeference 50,000 maps it’s put online. Go right to the site and you’ll see the invitation to help on the home page. You’ll also see that you can click on a tab to search maps that are already georeferenced! The British Library tells its volunteers: “Your name will be credited, and your efforts will significantly improve public access to these collections. Contributors can see the results of their work, as well as the progress of the pilot and other participants, and the top contributor will be publicly announced.”
David Rumsey Historical Maps. This mega-maps site is also looking for volunteers to help add locations to its online map collections. On the home page, click on the left where it says Georeferencer: Help Add Location to Maps.
We blog about maps a lot here at Genealogy Gems. To learn more about using old maps online and for genealogy, go to our home page and search on the Maps category on the lower left side of the page. Additionally, Genealogy Gems Premium members have access to full-length video classes like these: