These show notes feature everything we cover in this episode. Premium Members: download this exclusive ad-free show notes cheat sheet PDF. Not a member yet? Learn more and join the Genealogy Gems and Elevenses with Lisa family here.

The places where your ancestors lived can tell you a lot about their lives. I’m going to show you a free and easy technique for plotting land in Google Earth.
episode 67
Would you like to be able to find your ancestor’s property on a map today? Keep reading and watch the video to learn how. We’re going to take U.S. government survey legal land descriptions found in sources such as Federal Land Patents and quickly and easily plot the boundaries in Google Earth Pro. I’ll also show you an easy way to do it for property in Canada too.
(PREMIUM MEMBERS: Get your ad-free PDF cheat sheet for this episode in the Resources section at the bottom of this page. Not a member yet? Click here to join the Genealogy Gems family and get all the benefits.)
In the video I show you how to plot the boundaries of a piece of land in Google Earth. We’re going to take U.S. government survey legal land descriptions found in sources such as Federal Land Patents and quickly and easily plot the boundaries in Google Earth Pro. I’ll also show you an easy way to do it for property in Canada too. These strategies come from my book The Genealogist’s Google Toolbox,
These days there are actually three versions of Google Earth:
All are free, but they are not the same. The app and web browser versions are sort of “Google Earth lite.” The software is what you want because it has all the bells and whistles that will allow you to do all the things I’m going to show you today.
Plotting legal land descriptions in Google Earth has its advantages. If you’re plotting the land of your ancestors, you’ll be able to see what the area looks like today and what the current street names are. In Google Earth you’ll also have access to additional tools that you can use in conjunction with the boundaries you’re going to create, such as historic maps, area photos, and a wide range of data sets that provide more information about the area.
The first thing to do is check to make sure you have the most current version of Google Earth on your computer. Again, we’re using the software so you need to do this on your desktop or laptop computer. You want to make sure you have Google Earth Pro – LINK – A tell tale sign that you don’t is if the Google Earth globe icon on your desktop is grey and not blue. Open it and in the menu go to Help > About Google Earth. Here it should say Google Earth Pro and you can see the version number.
Check the current version number here, and if you don’t already have the program, go ahead and download it.
Now that you have it on your computer, open it up and leave it running in the background. You’ll need a decent internet connection for it to run.
Next pull up the legal land description that you want to plot. Here’s one that I have for some property owned by George Burket. I found this at the Bureau of Land Management Government Land Office Records website. This free website is where you can search for land patent that your ancestors once held.
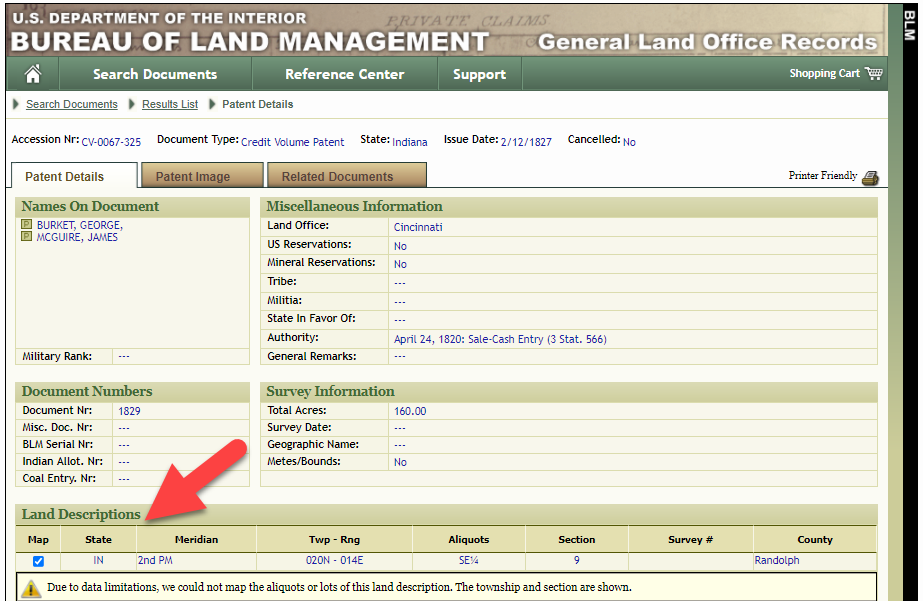
Legal land description at GLO
Even though the Bureau of Land Management places it on the map on their website, you can’t download this or add to it. The advantage of plotting this in Google Earth is that you will have access to much more geographic data, you can add many more details to the map, you can use it in conjunction with other related mapping work that you’re doing, and you can save and share it.
This description gives us the exact coordinates of the property. Jot down the land description or keep it open in your browser tab so you can refer to it.
In a new browser tab, we’re going to type in http://www.earthpoint.us. This will take us to the Earth Point website.
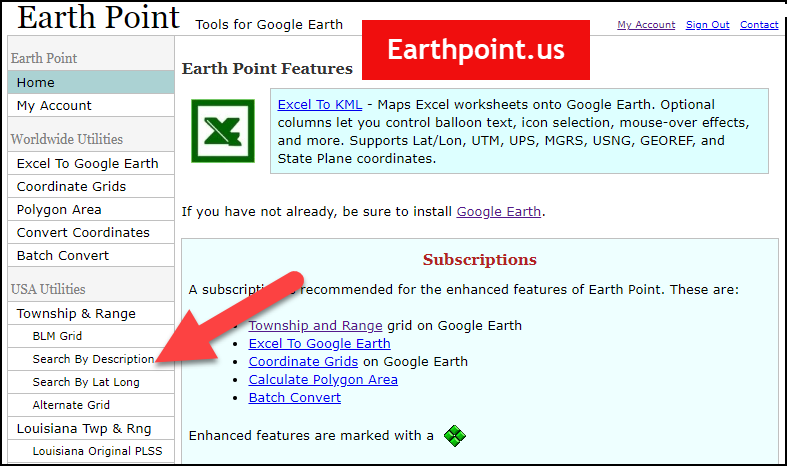
Search by legal land description at Earth Point
This website is free, although some of the features are available only with a paid subscription. Thankfully, the tool for plotting your ancestor’s land patent is free. Some of the free features do require that you sign up for a free account. The feature we are going to use currently does not.
On the Township and Range – Search by Description page you will see a field for each piece of information found in the land description. It’s important to enter this information in the order presented starting with the State. Select the state from the drop-down menu. Pause a moment to allow the fields to recalculate. This allows the appropriate data to be loaded into the next field based on your selection.
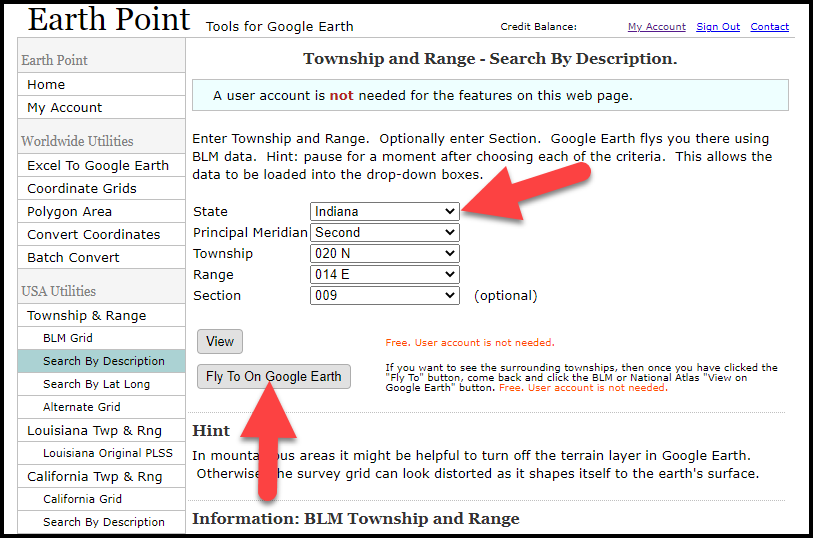
Entering data at Earth Point
After you have made each selection, click the Fly to on Google Earth button. This will generate a KML file which can be saved to your computer. KML stands for Keyhole Markup Language, which is the file type that Google Earth uses and understands. KMZ are zipped KML files which also are used by Google Earth.
Save the file to the desired location on your hard drive. Then click the file to open it. It will automatically open in Google Earth (which you already have open). The KML file is now located in your Temporary Places folder in the Places panel. The land is has now been automatically plotted on the map.
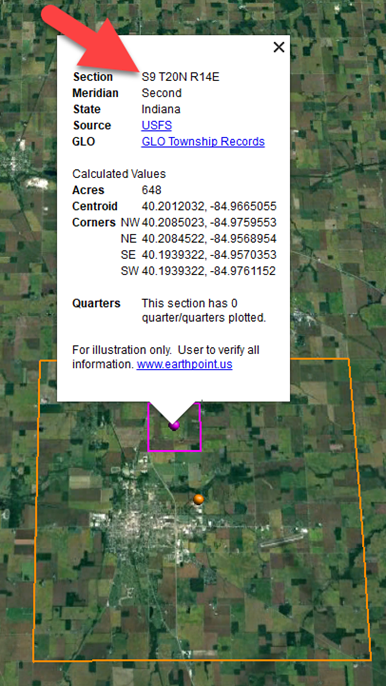
The orange outline is the township. In this example it is township T20N R14E. Click the orange ball in the center of the township for details. In the details you’ll find the total number of acres in the township, the latitude and longitude coordinates for the center of the township and corners.
Township in Google Earth
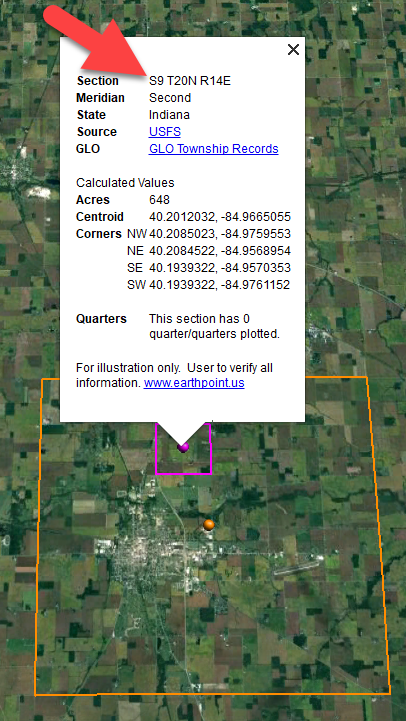
The pink / magenta outline is the Section where the property is. Click the pink center dot for the details:
Land section in Google Earth
In this example Section 9 consists of 648 acres.
Notice that Earth Point was able to plot the land down to the Section level. However George Burket did not own the entire section. We must return to the land description for the Aliquots.
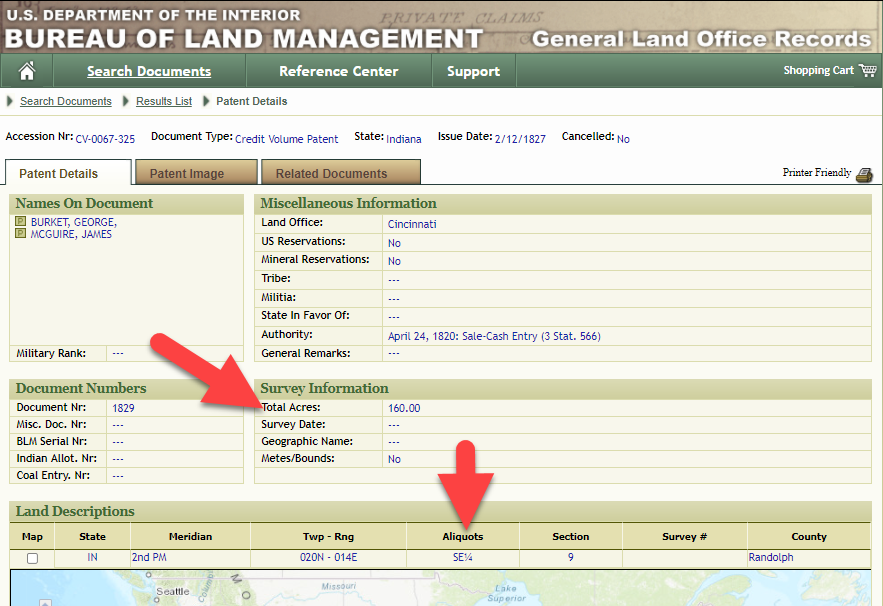
Aliquots in Legal Land Description
In this example, the land was the southeast quarter (SE1/4) of section 9. The land was a total of 160 acres.
We can use the Polygon tool in Google Earth to plot the 160 acres. In the toolbar, click the Polygon tool. This will open the New Polygon dialog box. Type a title, description and source citation.
As you hover your mouse over the map you will notice that the cursor is now a square shape. Click the screen on each of the four corners one at a time in order to set the four corners of the property – in this case the southeast quarter of the section. Once you have drawn the shape you can click on the handle on any corner to adjust precisely.
Click the Style / Color tab in the New Polygon dialog box to adjust the color and opacity of the acreage polygon. You can add color and thickness to the outline, and color and opacity to the fill of the shape. When you have it set the way you want it, click OK to close the New Polygon box. The Polygon is now set.
On the left side of the Google Earth screen you will see a series of panels: Search, Places and Layers. At the bottom of the Places panel is the Temporary folder. This is where the KML file was placed when it was opened. However, like its name implies, this is a temporary location. If you want to keep it, you’ll need to move it to a filed location within the Places panel. This will not change the position of the polygon on the map, only where it is filed and saved in the Places panel.
To file a polygon, click on the file in the Places panel, drag it to the desired location, and drop it. Next, go the main menu and click File > Save My Places. This will save your work so that when you close the program it will not be lost. Google Earth doesn’t auto-save.
The polygon plotting the acreage will be visible on the map when the box is checked in the Places panel. If you uncheck the box for the polygon it will still be there, but it will not be visible on the map. This allows you to create and save many items of interest without always having to have them displayed and cluttering up the map in Google Earth.
After your land polygon has been set, you may want to rename it. There are two ways to do this:
You can also restyle the polygon and edit the text. Start by going to the Places panel and click the arrow pointing at the Polygon’s globe icon. This will open it and show the nested content. Click to select the Polygon. Now you can right-click it (PC) and select Properties – OR – go to the menu under Edit > Properties. Either way it will reopen the Polygon dialog box so that you can make the desired changes. When you’re done, click the OK button to close the Polygon.
Snagit is the tool I used to capture the various views of the land I plotted in Google Earth. Learn more about Snag it by watching my videos and reading the show notes for episode 61 (for beginners) and episode 66 (advanced).
Although the Earth Point website doesn’t plot Canadian land, the Legal Land Description Converter website does. It can help you find land in Western Canada (British Columbia, Alberta, Saskatchewan & Manitoba) subdivided by the Dominion Land Survey (DLS) and the Alberta Township System (ATS).
These show notes feature everything we cover in this episode. Premium Members: download this exclusive ad-free show notes cheat sheet PDF. Not a member yet? Learn more and join the Genealogy Gems and Elevenses with Lisa family here.
Gwynn: I would like to know how to match plat with GPS coordinate/ current street address.
Answer: I cover how to overlay a plat map in Google Earth and discover the current street address in my book The Genealogist’s Google Toolbox.
Roger D: How exact do you need to be in picking points? Does Google snap to mid-points of lines?
Answer: Try to be as exact as you can, however as I showed in the video you can reposition them as needed. Google Earth doesn’t snap.
Lyn: Can I do this with English tithe maps?
Answer: There isn’t a website converter that I know of. However I do cover how to overlay digitized maps in Google Earth in my book The Genealogist’s Google Toolbox.
The manufacturer price is going up August 31, 2021. Now’s the perfect time to get your official Elevenses with Lisa mug.
You can also find them through the menu: Premium > Premium Videos > Elevenses with Lisa.

 From Diahan Southard, Your DNA Guide here at Genealogy Gems: DNA testing is one of the most personal ways to get involved in your family history. You have DNA from your parents, who have DNA from their parents, and so it goes, back into your greats and great-greats. The technology of genetic genealogy is all about tapping into that DNA record and pulling out information that might be useful in your family history. DNA can do this for you in two ways:
You have three choices of DNA tests, each with its own unique purpose.
YDNA – Essentially, if you want to know about a male ancestor, you need to find a direct male descendant to be tested. So if I want to know about my 3X great grandfather Morris Mitchell, I need to find Morris’s son’s son’s son, etc. until I find a living male with the Mitchell surname who can be tested on the Y chromosome DNA (mtDNA) test at Family Tree DNA.
mtDNA – If I want to know about a female ancestor, let’s say Mary West, I need to find Mary’s daughter’s daughter’s daughter’s etc. child (male or female) to take the mitochondrial DNA (mtDNA) from Family Tree DNA.
Autosomal DNA – For any ancestor, male or female, who is fewer than 5 generations from you, you can take the autosomal DNA test at either Family Tree DNA, AncestryDNA, 23andMe, or MyHeritage to find out more about that individual. Remember with the autosomal DNA that you always want to test the oldest generation first. So anyone who does not have both of their parents living should take the autosomal DNA test.
There are several companies that test DNA for family history including:
Each of these companies is offering a very similar kind of test, but each has their own unique tools and databases. Decide which company you want to test with by evaluating things like:
You can see a table comparing these companies here. The MyHeritage test is new, and is not on the chart yet, but will be soon.
The best thing you can do when setting out on your genetic genealogy journey is set good expectations. You can expect that the test will document the personal genetics of the person who takes it. By so doing, you are creating another genealogy record that will last for generations. This test will link you to your ancestors via your cousins. That means that you may take the test looking for ancestors, but what you get are cousins. It will take traditional genealogy work to turn those cousin connections into ancestral connections. Above all, expect that this is a growing industry, and what we know today is different than what we will know tomorrow, so enjoy the journey!
There are several comprehensive books on Genetic Genealogy out there. However, for the layman who just wants to understand their DNA test results and get some additional value from them, an entire book full of scientific explanations can be overwhelming and daunting. The following email is one we receive regularly:
Could you direct me to an understandable publication which explains DNA results in layman’ terms?
Thank you
Anne B.
 From Lisa Louise Cooke, host of The Genealogy Gems Podcast: I put myself in the category of “layman” when it comes to understanding DNA test results. And that’s why when I met DNA expert Diahan Southard at a genealogy conference, I immediately invited her to join Genealogy Gems. Diahan’s enthusiasm is contagious, and her ability to explain genetic genealogy to the layman is second to none!
Here’s a link to our DNA videos on YouTube with the author of the guides, Diahan Southard. As you will see, she has a ton of enthusiasm for helping the layman understand and get the most out of their DNA!
The beauty of the DNA quick reference guide series is that you can mix and match the guides to perfectly suit the testing you have done. We’ve published Diahan’s guides that delve into the testing companies FamilyTreeDNA and 23andMe, as well as the other tests available such as Mitochondrial (for your maternal line – both men and women can take this test) and YDNA (for your paternal line – only men take this test.)
If you’ve already tested and feel like you have a good foundation, then I highly recommend Diahan’s Advanced DNA Bundle. It will take your DNA test results to the next level by instructing you on the heart of what matters in plain English.
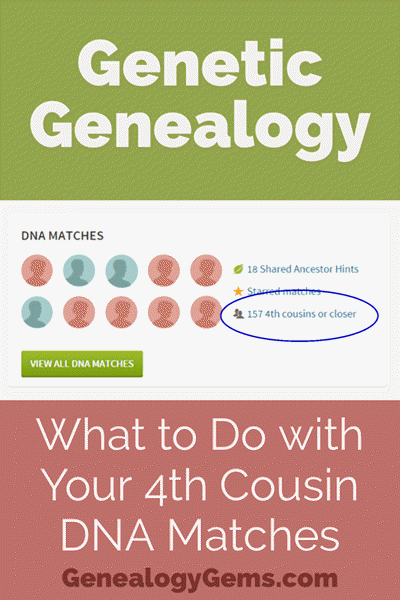
(Update 2020) When genealogists take an ancestry DNA test, they are looking for more than just their ethnicity results. They are also very interested in receiving information on other people who have tested who closely genetically match them. They want to know who the closest matches are, and if those matches have family tree information that they can share.
However, with all the people testing these days, (some being genealogists and some not) the volume of matches can become overwhelming very quickly.
Are you one of those people who have way too many genetic “4th cousins or closer” among your DNA matches? Have you ever wondered “What do I do with all these matches?!” If so, keep reading. We’re going to explore some of your options, and most importantly, how to determine how genetically close your cousins really are.
Math can provide us with a degree of certainty in genetic genealogy. Each of us has two biological parents. We have four biological grandparents, and eight great-grandparents.

However, the farther back we go the less we can rely on math.
For example, on paper you should have sixty-four 3rd great grandparents. However, many of us find that the same person occupies more than one slot on our pedigree chart. While this significantly decreases the workload for traditional genealogy, it adversely impacts your genetic genealogy. Especially when it comes to that long long list of 4th cousins you have in your match list at any of the three major DNA testing companies.
Depending on how intermarried your lines are, you may be seeing individuals on your match list that genetically look like your fourth cousins, but they are genealogically your sixth cousins – EIGHT TIMES! So how can you tell the difference?
There are two parts to that answer: one you can control, and the other you can’t.
While your fourth cousins and your eight-time-sixth cousins may look similar genetically, there are often small clues in the genetics that can help you tell the difference. This distinction can sometimes be detected by a testing company who, through research and validation, has been able to fine-tune their algorithms to detect these subtle differences.

Your Genetic 4th Cousins
You can participate in this double checking process by using some of the genetic tools that are available to you at Family Tree DNA, or at Gedmatch.com. But since you may not be an aspiring geneticist, let’s focus on the genealogical work you can do to determine if a match is truly a fourth cousin.
A fourth cousin designation just means that you and your match are separated by between six and twelve degrees (people). So that might be five back on your chart to your common ancestor, and five down to your match, which would make you true fourth cousins. It could also be some other permutation of that.
For our example, let’s assume true fourth cousins. That means that the two of you share one of thirty-two 3rd great grandparents (16 couples). In order to find out which set, you have two genealogical identifiers: surname and location.
Therefore, the first thing you should do is make a list of the surnames and locations of those thirty-two 3X great grandparents.
Now, most of us do not know all 16 of those couples, so you are going to have some holes. Feel free to fill in those holes with surnames on subsequent generations that will carry through to this fifth generation.
A great tool to plot your own list of ancestors geographically is the free downloadable Google Earth software.
Check to see if you have the latest version of Google Earth downloaded to your desktop or laptop computer. On your desktop, look for a grey and white globe. If you see a blue and white globe, you have the older original free version of Google Earth. However, a few years ago, Google made their Google Earth Pro version free to everyone, and it is now the standard.
If you do have Google Earth Pro (the grey globe software) then you’re ready to go.

The grey Google Earth globe on the desktop.
If you don’t have it, then you will need to download it.
How to Download the Free Google Earth Software:
Now that you have Google Earth, you can begin by creating a folder in the Places panel in Google Earth devoted to your 16 couples. Here’s how:
1. In the Places panel, right-click on MyPlaces and select Add > Folder:
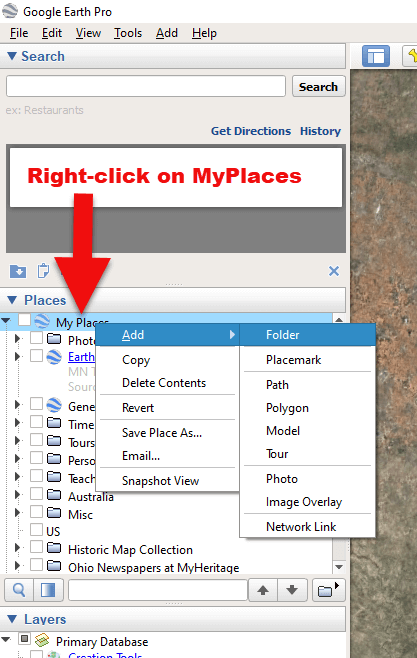
Right-click on MyPlaces > Add > Folder
2. Name the folder and then click OK:
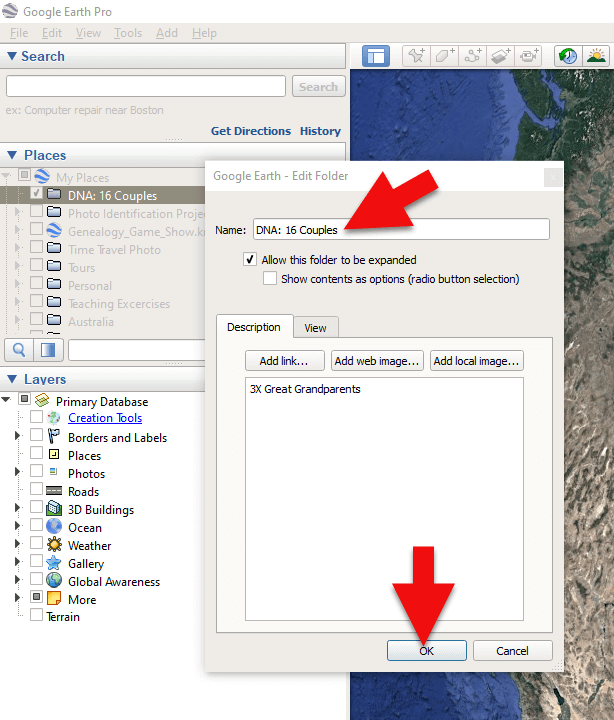
Creating a folder in Google Earth
3. Now you will see your new DNA folder for your 16 couples in the Places panel. If you don’t see it, look toward the bottom of the list. You can move the folder to any location within the list by dragging and dropping it.

Create a folder in Google Earth for DNA 16 couples
Once you have your DNA folder created fro your 16 couples, you can then easily plot your surnames and locations.
1. Click your new DNA folder to select it. This will ensure that the placemark you are about to create will be stored in that folder.
2. In the search box (upper left corner of the Google Earth software) type in the first location and click Search. Google Earth will fly to that location on the map.
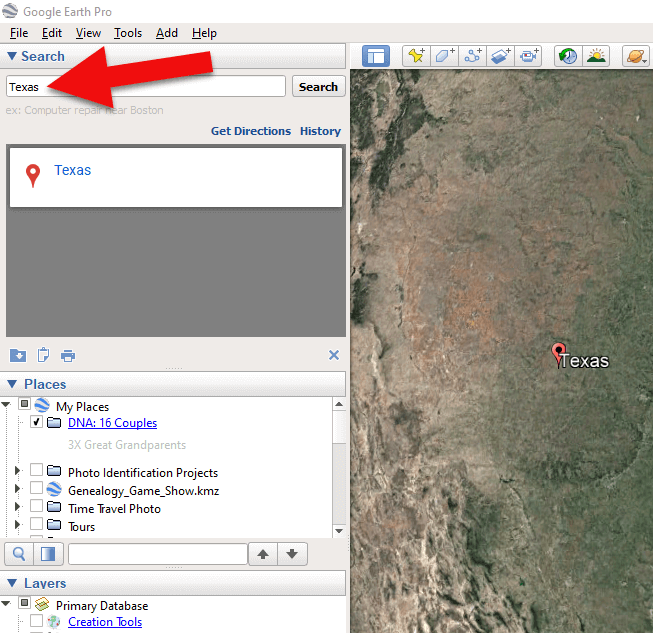
Type the locaton in the Search box and click Search.
3. In the toolbar along the top of the screen, click the placemark button to place a pushpin in that location:
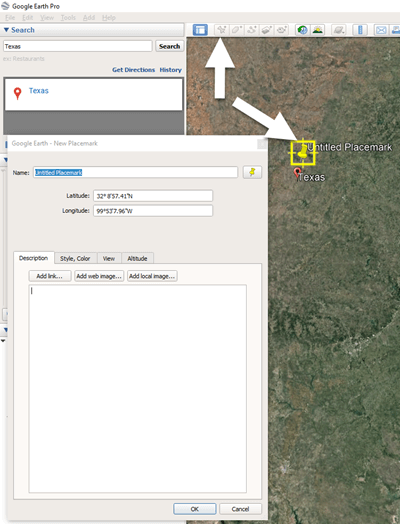
Click the Placemark button in the Google Earth toolbar.
4. In the Placemark dialogue box, enter a title for hte pushpin placemark. Click the OK button to close the box and set your placemark.
5. Repeat the process for all the locations.
Then evaluate the fifth generation of your fourth cousin matches for genealogical information that lines up with any of the items on your list.
You can also plot the surnames and locations of your matches in Google Earth. This is where Google Earth really comes in handy. The free software makes it very easy to see when your ancestral home may be bordering the locations of your matches. Those with whom you find a similarity become your best matches, and your best chance of determining your connection. Those without an obvious connection cycle to the bottom of your pile for a genetic evaluation. You can perform these same kinds of searches for your second and third cousins as well.
As you begin to become more familiar with the fifth generations of your matches, you may also start to see patterns of surnames or locations emerge among your matches. These then become the surnames and locations that might be able to fill the missing spaces in your pedigree chart.
If you are new to using Google Earth, I have several suggested resources for you by Lisa Louise Cooke:

Learn more in Premium episode 131.
Here’s a video of the authors discussing three common DNA misconceptions:
Authors: Diahan Southard and Lisa Louise Cooke