Photo + Story Competition: RootsTech 2018 Contest
A new Photo + Story competition will be part of RootsTech 2018! If you can take a story-filled picture and caption it meaningfully, you should enter. Check out these tips for creating winning family history photo and story combinations. Winners will receive prizes from Canon and Dell–so start putting together your best photos and stories.

RootsTech 2018 Photo + Story Competition
“A good photo tells a good story. And behind every good photo and story is a photographer who recognized the moment the two had come together and snapped the shutter.” So says the press release announcing RootsTech 2018‘s Photo + Story Competition. Here’s how to enter:
“Participate by finding or capturing a photo and story, past or present, of you or a family member. Unlike standalone photo or story competitions, we want you to use the power of both photo and story to share, persuade, inform, inspire, connect, and belong.” In fact, some of those verbs are the four categories in the competition:
- Connect
- Belong
- Family
- Heritage
Winners will awarded prizes from Canon and Dell, which will certainly help your future family history storytelling! Selected entries will appear in an exhibit at RootsTech 2018.
 This contest complements the appearance of RootsTech 2018 keynote speaker Humans of New York photographer Brandon Stanton. His personal glimpses into the lives of ordinary people in New York has set a standard for quality photo stories.
Details You’ll Want to Know
Here are several must-know details if you’d like to enter the contest–or encourage someone you know to enter:
- Entrants can submit one photo and story in each of the categories.
- Entrants must be at least 18 to apply.
- No professional qualification, licenses, certificates, or certification is required.
- If you didn’t take the picture, you must have permission or rights to use the photo (if it was taken after 1923). Agreeing to compete places full liability on the participant.
- Go to RootsTech.org for contest entry details.
- The deadline for entries is December 31, 2017.
- Selected entries will be notified by January 15, 2018, with more information on their intent to exhibit.
Family History Storytelling Tips for You
At Genealogy Gems, we’re all about helping you to discover, preserve and share your family history. If you’re thinking of entering this contest, consider how the following tips, adapted from a Genealogy Gems article on family history storytelling, can help your Photo + Story competition entry:

- Create vivid “characters.” Photos can capturing someone’s expressions, body language, mood, unique clothing or a moment of intense personal drama. They can also create compelling portraits of the heirlooms or objects that store family memories. Your stories can do the same. Choose unique, meaningful details–both in words and pictures.
- Paint the backdrop. What’s going on in the background of your picture? The “setting” and any background action should help tell the story, not distract from it. In your story, add essential details that the image can’t communicate. Is the exact date or place important? What else?
- Tell why this story matters. Call it what you will: a meaning, a moral, a message–the best stories and photos say something about life. Something more than skin deep. Think about why the picture and story matter to you. Share it clearly, concisely, with humor or feeling or whatever tone best works for you and the message.
Genealogy Gems will be at RootsTech 2018 to help you discover and share your family stories! Click here to learn more.
![]()
FAQ – Premium eLearning
Genealogy Gems Premium eLearning Membership – FAQ If you want inspiring and entertaining genealogy education on-demand, Premium eLearning is for you! World-renowned speaker Lisa Louise Cooke has built this program to be accessible for all ages, all skill levels,...Switch to Inbox by Gmail App or Improve Your Existing Gmail: It’s Your Choice

Inbox by Gmail app has some great features and if you’re willing to go all-in and are up for a big change, go for it. If not, here are some ideas for improving your regular Gmail experience.
About a year ago, Google announced the new Inbox by Gmail app. I didn’t cover it then because they had bugs to work out. But, I’ve been keeping an eye on it. It’s a bit overwhelming, however, if you are up for the change here’s a quick video summary of what it does.
As a recap, the Inbox by Gmail app can:
- Bundle similar messages for you, like offers and promos;
- Recognize emails about travel reservations and bundle those together; and lastly,
- It allows you to browse photos in emails without opening the message.
You can also do a lot of housekeeping and organizing tasks yourself. For example, you can:
- Pin messages that you want to come back to, then click on a thumbtack icon to show all pinned messages;
- Snooze an email message by marking it to pop back up to the top of your list at the time and date you indicate;
- Create easy reminder messages for things you need to do; and
- Keyword-search your emails just like you do in Google. Sometimes, the search function is even smart enough to answer questions for you. Like when I type in “flight Indianapolis” for my upcoming trip to the Midwestern Roots conference in July, I get an email with my flight reservation in my search results. At the top, I will also see a nice summary of my flight information that Google extracted from that email and puts right in front of me.
These are pretty slick features, but they come with a price: Inbox by Gmail is a dramatic change from Gmail which some might find a difficult transition.
Improve Your Regular Gmail Experience without Using the Inbox by Gmail App
If you’re not quite ready to switch to Inbox by Gmail, there are ways to enhance and improve your experience using regular Gmail. I don’t know about you, but I don’t use the “Chat” feature on Gmail very often. However, that little chat box pops up right below the labels, and that means that when you select a label lower down on the list, it’s easy to accidentally open the chat box. Frustrating indeed!
Make your life just a little bit easier by changing the location of your chat box. Go to Settings, then click on Labs. Click to Enable the Right-side chat feature. Chat moves out of the way over to the right and the problem is solved.
For those of you who don’t use the Chat feature at all, you can completely turn it off. Simply go to Settings, Click the Labs tab, click to select Chat Off, and then click Save Changes. Ah, this gives you a cleaner, less cluttered, Gmail to work with. Nice!
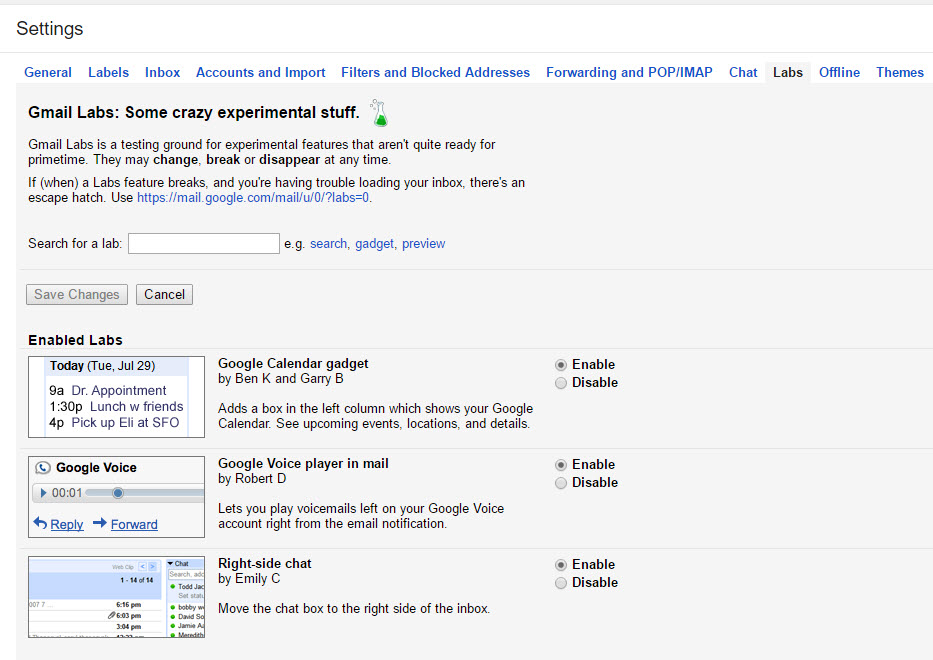
An important thing to remember about changing any of your Gmail settings is that you must click the Save button on the page to apply the changes.
Switch to the new Inbox by Gmail app or just improve your existing email with this little tip, the choice is yours. Thanks for sharing this tip with your friends…it’s nice to share, isn’t it?
More Genealogy Gems on Apps for Genealogy
4 Great Local History Apps for Genealogists
Best Genealogy Apps Under the Big Top
The Genealogy Gems Premium Podcast 134: Tips and Apps for Oral History Interviews on Your Mobile Device (The Premium subscription required)
Backblaze Security Gets Even Better for Computer Backup
We already trust Backblaze as the official cloud-based computer backup service for Genealogy Gems. Now they’ve added another optional layer of security: even better!
Recently Backblaze, our computer backup service and a sponsor of the Genealogy Gems podcast, let us know that we can now activate an extra layer of security to better protect the data we have stored with them.
The feature is called two-factor verification. It requires that we present both our account credentials and a verification code from a second device to gain access to our Backblaze account. That means someone who was trying to steal our data would have to have both our account information and access to the phone that’s tied to the account. Pretty unlikely!
“This feature is available immediately to all Backblaze users and does not require an update to be used,” they told us. It’s also not automatic–you can activate it if you choose.”
We’ve heard from so many Gems listeners and readers who have purchased Backblaze that we wanted to share with you how to enable this optional feature.
How to Activate Backblaze Computer Backup Service’s Two-factor Verification Security
1. Log in to your existing Backblaze account.
2. Open the “My Settings” page as shown here.

Step 4
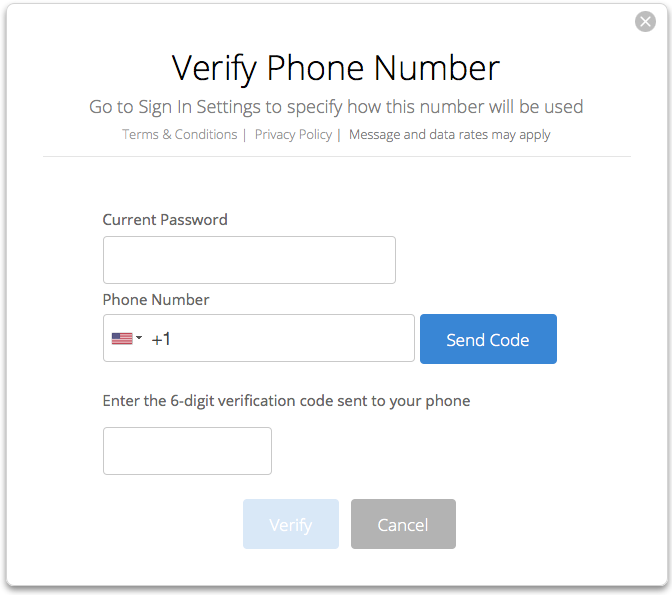
3. Click on the “Sign in Settings” link on the right hand side. If you already have a phone number set up for your account, go to Step 4. If you do not have a phone number set up for your account you will see this screen:
In the “Verify Phone Number” window, you’ll enter your phone number and then verify it is correct by having Backblaze send a verification code to the phone. That verification code is entered in this window. You can not turn on two-factor verification without successfully completing this step.
4. Once you have a phone number set up for your account, you’ll see a screen like this when you click on the “Sign in Settings” link.
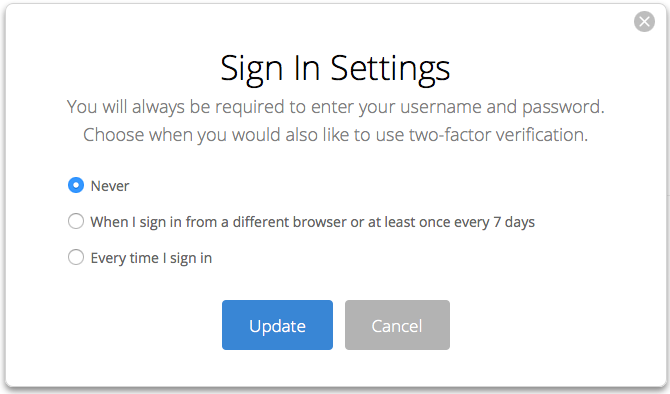
Step 5
5. Choose the two-factor verification setting you desire and select “Update” to change the setting.
6. The set-up/change of your two-factor verification setting is now complete.
What it will be like to use Backblaze two-factor vertification
Let’s say you have selected the “Every time I sign in” option for your two-factor verification setting. Here’s what happens when you sign in to Backblaze:
1. Click the sign-in button and enter your Backblaze account credentials.
2. A unique text message is sent to the phone number on your account, as shown here:
3. At the same time, a “Two-Factor Verification” screen is presented.
4. Enter the code from the text message you received into the “Two-Factor Verification” screen, then press “Enter Code.” You have 10 minutes to enter the code. If you do this correctly you will be logged in to your Backblaze account.
Why not use it?
 This is an optional feature on Backblaze. Why would you choose not to activate it?
“It is important to weigh the added security of two-factor verification against the possibility that you will not have the second device with you when you require access to your Backblaze account,” says an email from the company. Some users may not consider what they’ve got stored with Backblaze to be the kind of data that needs extra layers of protection. Others may not want the hassle of an additional layer of security.
But think carefully–Backblaze backs up ALL the files you tell it to. You may have personal and financial data in at least some documents: bank account or credit card numbers, digitized birth certificates or Social Security cards.
Consider what works best for you! Our best recommendation is to HAVE a computer back-up service in place. We chose Backblaze because of its reputation, the quality and security of its service and its very reasonable price. Click here to learn more about Backblaze and why we selected them as a sponsor of our free Genealogy Gems Podcast.
Resources
What’s Your Computer Backup Plan? Better Than Mine Was, I Hope!
Dropbox v. Backblaze: Does Cloud Storage for Genealogy Replace Computer Backup?
How Cloud Backup Helped One Genealogy Gem Get Closer to Living a Paper-free Life