by Diahan Southard | Aug 5, 2014 | 01 What's New, Beginner, Blogs, Family History Podcast, Social Media
Family History: Genealogy Made Easy Podcast
with Lisa Louise Cooke
Republished July 15, 2014

Listen to the free in podcast in your favorite podcast app.
https://lisalouisecooke.com/familyhistorypodcast/audio/fh40.mp3
Download the Show Notes for this Episode
Welcome to this step-by-step series for beginning genealogists—and more experienced ones who want to brush up or learn something new. I first ran this series in 2008-09. So many people have asked about it, I’m bringing it back in weekly segments.
Episode 40: How to Start a Genealogy Blog, Part III: Step by Step
In the last two episodes you’ve been hearing from experienced genealogy bloggers about family history blogging. I hope it piqued your interest and got you thinking about the possibility of doing it yourself. As we’ve discussed, it’s a great way to share your experiences with other researchers and potentially connect with long lost relatives.
Well in today’s episode I’m going to walk you through setting up your own family history blog step-by-step. By the end of this episode you could have your own family history blog up and running and sharing your enthusiasm about genealogy with the world. How does that sound? Are you willing to give it a try? And even if you’re not looking to start blogging today, listen in and plant the seeds for the future.
From the Mailbox:
A long-time listener wrote in this last week about the recent blogging episodes:
“The Transcript software mentioned by Denise Levenick looks great – I downloaded and installed it this morning. I am giving a brief software demonstration at the Greater Portland Chapter of the Maine Genealogical Society’s 30th Anniversary Celebration tomorrow and I am going to let people know about this product.
Episode 38 and Episode 39 have really got me thinking about starting my own blog. It won’t be easy with my 50 hours plus a week civil engineering job, but your podcasts have motivated me. Thank you!” -Will Haskell, Listener to All Your Podcasts
Transcript software is really cool: download the most recent version for free here. And that’s just one example of the kind of great tech tips that Denise Levenick blogs about at The Family Curator Blog!
Follow-up: when republishing this episode, we were curious about whether Will ever started a blog. He did! It’s very cool! Find Will’s Genealogy Blog at http://wchgenealogyblog.blogspot.com/.
Also, listener Anne-Marie had some questions about how to make progress with her Maw-gee research, specifically how to track down their immigration records. She wrote in again to say that she’s going to follow up on our suggestions and let us know what she finds. But she also had some comments about my interview with genealogy blogger the Footnote Maven (Episode 38):
“I have begun listening to Family History and Genealogy Gem podcasts from the beginning again. When I listened the first time I was so novice that I did not always understand what I was hearing. It’s great to have this audio reference guide.”
How to Start a Genealogy Blog: Step by Step
Now before we get started on created your blog let me just say that there are probably countless websites for setting up blogs and certainly countless ways to go about it. My goal in the approach that I’m going to take is to get you up and running in a short period of time for free. This is a great way to get your feet wet, see if it’s for you, and if you decide to get more elaborate with it later you can always do that.
1. Decide what the purpose of your blog is.
When it comes to a genealogy themed blog there are still lots of options – so here are some ideas:
- A Research Log
- A Surname Focus
- Family Traditions, Family Recipes, Photos
- Genealogy News
- Focus on a certain record type
- Provide beginner education
- Interviews with relatives
- History of an ancestor’s home or community
- Have a general all purpose blog
- Follow a pattern for each day
And remember the Footnote Maven’s good advice – You can’t be an expert in everything, so don’t even try. To me a good way to stay out of that trap is to stay narrowly focused. If you find yourself having to be an expert in everything you’re blog theme is probably too broad. And of course, be yourself. Do what you do best!
2. Use Blogger (http://www.blogger.com) to create your blog. It’s free, and easy to use.
Blogger is owned by Google so if you already have a Google account than you’re one step ahead of the game. If not that’s the first thing you’ll need to do. Then click “Create Your Blog Now.”
Note: As on any website, the organization and features of Blogger change over time. The following description was current at the time of publication. Use this following descriptions and concepts to guide you through the current version of Blogger.
Name your blog. Of course, the name should reflect what your blog is about, but it’s also good to think of one that is catchy, and one that you can get the URL address for. The URL name you pick has to be something that isn’t already being used, so it might take a few tries.
How to Name Your Blog:
- Type in the Title Field
- Type the URL you want in the “Blog Address URL” field
- click the Check Availability link to see if it is available
- Type in the word verification code
- Click the CONTINUE button.
3. Select a Design Template:
- Scroll through the design templates and pick one you like
- Click the select button
- Click the CONTINUE button
- You’ll get a page that says Your Blog has been created!
- Click the orange arrow that says START BLOGGING.
There are a couple of more things we’ll want to do with our blog before we get to the business of actually posting blog articles. First let’s just get familiar with the blog dashboard. This is sort of the “behind the scenes,” an area your readers will never see, but where you will actually do your blogging.
There are 4 tabs along the top: Posting, Settings, Layout and Monetize.
Blog Tune Up: From the Posting Tab….Click the SETTINGS tab. Type up a short description of the blog.
Vocab Word: KEYWORDS
Keywords label your blog so that when readers go searching for a blog to read they will find it. So some good keywords for this new blog that I’m creating would be
- Genealogy
- Family history
- Family tree
- Blog
- How to
Keywords can be single words or a short keyword phrase such as “family history” which readers will very likely be searching for. Blogger allows you 500 characters.
The rest of your options on this Basic Settings page are mostly about how your content will be labeled and found on the internet. You can take a look through the options but in most cases you will want to leave them on their default settings. When you’re done just click the SAVE SETTINGS button at the bottom of the page. And for right now you can leave all of the other types of settings as is as well. There are about 9 different categories within the Settings Tab that you can tweak, but the default settings on these are just fine for now.
4. Add at least one gadget. Click the LAYOUT tab. I love working with this area because this is where you get to customize the layout and the types of gizmos and gadgets that are on your blog. We don’t want to overdo it but there are some really good ones you’re not going to want to miss.
Blogger will automatically add a couple of gadgets to the sidebar of your blog. They are:
- Followers – people who use blogger who subscribe to your blog’s RSS feed.
- Blog Archive – This gadget automatically archives your older blog posts.
- About Me – This is just a place where you can tell your readers a little more about yourself and include your email address if you wish.
To see what other types of gadgets you can add just click the Add A Gadget link in top side box. That will bring up a window with lots of choices for you:
- Search Box
- Text
- Photos
- Slide show
- Video Bar
- Polls
- Lists
- RSS feed
- Subscription Links
- HTML / Javascript
Each one of these is very easy to use and pretty self-explanatory. But I recommend not overloading your blog. Only include, at least to start, the items you really think your readers would get some value from. Otherwise it can just be annoying distraction that gives readers a reason to leave your blog.
How to Add a Picture Gadget to Your Blog:
- Cick the plus sign on the right hand side of the page for the PICTURE gadget.
- This will bring up a page call CONFIGURE IMAGE.
- Give the image a title
- Type a Caption
- Link to an image on the web OR upload from your computer hard drive.
- (To upload from your computer make sure the “From your computer” button is selected and then just click the BROWSE button. Navigate your way to the location of the photo on your computer’s hard drive and select it.) Once the image appears that means it has been successfully uploaded to Blogger.
- (If you want to link this image to another website, then you will want to type in the address in the LINK field.)
- Click the orange SAVE button and we’re done.
- Now you will be back at your dashboard in the Layout mode. You will see that the top box on the side is now labeled as the title you gave your image.
- Click the blue PREVIEW button at the top and a preview window will open showing how your blog currently looks and it will include the image you just uploaded.
5. Rearrange Your Gadgets on Your Blog. Hover your mouse over the gadget and your cursor will turn into a cross with arrows. Click and grab the gadget and drag it where you want it and drop it in place. Click the PREVIEW button to see how that looks.
Genealogy Blogging Summary
We’ve made a lot of progress on our blog in a very short amount of time. Take some time this week to take the steps we took in this episode:
- Decide on the theme or focus on of your blog
- Get a Google Account and create your Blogger blog account with your chosen name and secure the URL address to go with it.
- Pick your design template
- Add at least one gadget from the choices provided
- And move the gadgets you have so far around until they are in the order you want.
Next week we will finish up this family history blogging lesson with adding a few more gadgets and details, doing a bit of pre-planning for our blog posts, publishing your first article, and then talking about how your readers will subscribe to your blog.
Finally, here’s a link to genealogy expert (and blogging guru) Amy Coffin’s blog post, “Another Jones Surprise or Why Genealogists Should Blog.” Next week’s episode will include handouts on Amy’s great ideas for up to a year’s worth of genealogy blog posts by societies or individuals—you won’t want to miss that!
by Lisa Cooke | Feb 18, 2014 | Family History Library, Family History Podcast, FamilySearch
Listen to the Family History: Genealogy Made Easy podcast by Lisa Louise Cooke. It’s a great series for learning the research ropes and well as refreshing your skills.
Originally published 2009 Republished February 18, 2014
https://lisalouisecooke.com/familyhistorypodcast/audio/fh19.mp3
Download the Show Notes for this Episode
Welcome to this step-by-step series for beginning genealogists—and more experienced ones who want to brush up or learn something new. I first ran this series in 2008-2009. So many people have asked about it, I’m bringing it back in weekly segments.
Episode 19: Using Family History Centers, Part III
This is the final episode of a series in which we answer all your questions about Family History Centers. My very special guest is Margery Bell, Assistant Director of the Oakland Family History Center in Oakland, California. She has over 35 years of experience working in Family History Centers, and is the perfect choice for our audio guided tour. In our first segment we’re buy prescription medicine online going to talk about the educational opportunities available through the Family History Centers, including the new online Wiki. Then in our second segment, Margery will give you her Top 7 Tips for getting the most out of your visit to a Family History Center (click to the show notes, above, for those tips). Finally, Margery will inspire you with some stories of genealogical serendipity that she has experienced over her many years working at Family History Centers.
Links/Updates
Some Family History Centers are now called FamilySearch Centers. Many Centers have opened in public and private libraries in the past few years, not just in meetinghouses of the Church of Jesus Christ of Latter-day Saints. Click here to find a FamilySearch Center/Family History Center near you.
FamilySearch Research Outlines
FamilySearch Wiki
by Lisa Cooke | Apr 6, 2020 | 01 What's New, Legacy Tree Genealogists, Research Skills |
The Genealogical Proof Standard tells us that we need to conduct reasonably exhaustive research in order for our work to be credible. If you’ve ever wondered just what constitutes “reasonable” (and if your family tree is up to snuff) my guest author Kate Eakman, professional genealogist at Legacy Tree Genealogists, has answers.

Professional Genealogist Kate Eakman explains evidence on the Genealogy Gems blog.
Genealogical Evidence: Have You Got What It Takes?
How do we know when we have compiled enough evidence to constitute proof?
Is a birth certificate or an autosomal DNA test result sufficient to declare this person is the child of that person?
Must we collect every record regarding an individual – the deeds, the tax lists, the newspaper clippings, the census reports – before we can declare a familial connection?
The Genealogical Proof Standard (GPS)
The Genealogy Proof Standard (GPS) directs us to perform reasonably exhaustive research, which requires that we identify and review all available records related to an individual.[1] This is being as thorough and accurate as possible and is a goal toward which we should all aspire in our genealogical research.
But, let’s be honest: most of us do not want to spend weeks or months (or even years) documenting one person before moving on to the next individual. We don’t want to know every detail of grandpa’s life before we turn to grandma.
We want to build a family tree which accurately provides us with the names of our ancestors so that we can identify our immigrant ancestor, or join a lineage society, or enjoy the satisfaction that comes from a balanced tree extending back a hundred years or more.
We want to be thorough and accurate, but we also want to make some progress. How do we balance the need for accuracy with the desire for results? How do we determine the necessary quality and quantity of evidence for our research?
Below are some guidelines to demonstrate how we can go about compiling the necessary information to say with confidence “this person is my ancestor.”
Genealogical Evidence Guidelines
1. One record/source is never enough.
Any one piece of data can say anything. A mother might lie on her child’s birth certificate for a number of reasons. A grieving spouse might not correctly recall the information for a husband or wife’s death certificate. There are typos and omissions and messy handwriting with which to contend. Even a lone DNA test is not sufficient evidence to prove a family connection.
We need multiple sources, and different kinds of sources, which corroborate the details of the others.
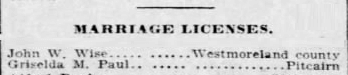
A single source is not enough. A marriage license does not guarantee that John and Griselda married. Photo courtesy https://newspapers.com.
A census report and autosomal DNA test results.
A deed and a will.
A birth certificate and an obituary.
Or, better still, a birth certificate, a census report, a deed, a will, an obituary, and autosomal DNA test results.
2. The more contemporary the source is to the person or event in question, the better.
Records of events made immediately after the event tend to be more accurate, and provide better details, than records created months or years later. As time passes, details become fuzzy, two events can be confused with each other, and our memories fade.
The passage of time between an event and the record of the event also allows for some revisionist history to creep in.
Here are some examples:
A birth year is adjusted to make someone appear older or younger in order to avoid the draft, enlist in the military, mask a dramatic age difference between spouses, or conceal an out-of-wedlock birth.
An obituary ignores the deceased’s first marriage because of some embarrassment associated with that marriage.
A census report enumerates everyone in the household as natives of Stepney, London, when they really were born in Stepney, and Hackney, and Whitechapel, which explains why the baptismal records can’t be found in Stepney.
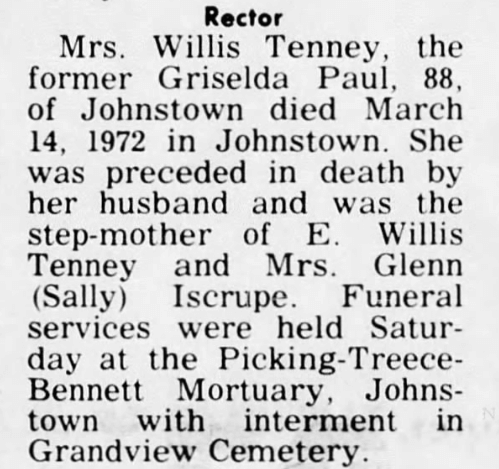
According to this obituary for Griselda, she was the widow of Willis Tenney, not John Wise. It appears Griselda and John did not marry after all. Photo courtesy https://newspapers.com.
According to this obituary for Griselda, she was the widow of Willis Tenney, not John Wise. It appears Griselda and John did not marry after all. Photo courtesy https://newspapers.com.
This is particularly true when it comes to autosomal DNA testing. My autosomal DNA is more useful for identifying my ancestors than is my son’s because I am one generation closer to those ancestors. This is the reason we encourage people to test the oldest members of their family first: their DNA has the potential to be the most useful simply because they are from an earlier generation (or two).
3. It is okay to make appropriate assumptions, but be careful!
In genealogical research we must sometimes make assumptions. When research theories are based on logical reasoning, it is perfectly acceptable to make those appropriate suppositions.
Determining which assumptions are appropriate can be simple: the two-year-old child enumerated in the home of a 90-year-old woman in the 1850 census can safely be eliminated as a biological child of that woman; the man born in 1745 could not have been buried in 1739; the person with whom I share 3150 cM of DNA is my sibling.
The challenge is to avoid making what seems like an appropriate assumption but is really based on faulty reasoning or bias. For instance, we presume that every child listed in a household in the 1860 U.S. Census is son or daughter of the two adults listed first. However, the household could include step-children, cousins, or individuals not even related to the family who were erroneously assigned the same surname.
Other inappropriate assumptions can include:
- the notion that a baby was born within a week of his baptismal date;
- a woman’s reported surname on her marriage certificate is her maiden name;
- there is only one person in any village, town, or city with the name of your ancestor;
- someone who shares 2000 cM of DNA with you must be your grandparent, aunt or uncle, niece or nephew, half sibling, or grandchild (they could be a ¾ sibling, the child of one of your parents and the sibling of the other parent).
4. All of the data from the various sources must correlate, and there can be no unresolved contradictions.
When the birth certificate says Richard was born in 1914, the 1938 newspaper article about his wedding reports Richard was 24 years old and the 1942 World War II Draft Registration card notes Richard’s date of birth occurred in 1914, we can confidently declare Richard was born in 1914.
If the wedding article declared the groom was 23 years old the contradiction could be explained by the time of year in which the wedding occurred – before or after Richard’s birthday.
But if his birth certificate reported a 1914 birth, and the newspaper article noted Richard was 32 years old, while the World War II Draft Registration listed his year of birth as 1920, we have some important contradictions. It is most likely the records are for three different men with the same name.
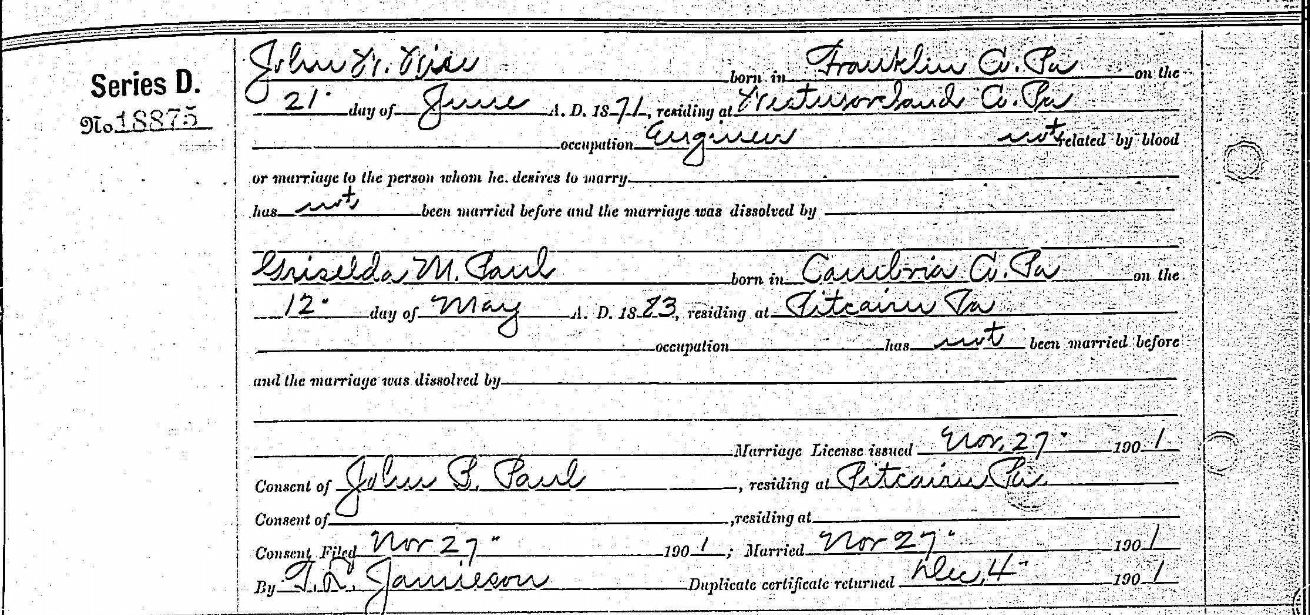
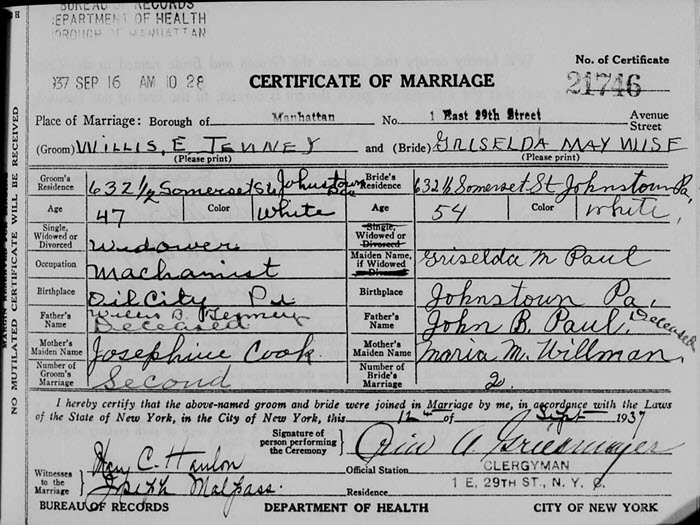
By collecting additional evidence, we finally learn that Griselda and John Wise did marry, and after his death Griselda married Willis Tenney. If we had collected only one of these four records we would not have had the most accurate information regarding Griselda Paul. Photos courtesy https://familysearch.org.
It’s important to remember that once we have accomplished that initial goal of building out our tree a few generations (or identifying our immigrant ancestor, or determining if we are related to that historical person) we can – and should – go back and collect other sources related to that person. This will result in uncovering a more complete story of their lives in the process.
As we can see from the four documents regarding Griselda Paul’s marriages, her story is much more than a simple list of birth, marriage, and death dates. As we identify, review, and analyze the other available sources, Griselda’s story will come alive with the facts and details we uncover.
A Fresh Set of Eyes on Your Genealogy Brick Wall
Sometimes the wrong evidence or assumptions can push us into a brick wall. A fresh set of expert eyes can help you identify the problem, and recommend the sources you need to pursue in order to compile trustworthy evidence.
If you are looking for some assistance in your genealogical research, Legacy Tree Genealogists can help. Our affordable ($100 USD) Genealogist-on-DemandTM Virtual Consultation service provides you with the opportunity for a 45 minute one-on-one discussion of your research with one of our expert genealogists. We can help guide you in evaluating evidence and determining research strategies to move forward with your research confidently.

About the Author: Kate Eckman
Legacy Tree guest blogger Kate Eakman grew up hearing Civil War stories at her father’s knee and fell in love with history and genealogy at an early age. With a master’s degree in history and over 20 years experience as a genealogist, Kate has worked her magic on hundreds of family trees and narratives.
Professional Genealogists Kate Eakman
[1] “Genealogical Proof Standard (GPS),” Board for Certification of Genealogists, https://bcgcertification.org/ethics-standards, accessed March 2020.
by Lisa Cooke | Feb 6, 2017 | 01 What's New, DNA |
Sometimes history provides us with a situation that is just too outlandish to be false, like this one on mDNA testing for genealogy by using ancient ponytails! In these lucky, true-to-life conditions, clues to help us unravel genealogical mysteries and tell our own crazy stories might just be found.
 [CC BY-SA 4.0 (http://creativecommons.org/licenses/by-sa/4.0)], via Wikimedia Commons")
English Mutineers Create Endogamous Population
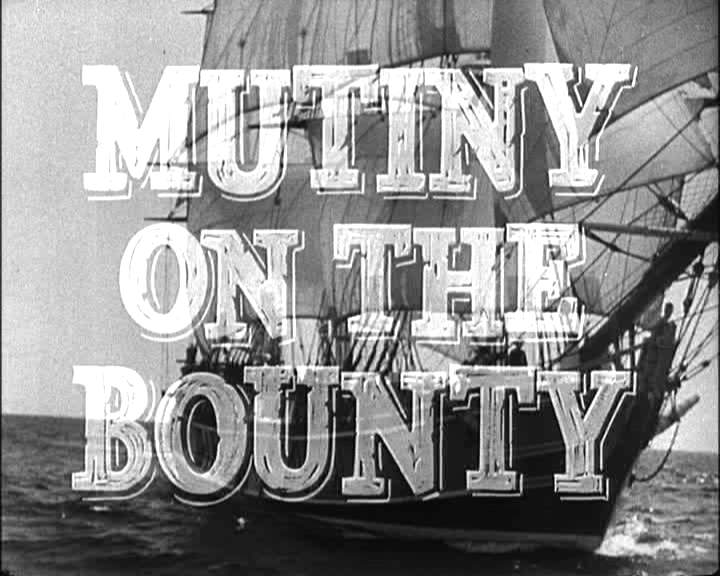
By Trailer screenshot (Mutiny on the Bounty trailer) [Public domain], via Wikimedia Commons
And when I say tiny, I mean tiny. 1.75 square miles tiny.
But considering that 9 English mutineers, their Tahitian brides, and a couple Tahitian men were the founding population for this island, it provides an amazing genetic and genealogical view into endogamous populations.
The Proof is in the Pigtails
This fascinating tale is about to get richer, as ten pigtails of hair claiming to be from some of the original mutineers and their wives, have recently been acquired by the Pacific Union College’s (PUC) Pitcairn Islands Study Center in California. The King’s College London has contracted them to perform DNA testing.
Pay close attention to this next part: Researchers are going to conduct DNA testing on the hair samples. But this does not mean you are going to be able to test the locks of hair stowed away from one of your ancestors!
Why, you ask?
First barrier: Cost. This process of trying to extract DNA from a hair sample, especially a very, very old hair sample is meticulous work. It will cost the average consumer a pretty penny. And, you may not be able to find a DNA testing company who wants to do it for you. All major genetic genealogy companies will just flat out tell you “no.” Most paternity testing companies will require your hair has the root attached. In fact, in my quick search, I can’t even find one DNA testing company that will attempt to get DNA from your lock of hair.
Second barrier: Results. Even if you could get a lab to extract the DNA for you, the only available DNA type retrieved from a cut piece of hair is mitochondrial DNA (mtDNA). The mtDNA will trace a direct maternal line. This is opposed to the YDNA that traces a direct paternal line and the autosomal DNA which traces both sides of your family tree. Even if they do get mtDNA from your sample, it is likely to be damaged and incomplete. Therefore, the best you will likely get is an assessment of your deep ancestral origins.
For you, that might not be quite enough to determine and document your family history. But for those interested in verifying this story of mutineers settling in the Pitcairn islands, it might be.
Will it Work?
If they do get mtDNA from the 10 pigtails, they will get 10 mtDNA lineages represented. Those stemming from the mutineers should have their deep origins in Europe, while their Tahitian brides will have a very different mtDNA signature. Likewise, if an mtDNA signature can be obtained, then the mtDNA of those still living in Pitcairn and nearby Norfolk (where many went in 1857) should match these pigtails. If it does, they can measure how many of the current residents are directly maternally related. Of course, in order to truly verify the claims, some serious genealogy work must be completed.
I will be watching this story closely over the next few months as research progresses. If successful, this will be another victory for the rarely celebrated mtDNA. This study shows that if your goals are understanding deep heritage, or testing out a particular hypothesis on your maternal line, mtDNA can be a useful option.
While the DNA studies you read about in the paper won’t always be something you can learn from, others are. Take for example the stories I shared several months ago on the Genealogy Gems podcast and blog about DNA confirming the love affair of President Warren G. Harding and the story of how experts proved it was King Richard III buried under that parking lot. You can definitely learn about using DNA for genealogy from these very public examples!
More on mDNA Testing for Genealogy
When to Do an mDNA Test for Genealogy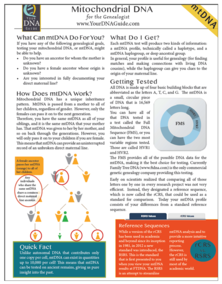
mDNA Quick Guide for Genealogists by Diahan Southard
Page 2 of 10«12345...10...»Last »