Blog


Genealogy Gems Podcast Episode 259 Special Christmas Episode
A Cup of Christmas Tea with Best-Selling Author Tom Hegg
Get your copy of A Cup of Christmas Tea here.
Listen to Genealogy Gems Podcast Episode 259
In this special audio version of the interview, listen to Tom recite this wonderful story A Cup of Christmas Tea set to beautiful music. You’ll also hear him recite the children’s classic Peef the Christmas Bear. To Listen click the media player below (AUDIO ONLY):
Watch the Original Video
This audio comes from my YouTube video series Elevenses with Lisa. You can watch the video interview at the Elevenses with Lisa episode 38 show notes page.
Get $10 off StoryWorth
Become a Genealogy Gems Premium Member
Premium Members have exclusive access to:
- Video classes and downloadable handouts
- The Genealogy Gems Premium Podcast
- Elevenses with Lisa downloadable ad-free show notes PDF cheat sheets
Become a member here.

Genealogy Gems Podcast App
Don’t miss the Bonus audio for this episode. In the app, tap the gift box icon just under the media player. Get the app here.
Get the Free Genealogy Gems Newsletter
The Genealogy Gems email newsletter is the best way to stay informed about what’s available with your Premium eLearning Membership. Sign up today here.
Our Sponsor:
MyHeritage: Click here to start finding your family history at MyHeritage
MyHeritage.com is the place to make connections with relatives overseas, particularly with those who may still live in your ancestral homeland.
Follow Lisa and Genealogy Gems on Social Media:
- Instagram.com/genealogygemspodcast
- Facebook.com/genealogygems
- Pinterest.com/lisalouisecooke
- YouTube.com/GenealogyGems
Music: FairyTale Waltz by Kevin MacLeod is licensed under a Creative Commons Attribution 4.0 license. https://creativecommons.org/licenses/by/4.0/ Source: http://incompetech.com/music/royalty-free/index.html?isrc=USUAN1100232 Artist: http://incompetech.com/
We Wish You a Merry Christmas by Twin Musicom is licensed under a Creative Commons Attribution 4.0 license. https://creativecommons.org/licenses/by/4.0/ Artist: http://www.twinmusicom.org/

Top 10 Archival Storage Solutions for Family Heirlooms
Top 10 Archival Storage Solutions
Family historians often end up with family heirlooms and documents that need archival storage.
Short on time? This week’s video is just 20 minutes and packed with the archival solutions you need. The video premieres on Thursday and features a live chat.
Watch the live premiere of this week’s video and participate in live chat with our Genealogy Gems YouTube channel subscriber family. (Subscribing to our channel is free. Click the red Subscribe button on the video page on our channel.)
Thursday, December 9, 2021 at 11:00 am CT
(calculate your time zone)
Length: 24 minutes
Three ways to watch the show:
1. Video Player (Live) – Watch the video premiere at the appointed time in the video player above.
2. On YouTube (Live) – Click the Watch on YouTube button to watch live at the appointed time at the Genealogy Gems YouTube channel. Log into YouTube with your free Google account to participate in the live chat.
3. Video Player above (Replay) – Available immediately after the live premiere and chat.
Episode 81 Show Notes
Download the ad-free show notes It includes a special supply checklist that can be printed out as a single page. (Premium Member log in required. Not a Premium Member? Become a Genealogy Gems Premium Member.)
(Please note: This interview transcription has been minimally altered for ease of reading and clarity.)
Lisa: I’d love to talk about the archival supplies we need. Because obviously, to complete a task and do a good job of it, we got to have the right tools. That’s certainly true when it comes to archiving. You’ve got 10 of your top tools that I know that you’ve used as an archivist. What is number one?
1. Archival File Folders
Denise: The first thing has to be archival file folders. They are not terribly expensive. And really, what you want to do is put your item, whatever it is, in the highest quality folder or box or something to protect it right away. But since most of us have pictures and paper, a file folder really is a good place to start.
Denise recommends these archival file folders.
Lisa: That sounds great because often other family members are giving us things, and we may not have time to deal with it right then and there. It sounds like this would be a very safe place to put it.
Denise: It is. You can purchase them in a box of 50 or 100. If you have a lot of items or just 10 or a dozen folders, it really can scale to suit whatever the size of your archives might be.
We really do need to take that extra step and seek out acid-free, lignin-free archival file folders. The kind you buy at the office supply store are just not the quality you need to preserve your papers and your photos. You can actually cause more damage if you put things in those.
Lisa: Because there’s probably acids in those, right?
Denise: Right, because the regular office supply ones, particularly the kind that are just for regular office use, they have so much acid in them that they can cause your item to deteriorate even more.
Lisa: Okay, so number two I see here is flip-top document case. This sounds like a specialty item. What are we talking about?
2. Flip-Top Document Case
These boxes are so confusing when you’re shopping. The names of these document cases and boxes can be confusing. The one I use looks like a mini file folder box. That’s exactly what it is. Examples of the kinds of things you can store in them include old rolled up documents, military photos, and banquet photos. I have a process to flatten these, but meanwhile I needed to store them.
You can reuse this kind of a box for anything. It doesn’t have to just be file folders. But because it’s designed for file folders, it’s really perfect. It’s even got a little tag to pull it out on the shelf if you need to pull it out. There’s a place to add a label.
It’s about five inches wide. I like this size because when you get those file folders in there, it gets heavy and a lot of people store these up on shelves. They can be heavy to move down. I bought some real wide ones that are seven or eight inches. And man, those things are heavy! So, I recommend smaller ones.
Lisa: I have some items that are definitely odd sizes, or like you said they were originally rolled up and I haven’t flattened them out and decided what to do with them yet. So, this sounds great.
Recommended flip-top document case
The third item on your list is oversized document or photo box. So, it sounds similar. We often have larger items we’re struggling with, and we don’t want to fold it up.
3. Oversized Document or Photo Box
Denise: No, in fact, you want to unfold the item, and let those folds relax.
The archival suppliers make a box that is large, larger than a shirt box. So it might hold a fully open newspaper. Or they work well for portraits or drawings or maps. They’re typically quite shallow. They won’t be necessarily a clamshell kind of opening like the boxes we just mentioned. It might be a lift off top. But you can use it for anything. And the reason it is shallow is you don’t want to put a lot of weight on the things that are on the bottom.
If you can afford it, buy large file folders that will protect your item, and then you put it in the box.
You should keep things like newspapers separate. You do not want to store newspapers with anything else other than newspapers because they’re so toxic. The newsprint is just full of acid. You want that isolated from everything else.
4. Newspaper Preservation Kit
Lisa: So that must be why number four is the newspaper preservation kit. I didn’t realize that there was one.
Denise: Yes, newsprint is a big offender.
When I visited the New England historic genealogical library in Boston, and I got a tour of their upstairs archives. It was so exciting. I felt like I was you know, in the inner sanctum. I was shown rows and rows of archival boxes. And then just stacks of items people have donated like Bibles and books and family papers. They all had to be processed and organized. The archivists there told me they will not accept donations of newspapers. Because they are so toxic, anything they touch will turn brown. And it just degrades everything around it. So ,you want to be sure to isolate your newspapers if you’re going to keep them.
What they do at the library is photocopy the newspaper onto acid free paper. Or they scan it and then print a copy on acid free paper and get rid of the newsprint.
Lisa: That sounds like a really clever way to deal with that problem. So even if grandma gives you her newspapers, and she’s also got other stuff with it, you don’t want to keep it that way. You need to separate it out.
Denise: If you really want to keep like an obituary because it’s an original paper or something, that would be a good case for encapsulating in between two sheets of archival plastic. You can encapsulate it and then you can put it right back in that Bible because it’s isolated.
Denise recommends using this Newspaper Preservation Kit
Lisa: Alright, so next we have acid free tissue paper. What would you be using this for?
5. Acid Free Tissue Paper
Denise: I love this stuff! I keep a stack of it here at home.
One time my dad gave me a stereograph, you know the thing you hold up and there’s double pictures. He gave me one of those. It was my grandfather’s. It was in of all things an envelopes box. A crummy, terrible box. And it was wrapped in red tissue paper! Have you ever like gotten a drop of water on red tissue paper? It bleeds terribly!
In the box along with the stereo cards were photo cards. And, being my dad, (he’s very strict) it’s “my way or the highway.” So, I couldn’t really tell him anything.
I took the box and he said he wanted it right back. I had some acid free tissue paper, so I just took the red tissue paper out, and cushioned everything in that dumb non-archival box with the acid free tissue paper. I took some pictures of it and looked at the cards, and then I gave it back to him. It was in a lot better shape! So, if you have acid free tissue paper, you are golden when stuff like that happens.
You can also use it to stuff the sleeves of a military uniform or wedding dress. You can wrap a pair of baby shoes in it. You can use it between layers of photographs. It’s just really helpful to have on hand.
Denise recommends getting loads of this acid free tissue paper.
Lisa: It sounds like we definitely need a stack of it on hand at all times.
6. Acid Free Flip top Photo and Print Box
Lisa: So now we are onto number 6 and another box designed for an unique purpose.
Denise: These boxes are designed in different sizes and colors. It doesn’t matter what color they are. They’re made out of a heavier board. And actually, this little box will protect your contents against even mild changes in temperature and humidity. It’s a really good protection.
I use one that is five inches by seven inches. It’s designed to hold five by seven photos on edge. Putting them on their edge ensures that there isn’t pressure placed on them by the weight of things on top. These come in all sizes. You can get big ones that are more like a shoe box.
If you have a lot of photos, you can get dividers to use in the box. But this would also be fine. You could even use some acid free tissue and put a pair of baby shoes in there.
Lisa: Oh, yeah, absolutely.
Denise: The thing I like about these boxes is you can write on them, or you can add a label.
I cleaned out my parents homes after they died, if I came across a box like this, this says to me, “oh, there’s something special in there.”
Lisa: Yes. I totally agree with that! As I’m putting stuff together in my office, I’m thinking when I’m gone, I want something that signals to people “Keep this! Don’t toss this! This is important!” You’re kind of dressing it up and letting them give them a signal that this has been already taken care of so it needs to continue to be taken care of.
7. Archival Quality Albums
Well, number seven is archival albums. This one resonates with everybody. I mean, is there anybody who doesn’t have magnetic photo albums from 1970s, where we just struggled with things sticking and you can’t take it apart? I imagine an archival quality album would really help us with photos, negatives, letters and anything flat.
Denise: Right! The albums are designated archival quality. You want to look for a binder that is archival, as well as the inside pages. If you want to scrapbook, then you just want the paper and you would probably use photo corners. You could then write with an archival pen.
Something to be careful about is when you put a binder together. You might want to put it on a bookshelf, which is fine, but the dust can still get in from the top. Light and dust are the real enemy of things that you’re trying to preserve. So, buy a slipcover or keep them in your closet. That’s really the best place for these things because they’re protected from the light and the temperature that way.
Lisa: Good point. So, you’re saying that if you want them in your living room where people can pull them off the shelf and look at them, you will want to lay something over the top of the albums so that dust isn’t settling inside.
Denise: Yes. You know how the top of your books can get dusty!
Here’s a great selection of archival quality albums.
Lisa: Exactly. I hadn’t thought about that with my photo albums. That’s a really good point.
Sometimes we have still have negatives. I know my husband inherited a lot of negatives from his side of the family. And, you know, we may or may not be ready to make prints out of all of them as soon as we get them, but we want to keep them What do you recommend for that?
8. Negative Preserver
You can use a box that is designed for negatives. It’s shorter.
Typically the 35mm negatives came in a little plastic sleeve, and that is good to use. A lot of times you can get archival supplies at a camera store. They use good quality, and I think they have something called a print file available.
Another option for negatives is binder sleeves. They’re a full page and they have little slots to put the negatives in, and then you put them in a binder that has sort of a clamshell closing. I have several of those and they work pretty well. They protect the edges of the negatives.
Lisa: Excellent!
9. Archival Slide and Media Boxes
Number 9 takes us into even more kinds of media with Archival Slide and Media Boxes. I know when I got all my VHS tapes digitized, I couldn’t bring myself to throw them away. So you’re saying that if we want to keep different forms and media, there are special boxes for that too?
Denise: Right. There are boxes that are acid free, like the ones I showed you that are sized for media and slides. You can get metal slide boxes that are pretty nice. I would avoid wooden ones. I have a few of those we inherited. But even metal ones I found at the thrift shops. People got rid of their old slide boxes.
The Kodak slide boxes that they came in aren’t bad. Slide carousels just take up a lot of space. Remember those carousels? But you can get them and they make boxes for all kinds of things. You don’t have to only use a box that is labeled a slide storage box. You can put it in something that fits.
Lisa: Good to know.
Denise: They also make them uniquely for the different types of films.
Lisa: Yes, I think I’ve got some home movie on every type of media ever created over the decades which is a good problem to have, but it’s a challenge.
Here’s a great archival quality video cassette tape box.
10. Archive Blue E-Flute Quilt Preservation Kit
Number 10 reminds me of when you and I first met gosh, probably a dozen years ago at least. And I remember talking to you about quilts. One of your specialties is really your knowledge of dealing with textiles. So often we’re thinking photos and paper but if we’re fortunate we might have a uniform, tablecloth, quilt or other textile. Tell us what this kit can do for us.
Denise: I love these! The archival boxes that I showed earlier are wonderful, but they’re heavy. Just the box itself. Imagine you have a full size bed quilt. You need a big box which is expensive and heavy.
The E flute is a kind of plastic. You’ve probably seen it used as packing material. It’s got little ridges. And it’s kind of translucent plastic stuff. That’s the best description I can think of, but it’s very lightweight. You can order one of these boxes, it comes folded or flat and you kind of assemble it. There are other types too.
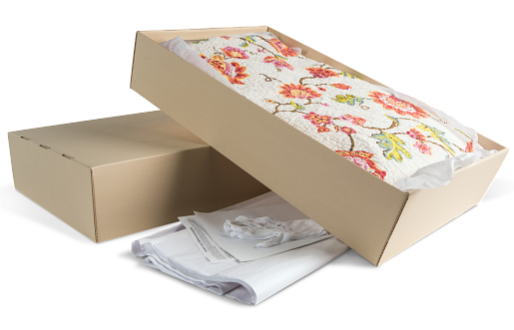
Archival quilt storage solution box
I bought one for my quilts. The only trick is because the E Flute is translucent, it won’t keep the light out. I have a beautiful old velvet album quilt, and I have folded that inside a sheet and put that whole thing in the E flute box, and then stored it in a dark. I have a little archive space where I keep that kind of thing.
They make them different sizes and in kits. I really do recommend them.
Denise recommendation: Quilt Preservation Kit
Lisa: Well, that’s the next thing on my list. I have my husband’s father’s military uniform. Part of what was holding me back in storing it was getting the right kind of box. I was thinking it was going to be one of these really heavy big boxes. So, this sounds like a really nice alternative.
Denise, you’ve given us 10 fantastic archival heirloom solutions. It’s wonderful to hear that they’re available in such a wide variety. Thank you so much, my friend. It’s wonderful to see you and I really appreciate your sharing your knowledge with us.
Denise: Thank you. It’s been nice to talk with you again, Lisa. And hope to see you again sometime soon.
Lisa: Me too!
Resources
- Download the ad-free show notes (Premium Member log in required. Not a Premium Member? Become a Genealogy Gems Premium Member.)
- Subscribe for free to our Genealogy Gems YouTube channel so you’ll never miss another episode.
- Subscribe to my free email newsletter to get notifications of new videos and articles.

1950 US Census Maps – How to Find and Use Them
In Elevenses with Lisa episode 79 Lisa Louise Cooke explains:
- How to find 1950 US Census Enumeration District (ED) Maps
- The purpose behind them and how to interpret the maps
- Ways to use the maps for your genealogy
This is a follow up to episode 51 on The 1950 Census for Genealogy. In that episode I discussed the importance of finding your ancestors’ enumeration district numbers in order to be able to find them when the digitized images are released (before the index is available.) In this episode I will walk you through how to locate the enumeration district (ED) number and then find the actual 1950 US Census ED map. We’ll wrap things up with a quick update on the release of the 1950 US Federal Census.
Episode 79 Show Notes
(Get your ad-free Show Notes Cheat Sheet at the bottom of this page in the Resources section.)
As I mentioned in Elevenses with Lisa episode 51 The 1950 Census for Genealogy, prior to 1880, U.S. Marshalls were the enumerators for the federal decennial census. Starting with the 1880 census enumerators were hired and they were each assigned an enumeration district, also known as an ED. These districts had to be mapped out so that the enumerators knew the area they were responsible for counting. Therefore, maps are drawn in anticipation of each census being taken, including the 1950 census.
Learn more by watching episode 51 on the 1950 census.
About the 1950 US Census Maps
It’s always important to understand the purpose of a record or source, and the 1950 Enumeration District maps (ED maps) are no exception. Unlike most maps where it’s all about accurately drawing up the current roads and geographical features, census ED maps are drawn up for the purpose of defining boundaries for the purpose of counting people. This means as we look at ED maps we need to keep a few things in mind.
The first thing to understand is that the 1950 ED maps were not necessarily up-to-date with the lay of the land in 1950. Not all streets, parks and features will be included. The reason for this is that the maps themselves were not created for this purpose. Existing maps were used and then enumeration district boundaries were drawn on them.
Maps came from a variety of sources including but not limited to county and City Planning Commissions, 1940 census bureau tract maps, and city engineers. In fact, from a mapping perspective the variety of maps in the collection are fascinating.
Look for the map title, description, legend and census stamps typically found in one of the corners. In this example (see image) from Aurora, Colorado the map used was originally created by the city engineer in 1946 and was revised in 1947.
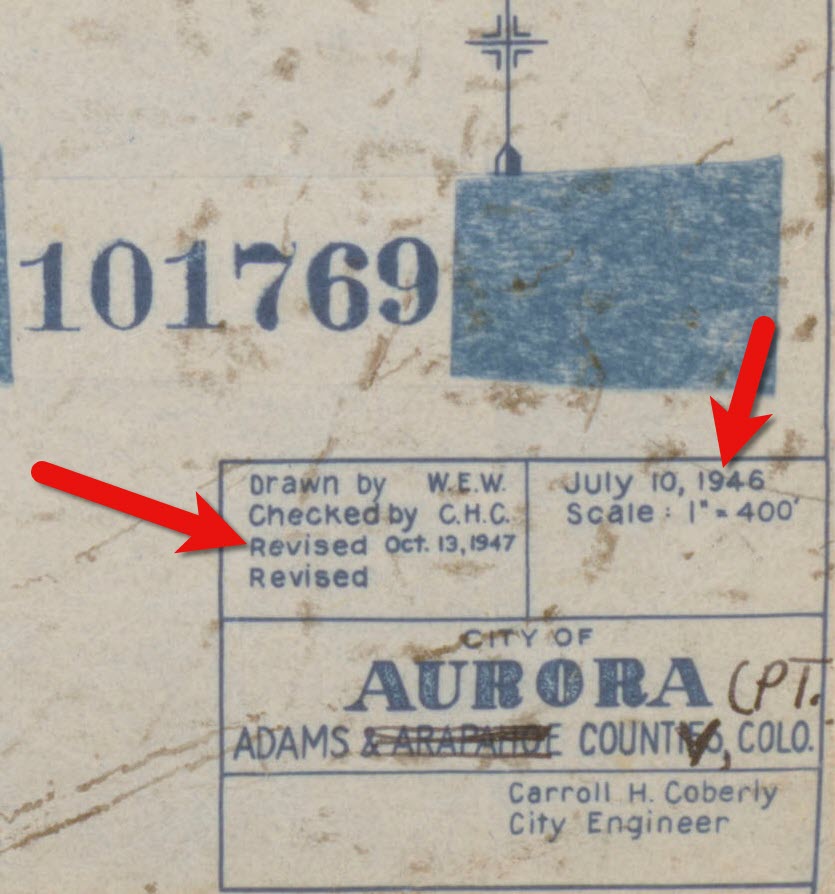
1950 census map of Aurora, Colorado (Source: National Archives)
Following the end of World War II, the United States was growing at a quick pace in 1950. This is particularly true of the newly emerging suburbs. Therefore, if your ancestors built a new home in a new development in 1949, don’t be surprised if you don’t see the street on the 1950 census ED map. However, rest assured that the maps still hold value for your family history as they provide many interesting and unique details about the area surrounding your ancestors’ homes.
Each map was stamped with a small legend where the meaning for each of the colored lines drawn could be indicated. From my random sampling of 1950 census maps across the United States it appears that the coloring coding was consistent as follows:
- Red = Township
- Green = Corporate Limits/Ward
- Orange = Enumeration District
Expect to see errors, inconsistencies and omissions in the maps. The more rural the area the more likely the map was compiled from several sources by the Census Bureau cartographers. This compilation created more opportunity for errors, and often used older maps.
Source: National Archives
The Meaning of Census Enumeration District Numbers
A census enumeration district number is made up of two numbers separated by a dash. The first number (in this example: 1) represents the county/region. The second number represents the area within the county that could be covered by an individual census enumerator within the amount of time provided for taking the census, about 2-4 weeks. The official start of the 1950 US Federal Census was April 1, 1950.
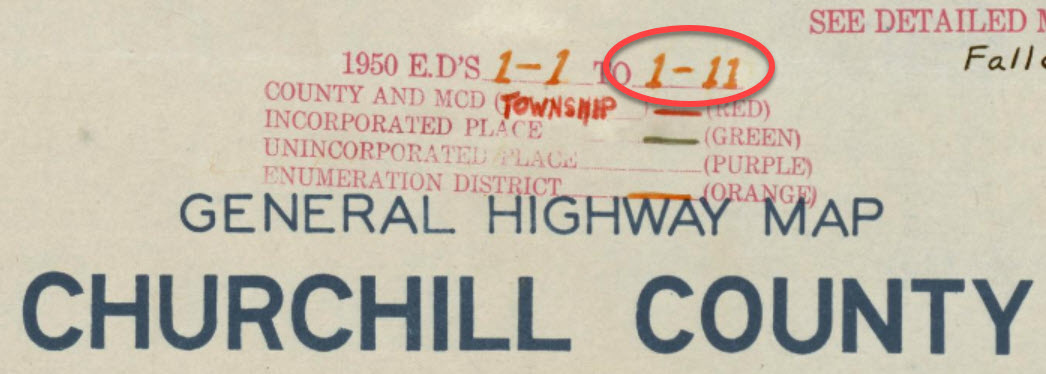
Census enumeration district (ED) numbers on a 1950 census map.
How to Find 1950 Census Maps
Some 8,000 census maps have been digitized and are available at the National Archives. However, the National Archives website can be challenging to navigate. I recommend using the Unified 1880-1950 Census ED Finder Tool at Steve Morse’s website.
1. Go to https:/stevemorse.org
2. In the menu in the upper left corner hover over US Census and in the secondary menu click Unified 1880-1950 Census ED Finder
3. Select the state from the first drop-down menu.
4. Next select the county.
5. Then select the city.
6. You will then see many enumeration district links listed. In order to find the right one for your ancestor’s home, enter the house number and select the street from the next drop-down menu. Don’t worry about directional parts of the address like west or east unless they are offered in the list of street names.
7. As soon as select the street name, the list of ED numbers should be reduced. In this example we are down to three.
8. To further reduce the possible ED numbers, we can select Cross or back street on same city block. If you’re not sure what the neighboring streets are, click the see Google Map This will plot the address you entered into Google Maps where you can then find the closest cross street, and the next streets over. If the address is not precisely marked on the map, check the address that appears in the Google Maps search box.
In my case, the One-Step tool didn’t allow me to specific W. Arcade, so Google Maps just gave me the general area, and not the address. By adding the W. to the address and pressing enter on my keyboard Google Maps was able to precisely plot the location. Now we can make note of the closest cross street (ex. N. Center), the street north of the address (E. Monterey Ave.) and the street south of the address (W. Noble St.)
9. Head back to the Unified 1880-1950 Census ED Finder page and enter each nearby street (you can enter multiple.) This should reduce the ED numbers one. This is the ED that includes your ancestor’s address.
How to Find 1950 Census Maps
1. Make note of the ED number, and then go back and click the button that says See ED Maps for ____________ County. You could have clicked this button without going through the process of locating the ED number, but the ED number makes it much easier to find your ancestor’s home street on the map. This number will also assist you in being able to find your ancestors in the 1950 census before it is indexed.
2. You will now be on the Viewing 1950 Enumeration District Maps in One Step Re-enter the city from the drop-down menu.
3. Click the Get ED Map Images You will receive two links. The first link is Links to NARA viewer will take you to the page on the National Archives website which includes all of the information about the map and the record hierarchy. Source citation information can be gathered from this page.
5. Click the second link called Direct links to jpegs on NARA server. This will take you to the image by itself as hosted on the National Archives website. I find this the easiest way to save the full resolution image to my computer hard drive. On my PC I right-click on the map and select Save Image As.
This page is also important if you want to use this image in another program such as Google Earth. The URL for this page is the direct URL to the image. Notice that it ends in .jpg. This means that it is the image alone, and this link can be used to create a custom map overlay in Google Earth. You can see an example of a custom map overlay in my video Create a Family History Tour with Google Earth Pro at the 06:13 mark.
Resources
- Download the ad-free show notes (Premium Member log in required. Not a Premium Member? Become a Genealogy Gems Premium Member.)
- Subscribe for free to our Genealogy Gems YouTube channel so you’ll never miss another episode.
- Subscribe to my free email newsletter to get notifications of new videos and articles.