Click the video player below to watch 10 Top Tips for Beginning German Genealogy now.
Episode 52 Show Notes
Researching ancestors in another country can be a little daunting. Challenges include foreign languages, moving boundaries, and spelling variations. This is certainly true for German genealogy.
If you’re new to German genealogy or your research has stalled, this episode of Elevenses with Lisa is for you. In fact, even if you don’t have German ancestors I think you will still find the principles and ideas covered very helpful.
Translator, author and German handwriting expert Katherine Schober shares her 10 Top Tips for Beginning Germany Genealogy.These tips are packed with tools and resources that you can start using right away.
Katherine Schober is a German / English translator, specializing in the old German handwriting. She is the author of “The Magic of German Church Records” and “Tips and Tricks of Deciphering German Handwriting”, as well as the creator of the online course “Reading the Old German Handwriting.” And this year she will be one of the featured speakers at this year’s virtual International German Genealogy Conference.
Click the video below to watch the show. Then scroll down below to get all of the show notes. Premium Members will find the downloadable ad-free show notes cheat sheet PDF in the Resources section at the bottom of the page.
Mentioned in this video:
International German Genealogy Conference July 17-24, 2021. Use special code EARLY until April 30 to get $50 off the package of your choice. Registration here
Reading the Old German Handwriting Course online with Katherine Schober Register for the course here
Use Coupon Code GEMS for 10% off the course.
1. Start with What You Know about Your German Ancestor
Resist the temptation to start searching online immediately. Take the time to talk to your relatives, starting with the oldest. Review family documents, photo albums and other materials around your home. You may be surprised how much you already have, and the light that other relatives can shed on the family tree. Every step of the way its critically important to document everything!
2. Look for Resources in America Before Jumping Over to Germany
Photos
Family Bibles (Watch Elevenses with Lisaepisode 29)
Census Records
Local church records
Passenger Lists (Watch Elevenses with Lisaepisode 34)
Records in Germany are kept at the local level. Make sure you have the right town in the right state.
Meyers Gazetteer About the Meyers Gazetteer from the website: Meyers Orts- und Verkehrs-lexikon des deutschen Reichs “is the most important of all German gazetteers. The goal of the Meyer’s compilers was to list every place name in the German Empire (1871-1918). It gives the location, i.e. the state and other jurisdictions, where the civil registry office was and parishes if that town had them. It also gives lots of other information about each place. The only drawback to Meyer’s is that if a town did not have a parish, it does not tell where the parish was, making reference to other works necessary.”
The Historic Gazetteerat The Genealogical Gazetteer provides “The precise identification of places is essential in genealogy. Unfortunately, too few researchers care in identifying places. The project “GOV” was initiated to help historians and genealogists with the management of place references and to provide high quality data for anyone.”
4. Identify Available Records for the Town in Germany
Matricula – find church registers (mostly books of birth, marriage and death) from various European countries (currently Austria, Germany, Poland, Serbia and Slovenia).
8. Search for Vital Records
Vital records began nationwide in 1876, though it may be possible to find earlier records in certain locales.
Some pairs of letters can find themselves interchanged in German words. Understanding which ones were commonly swapped can save you a lot of frustration as you attempt to interpret documents. Examples of commonly switch letters include B and P, and K and G.
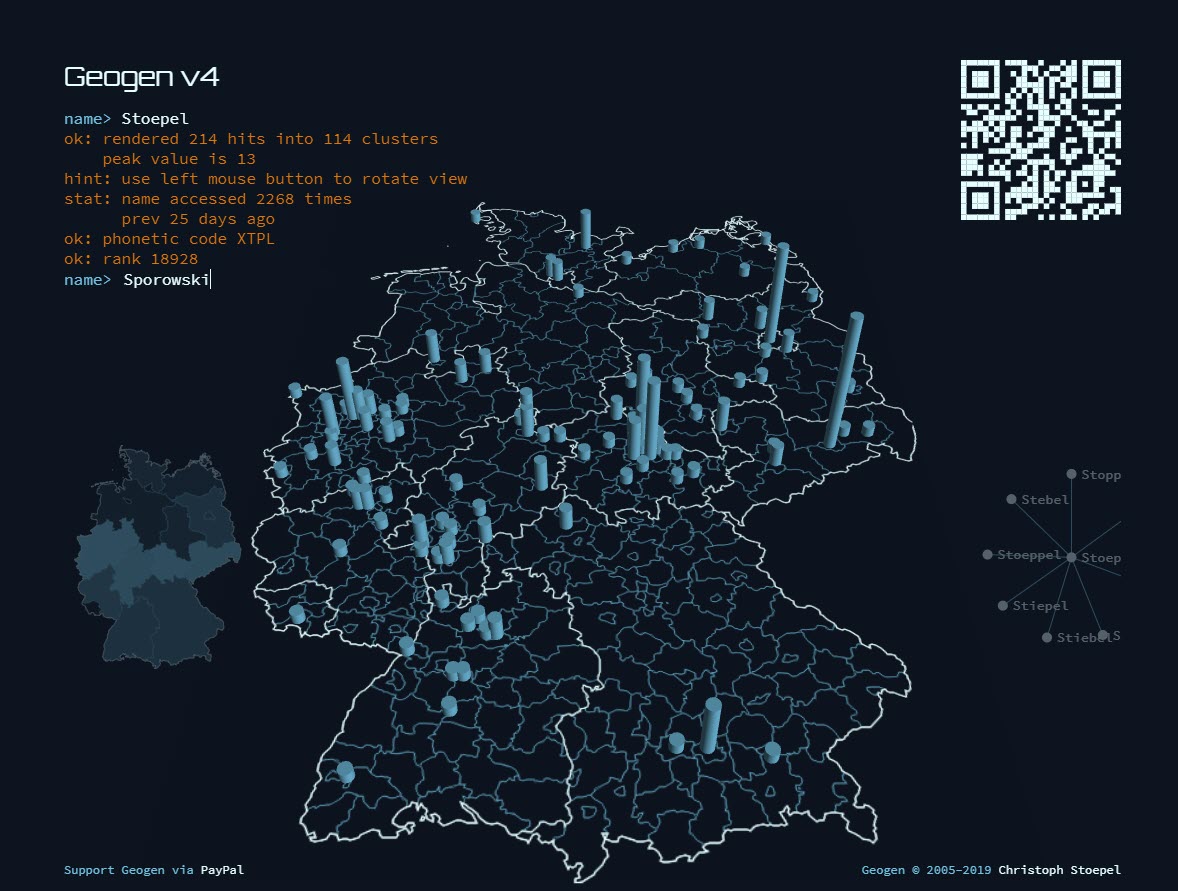
Geogen v4 offers genealogists a way to discover the areas of Germany where a surname appears most frequently. Type in your ancestor’s German surname and press Enter on your keyboard. Try variations that you have come across in records to compare the results.
Geogen v4 offers genealogists a way to discover the areas of Germany where a surname appears most frequently.
10. Use the Genealogy FAN CLUB
If you get stuck, use the FAN CLUB principle by looking at Friends, Associates, and Neighbors. These are the people who interacted with your ancestors in important ways. They will come in particularly handy when you run out of records for your German ancestor. By reviewing the records of those closest to your ancestor you may find new clues that can move your search forward and lead back to your family tree.
Katherine Schober is a German-English genealogy speaker, author, and translator, specializing in the old German handwriting. She is the author of “The Magic of German Church Records” and “Tips and Tricks of Deciphering German Handwriting”, as well as the creator of the online course “Reading the Old German Handwriting.” Katherine lives in St. Louis with her Austrian husband, and can be reached via e-mail at language@sktranslations.com or via her website, www.sktranslations.com.
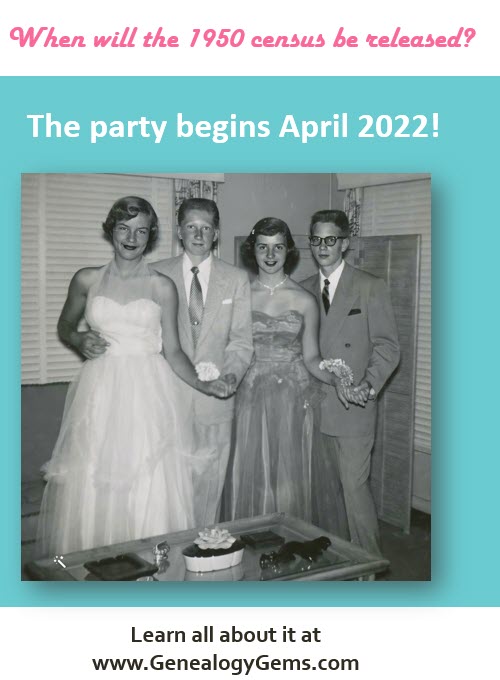
The census is the backbone of genealogical research. Here in the United States it gives us a cohesive look at our ancestors every 10 years between 1790 and 1940. And now there is a new census on the horizon!
The 1950 census is an exciting one because it may include your great grandparents, grandparents, parents and perhaps even you! It will provide opportunities to confirm some of what we already know and clues for new research.
This week brings us to the one year mark before the release of the 1950 census in April 2022. Now is the perfect time to familiarize ourselves with it and start preparing. In this free webinar on the Genealogy Gems YouTube channel we’re going to do just that! In Elevenses with Lisa episode 51 you will learn:
the interesting and little known stories behind the 1950 census,
what it can reveal about your family, (and who you will NOT find!)
the important documents associated with it that you can access right now!
Get the HD version by clicking the gear icon in the video player.
1950 Census Show Notes Cheat Sheet
Premium Members have access to the ad-free downloadable show notes cheat sheet in the Resources section at the bottom of the page. Click here to become a Premium Member.
What You Can Learn About Your Family from the 1950 Census
The 1950 Census may be able to answer all kinds of questions for you such as:
Where was your family living in 1950?
Did you have American relatives living abroad?
What did your relatives do for a living?
What was their household income in 1949?
The 1950 census also stands out because it ushered in some new features and data collection improvements with the goal of providing more complete and accurate information than ever before.
This census can help you confirm information you already have about your family while also providing new facts and clues for further genealogical research.
So, let’s dig into the 1950 US census. Oh wait…we better hold our horses! The 1950 census isn’t available yet!
When will the 1950 census be released?
The official census day in 1950 was April 1. So as of April 2021 we are one year away from the release of the 1950 Census. However, it’s never too soon to get acquainted with this important genealogical record. There’s a lot we can do to get ready to research when it’s released by the National Archives in April 2022. That will be 72 years after the official 1950 census day.
So why don’t we get to see the 1950 census until 72 years have passed?
The “72-Year Rule” became law in 1978 (92 Stat. 915; Public Law 95-416; October 5, 1978). It restricts access to decennial census records to only the person named on the record or their legal heir.
Why is there a “72-Year Rule” for the Census?
It’s long been believed that the rule was based on the average life-expectancy at the time. However, that may not be the case at all. Letters at the National Archives dating back to 1952 from the census bureau director and the archivist of the U.S. support the rule, but don’t say what it’s based on. Joel Weintraub’s essay Why the 72 Year Rule for U.S. Census Privacy? proposes that the rule evolved for a variety of reasons when the National Archives was first created.
The bottom line: For now, we have to wait until 2022 for the 1950 U.S. Federal Census.
Who was counted during the 1950 census?
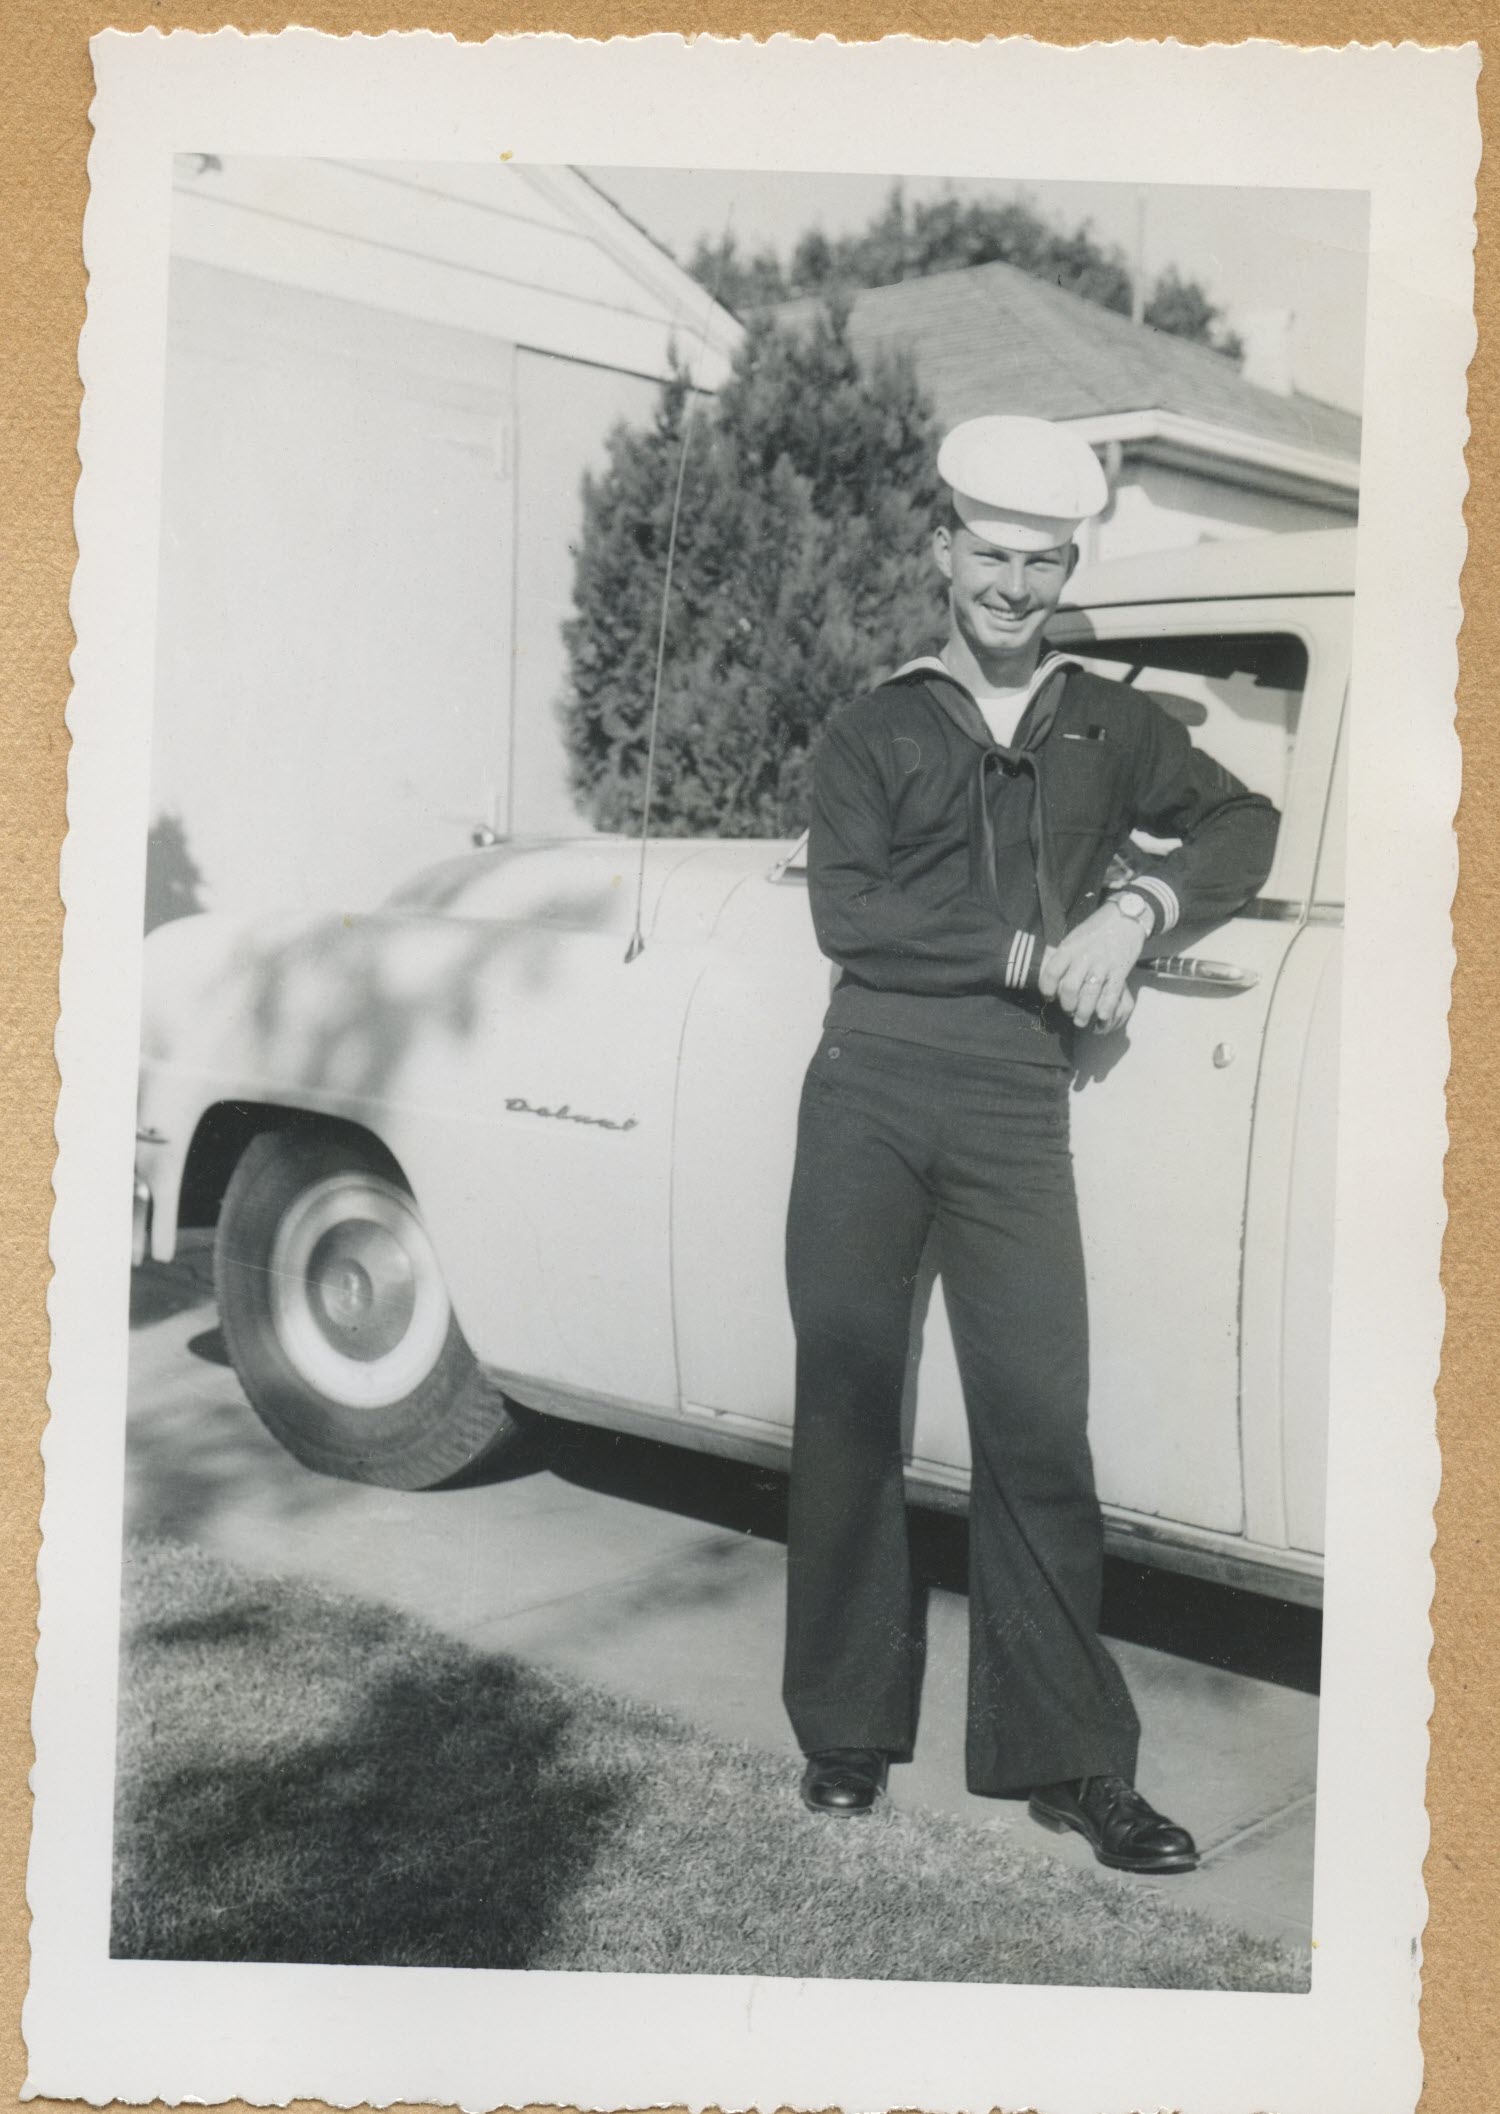
In addition to Americans living here in the States, for the first time Americans abroad were enumerated in 1950. This included:
members of the armed forces,
crews on vessels at sea,
and employees of the United States government and their families living in foreign countries.
Sailors and soldiers serving overseas were counted in the 1950 census.
Be aware that there were other people living abroad at that time who didn’t fall within these official categories. In those cases, they were to be reported by their families or even neighbors who lived in the U.S. This was clearly second-hand information which means that the information wasn’t as reliable. In fact, so much so that these individuals weren’t included in the published statistics. Keep this possibility in mind if you have trouble locating a relative when the census comes out.
What Questions Were Asked in the 1950 Census?
The 1950 population census questionnaire asked for information such as:
Address;
whether their house was on a farm;
name;
relationship to the head of the household;
race;
sex;
age;
marital status;
birthplace if they were foreign born,
whether or not they were naturalized;
their employment status;
how many hours they worked in a week;
occupation,
industry,
and class of worker.
The information provided by your ancestors has the potential to lead you to more genealogical records.
Geographic Areas Covered in the 1950 Census
So where were all these people living? The 1950 census covered:
the continental United States,
the territories of Alaska and Hawaii,
American Samoa,
the Canal Zone,
Guam,
Puerto Rico,
the Virgin Islands of the United States,
and some of the smaller island territories.
1950 Census Enumerators
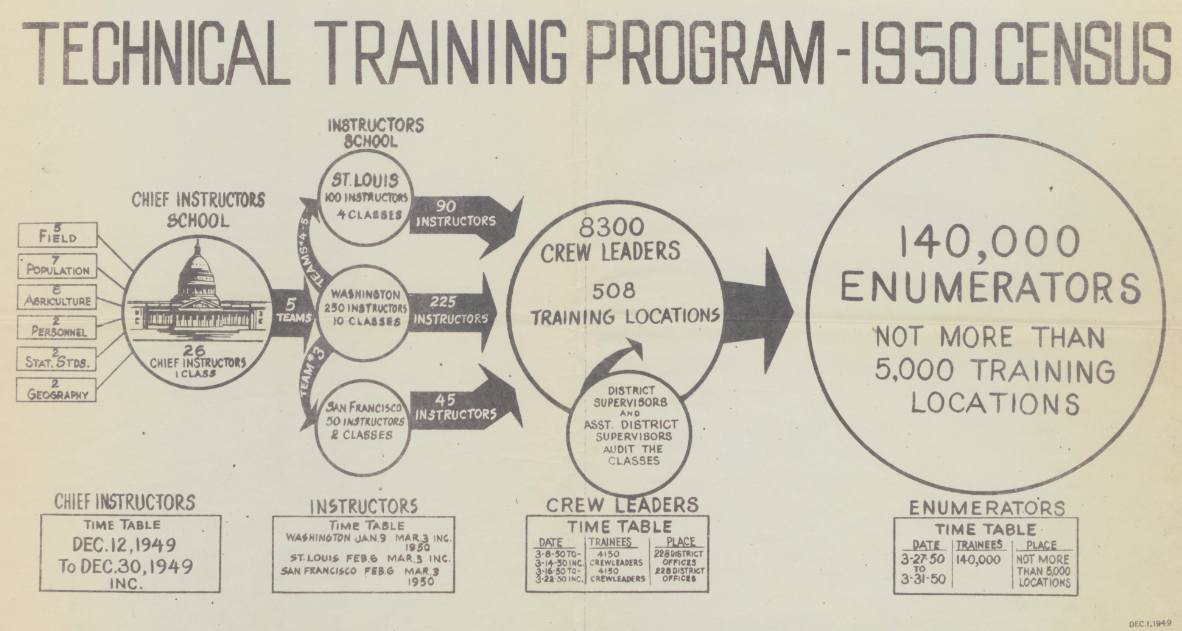
In 1950 the population of the United States was about ½ of the population today. But it still took a lot of people and organization to count 150 million people. The people doing the counting are called enumerators. These enumerators came from all walks of life and had to be trained so that everyone got counted with the fewest mistakes possible. A technical training program was developed to accomplish this goal. 26 chief instructors would teach a few hundred instructors to train 8300 crew leaders who would ultimately train over 140,000 census enumerators.
The 1950 census enumerator training program. (Source: census.gov)
1950 Census Enumeration District Maps
You may be wondering ‘how did the enumerators know where to go to count people?’ The answer is Enumeration Districts or EDs. The geographic area to be covered by the enumerator was divided up into Enumeration Districts. These ensured that enumerators were not crossing paths and duplicating efforts. EDs were just the right size so that the census taker could cover the area in one census period, which was about 2-4 weeks.
Enumeration District maps were drawn for the 1950 census. These are important for your genealogy research because they:
describe your ancestors’ neighborhood in 1950
are essential for figuring out where to find your ancestor in the census.
don’t fall under the 72-year rule, which means that they are available now.
It takes time for the entire census to be indexed. If you want to start using it as soon as it’s released, you will need ED maps. You’ll need to know where your relatives lived so that you can find the address on the ED map. The map will provide you with the associated ED number. This number is needed to search the unindexed census.
There are 8000 ED maps for the 1950 census that have been digitized. You can find them at the National Archives website in Record Group 29: in the series called Enumeration District and Related Maps 1880-1990.
An alternative place to find 1950 Enumeration District maps is the One-Step Webpages by Stephen P. Morse website. It’s not only an easier way to find the correct map, but it includes maps not found on the National Archives website. It’s also worth reading the essay on the website called Problems Using 1950 Enumeration District Maps. It will help you better understand how to use the maps.
Up until 1870 the job of census taker fell to the U.S. Marshals. The U.S. Marshalls received very little in the way of instructions or training. It wasn’t until 1830 that they even got printed schedules to record the information given by each household! That all changed with an act of congress passed in 1879 that shifted the job to people specifically hired to be enumerators. This was just in time for the 1880 census.
By 1950, 140,000 census enumerators hit the field armed with their Enumeration District map showing them where to canvas, and a lengthy set of instructions that they received during their training. In fact, 1950 was the last time that the census was taken exclusively in person because in 1960 the Census Bureau started mailing out questionnaires.
The 1950 census enumerator instructions are available for free as a downloadable and searchable PDF file. It’s 24 pages of specific instructions designed to help enumerators record the information they gathered.
The enumerator instructions are important for you as a researcher because they explain what you’re seeing on the census page. If we see a mark or a notation, or a field left blank, the instructions will explain why the census did it that way. If we understand the why behind the information we find we will be much more likely to interpret it correctly.
An example of this can be found in the 1940 census. You’ve probably noticed X’s in circles scattered about the pages. On a map that could be misinterpreted as there’s buried treasure in that house! But alas, it doesn’t. Only the census enumerator instructions can help us really understand their true and important meaning. The 1940 census enumerator instructions state “Enter (X in a circle) after name of person furnishing information.” This helps us better determine the validity of the information provided for each individual in the household.
Who Was Not Counted in the 1950 Census?
The instructions for the 1950 census also includes a list of those people who were not to be enumerated, such as:
People temporarily visiting the household
Foreign citizens visiting embassies and similar facilities. Do enumerate foreigners who are studying or working here temporarily.
Students below college level who are boarding to attend school locally.
College students visiting but who live elsewhere to attend school.
People who eat with the family but don’t sleep there.
Domestic workers who don’t sleep in the household.
Household members who are currently an inmate in prison or other institution.
Ship crew members or people who live in lighthouses
Absent Soldiers and sailors
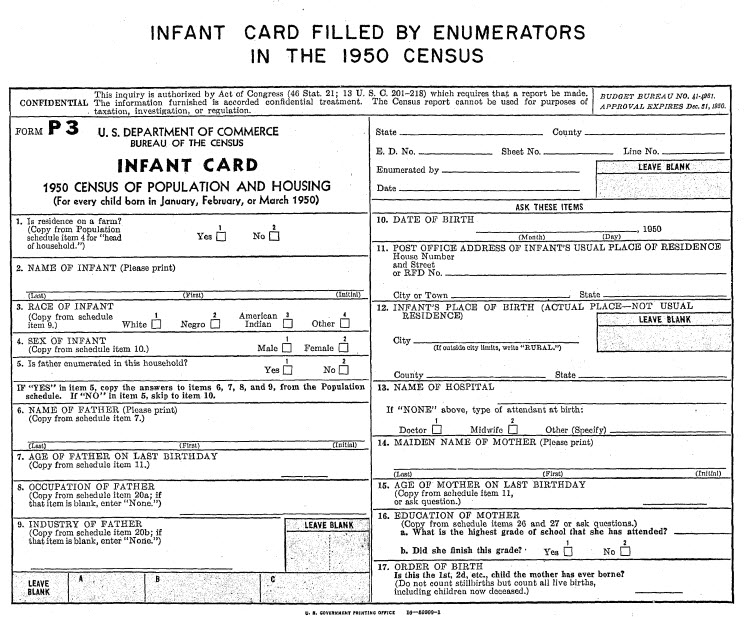
What are 1950 Census Infant Cards?
There’s also an entire page in the instructions devoted to explaining what Infant Cards were and the information they were to contain. If you have relatives who were born in January, February or March of 1950, they would have had a special Infant Card completed just for them. Learn more: Download the infant card PDF
1950 census infant card.
How Accurate is the 1950 US Census?
Several procedures were put in place in an effort to dramatically improve the accuracy and completeness of the 1950 census. These included:
improved enumerator training,
providing enumerators with detailed street maps of their assigned areas,
publishing “Missed Person” forms in local newspapers,
and setting aside specific days to conduct a special enumeration of people staying in hotels, motor courts, and other places frequented by transient people.
Also, in an effort to ensure greater accuracy and completeness, a post-enumeration survey was instituted for the first time. The Census Bureau recanvassed a sample of approximately 3,500 small areas and compared these to the original census listings. The goal was to identify households that might have been omitted in the original enumeration. They also took a sample of about 22,000 households and reinterviewed them to determine the number of people who might have been missed in the first count.
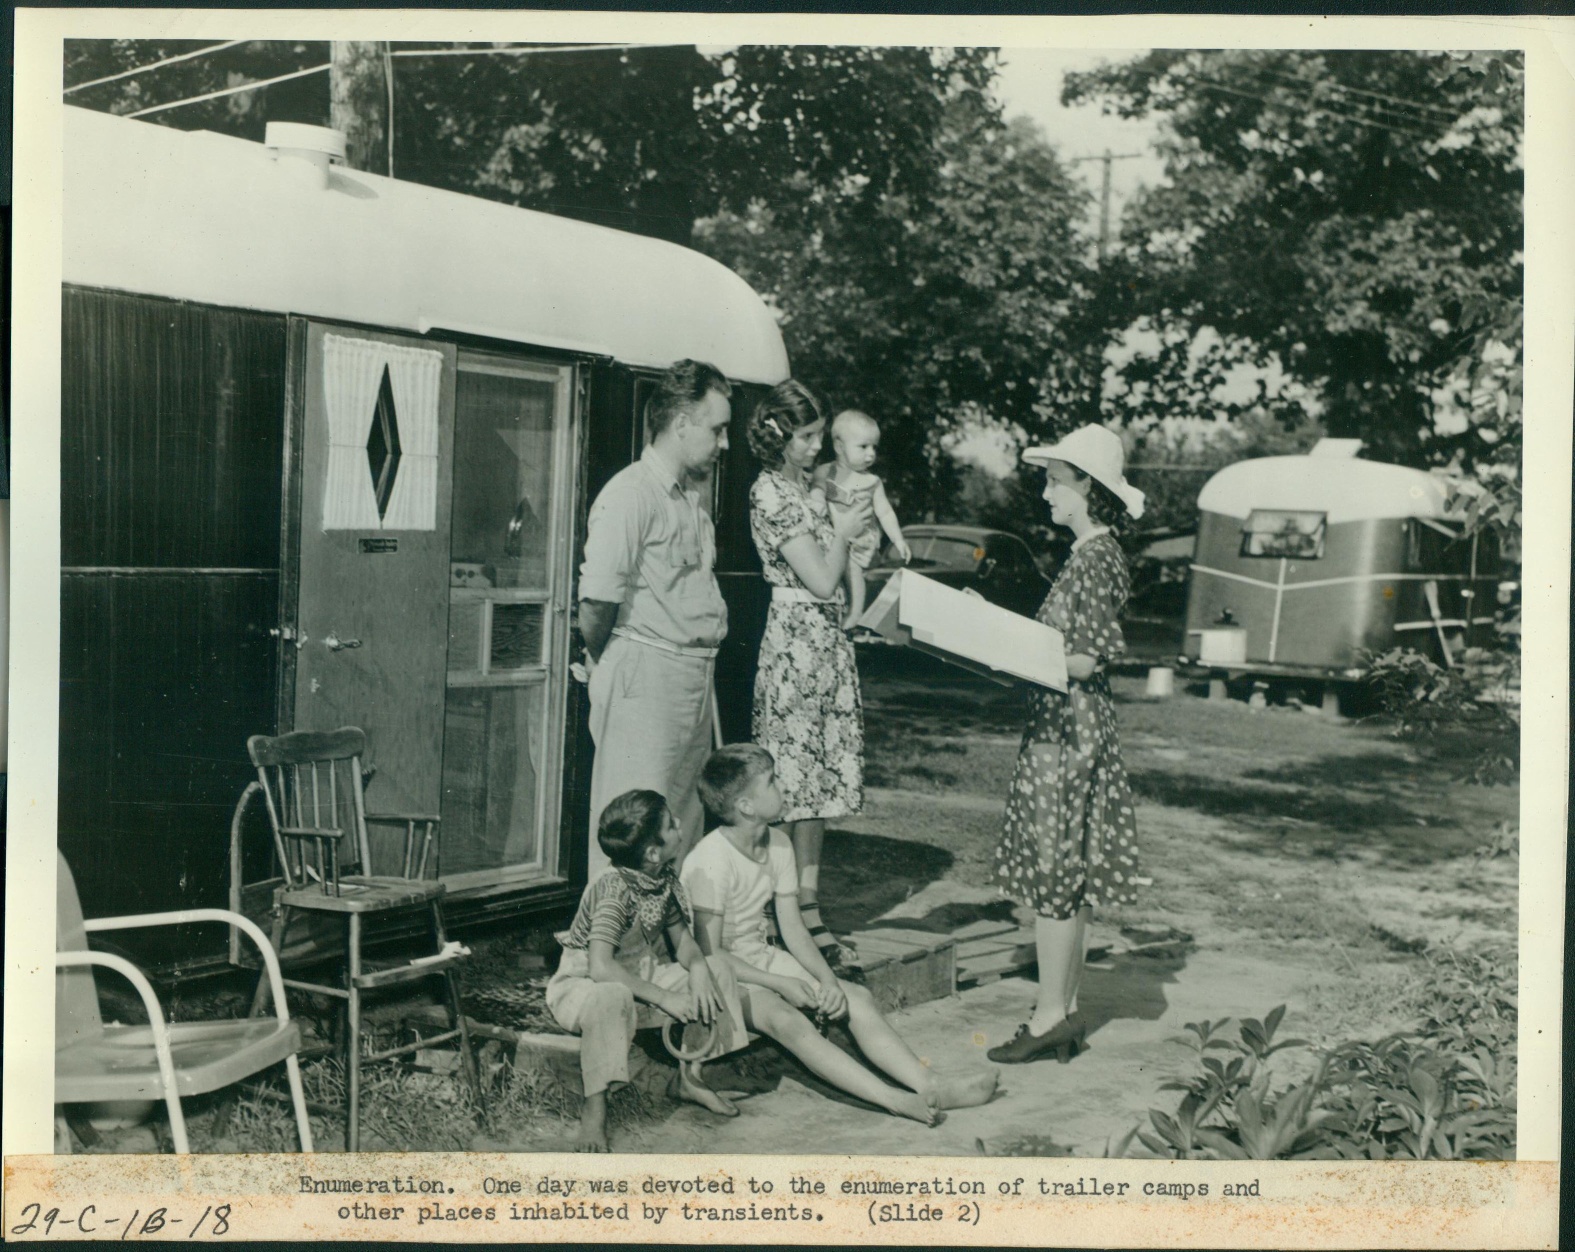
How Were Transient People Counted in the 1950 Census?
The challenge of counting people is that people can move around. This means they could be counted twice, or the genealogist’s nightmare: not counted at all!
The solution to counting transient people in the 1950 census was T-Night canvasses. The “T” stood for “transient” and they were held on Tuesday April 11 & Thursday April 13, 1950. They were designed to provide a more accurate count of people who did not have a fixed address or were temporarily away from home.
“Transient” enumerations were conducted on specially designated days in 1950. (source: census.gov)
Tuesday, April 11, 1950 was the date for “an intensive drive to cover in a single night the occupants of certain places usually devoted to transients” such as hotels, YMCAs, and tourist courts or camps (campgrounds). Young men were moving to the city from rural areas, and the YMCA (Young Men’s Christian Association) was a popular, safe and affordable place to stay. By 1940 YMCA room across the country totaled more than 100,000.
According to the instructions, enumerators were to visit these facilities from 5 p.m. to 11 p.m. on Tuesday evening and again from 7 a.m. to 12 noon the next day. On Thursday, April 13, 1950 enumerators turned their attention to missions and flophouses. T-Night enumerators assigned to these facilities were to “station themselves at the main entrance or the lobby of the place” and instructed to interview guests, resident staff and employees personally.
Another unique feature of T-Nights was that enumerators used the Individual Census Report Form (ICR). In an unusual move, it was completed by the person being counted instead of by the census taker. This ensured privacy for the informant since census interviews often had to be conducted in hallways or a room with other roomers. Thanks to the 1950 census enumerators working the hotel lobby, asking guests passing through if they had already completed an ICR, calling up guests on the house phone and working with staff on identifying those checking in, there’s an even better chance that we will find our family members in the 1950 census.
What Does “REG” mean on the 1950 Census?
Even after all of this extra effort, some people never completed the ICR form. In those cases, the enumerator would fill out the ICR on information taken from the hotel register. The entry on the census would be marked “REG” indicating that the information came from the hotel register.
The 1950 Census Residential Survey
A new feature of the 1950 census was the Residential Survey. In a separate surveying effort, information was collected on a sample basis from owners of owner-occupied and rental properties and mortgage lenders.
1950 Census Technology Trivia
According to the National Archives, “The Census Bureau began use of the first non-military computer shortly after completing the 1950 enumeration. UNIVAC I (for Universal Automatic Computer), the first of a series, was delivered in 1951, and helped tabulate some of the statistics for the 1954 economic censuses. It weighed 16,000 pounds and used 5,000 vacuum tubes.”
5 Things to Do While Waiting for the 1950 US Federal Census
Looking for something to do now while you wait for the 1950 census? Here are just a few things you can do while you wait:
1. Review your family tree. Make a list of those families you want to look up. And look for gaps and questions that might be able to be answered using the 1950 census.
2. Look for 1950 family addresses.
Old letters
Diaries
Scrapbooks
Ask Relatives
City directories
Vital Records
Occupational records
Newspapers
Social Security Records
1940 census addresses
3. Use the One-Step website to find Enumeration District Numbers
Enter the state and town to retrieve the map
Find your ancestor’s address on the map
Make note of the ED number written on the map for that address
Note: The One-Step website includes some maps not found at the National Archives!
4. Download the Enumeration District Map for your Ancestor’s Home Again, you can access the maps through the One-Step website or the National Archives website. These are excellent research resources to have on hand. They can be used to create map overlays in the Google Earth Pro software. Step-by-step instructions for doing so can be found in my book The Genealogist’s Google Toolbox and my downloadable video tutorial series Google Earth for Genealogy.
5. Check out the 1790 through 1940 census records online at the National Archives. Census records can be found at many popular genealogy websites. The National Archives has a great resource page listing each decennial census and the associated online resources including where census images are hosted and searchable for free or on subscription websites. It also includes additional resources and background on each census taken.
If you’ve been wondering how to write and self-publish a book about your family history, my guest in this week’s free webinar has answers for you!
Amazon Link to Buy the Book
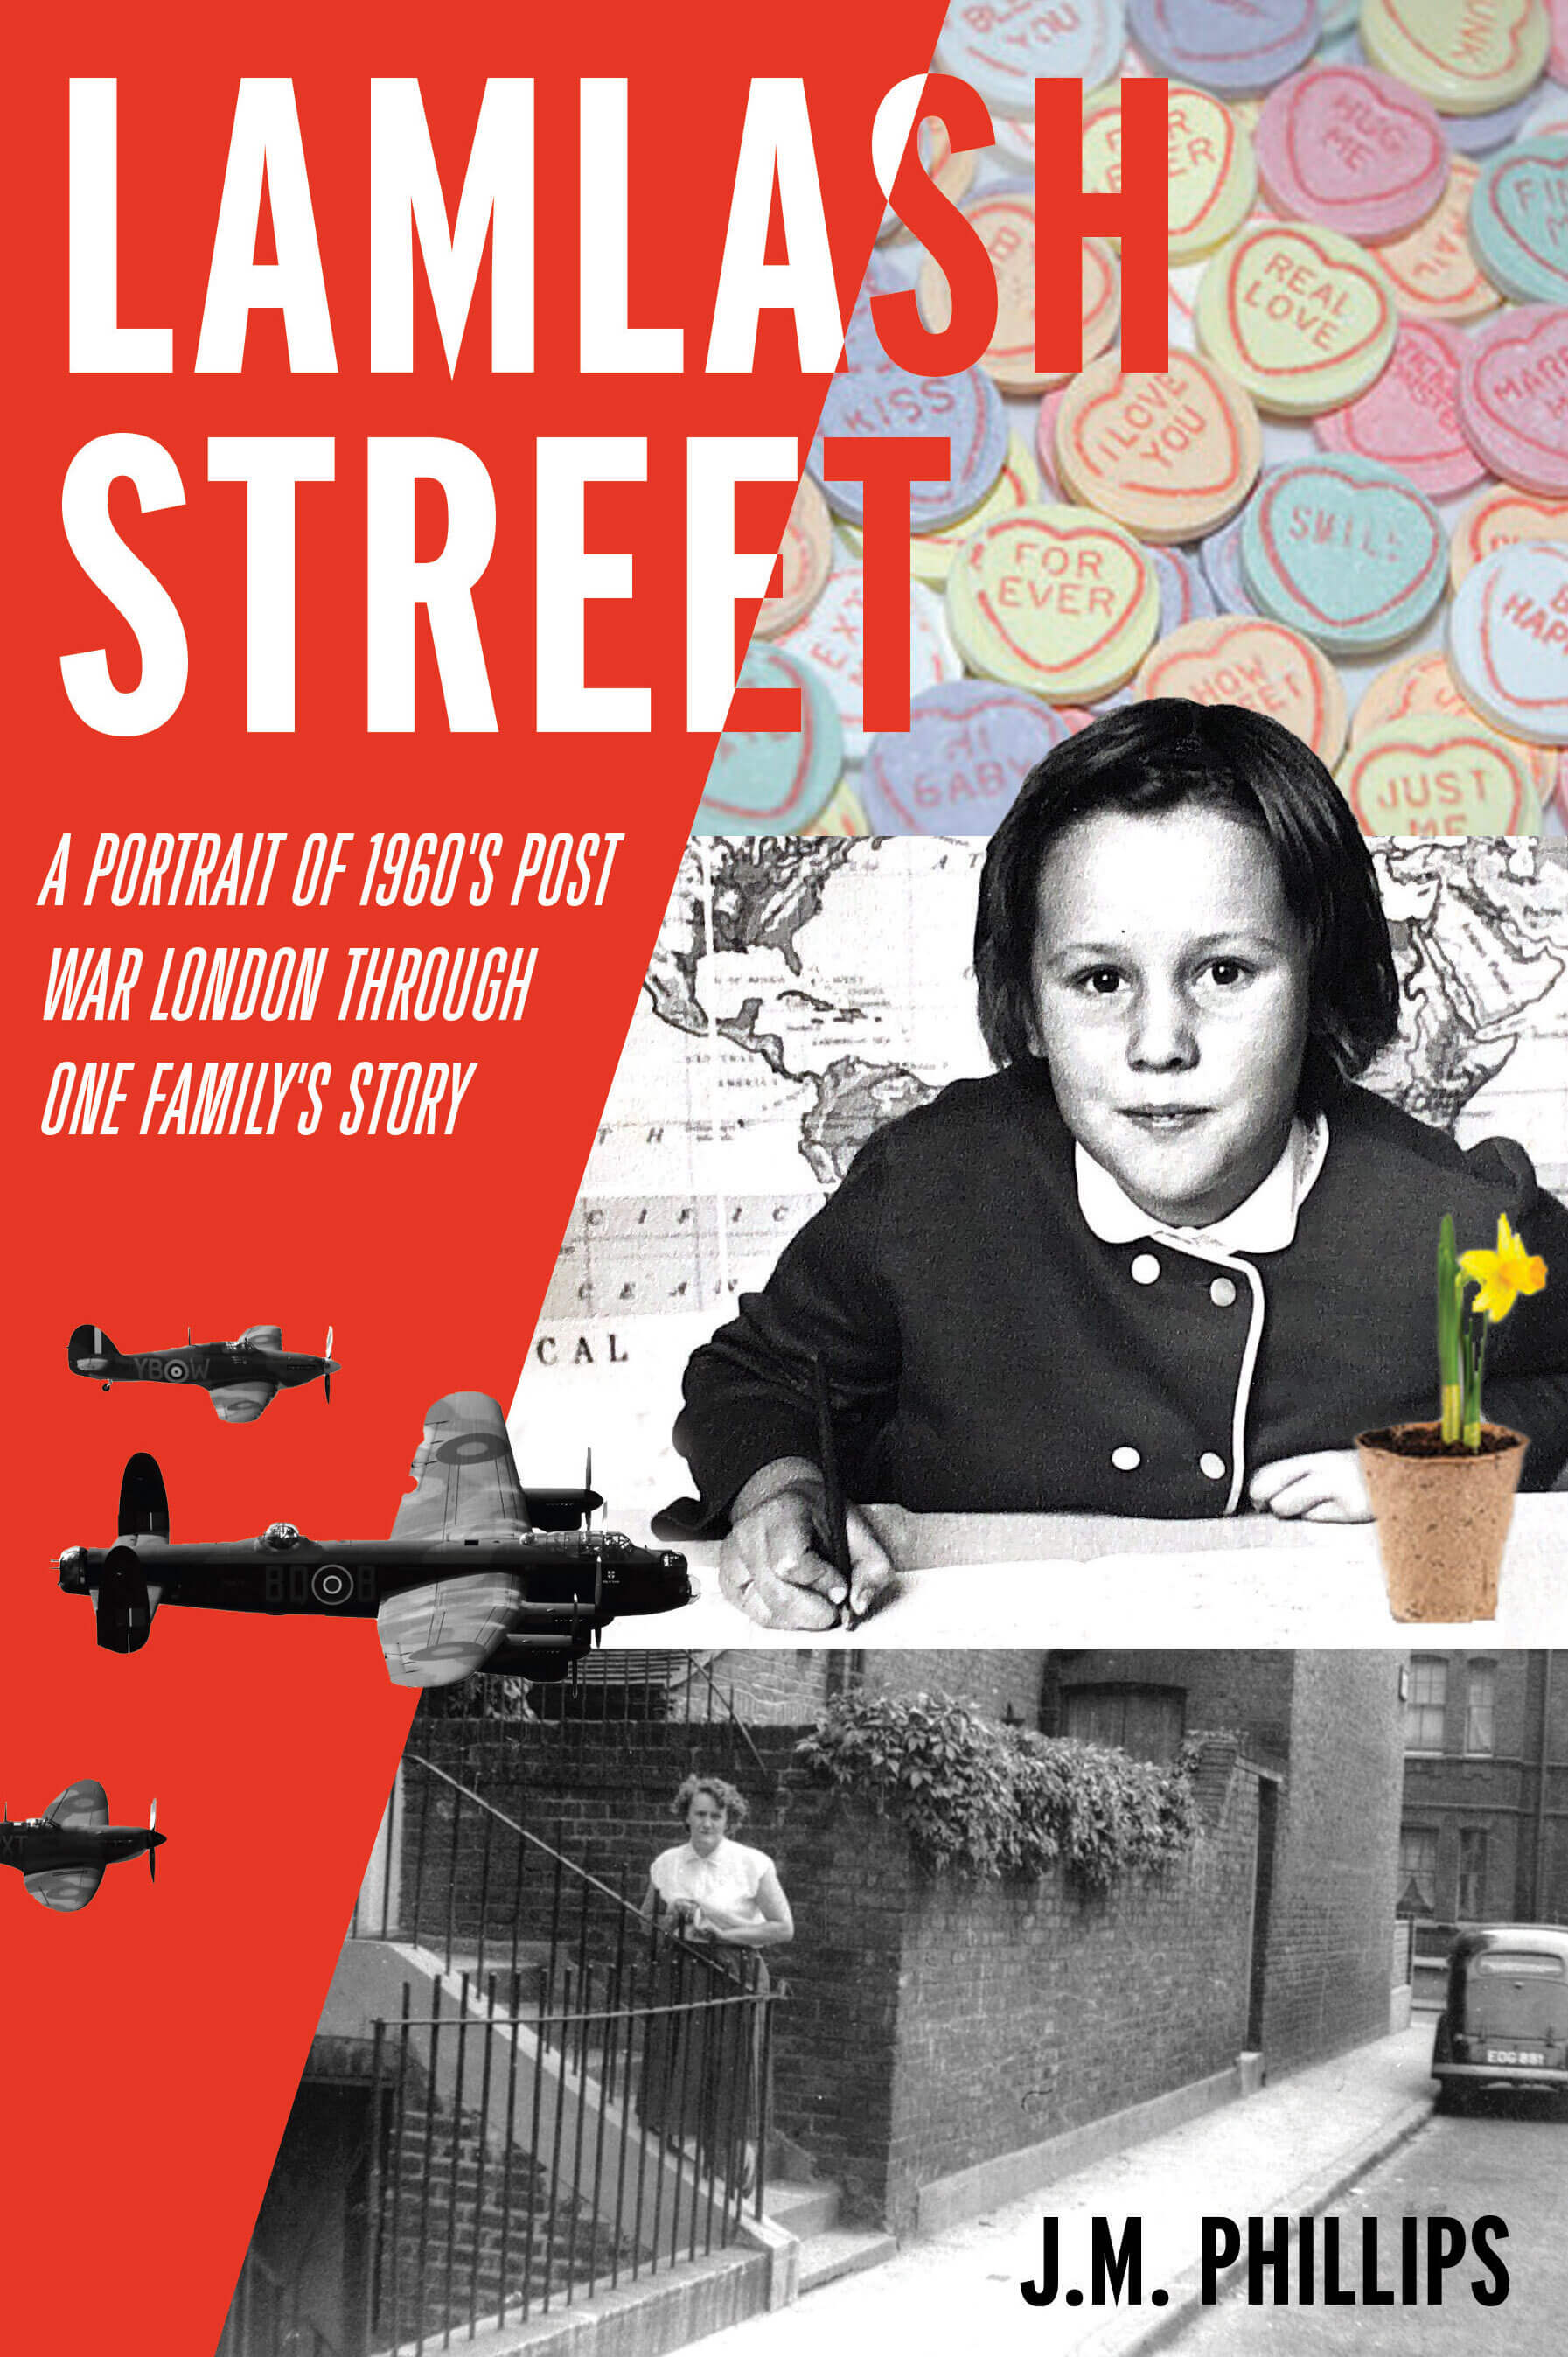
Click here to buy the book. (Thank you for using this link which helps make this free show possible.) J.M. Phillips is the author of the new book Lamlash Street,A Portrait of 1960’s Post-War London Through One Family’s Story available at Amazon in paperback or Kindle.
Elevenses with Lisa Episode 50
Join me on Thursday, April 1, 2021 at 11:00 am CENTRAL TIME for the live premiere of my interview with J.M. Phillips. I’ll be joining you live in the chat as watch together at the Genealogy Gems YouTube channel.
In this episode author J.M. Phillips shares:
How to be a great family history storyteller
Her favorite writing techniques that help create a compelling story
What she learned about self-publishing (and what you need to know)
Her experience living on and writing about Lamlash Street
My Guest: Author J.M Phillips
Jill Phillips is a family storyteller with a passion to inspire families to connect through the telling of their past. She started life on Lamlash Street in London, emigrated to Canada, where she obtained her master’s degree, and spent 30 years working as an Occupational Therapist and Hospital Manager. Motivated by her family’s experiences in 1960’s London, Jill shares their stories to celebrate a time of close family connections in difficult life situations and a way of life which is fondly remembered.
About the Book Lamlash Steet:
Explore a world that can’t be visited anymore—South East London, 1963.
On Lamlash Street, Cockney families have more life and character than money, living among the bombed out and condemned buildings. Post WWII London will evolve swiftly into the era of The Beatles, Twiggy, and modern, swinging London.
Experience the lively true story of a girl on her way to being a young woman, coming-of-age at a moment in London’s history unlike any other. Jill Phillips tries to capture her first kiss while navigating a world turning upside down and the trauma that her parents and uncle experienced during the war.
It’s a time when a local factory shutting down could mean more than just job loss. As families are torn apart, they rely on questionable yet quirky neighbors and find inventive ways to survive—like pay cigarette machines in the house and Christmas presents “special ordered” for a fraction of the cost.
Seen-but-not-heard by the adults in her life, Jill looks for young love and how to define herself. Stories of Nazi aircraft on the walk home from school, watching Doodle bugs (flying bombs) drop on London from rooftop perches, and her uncle’s many unsettling stories of war as young merchant mariner give her a unique lens of the world and what a better future could look like for her family.
Lamlash Street: A Portrait of 1960’s Post-War London Through One Family’s Story is a heartfelt and funny historical memoir.
How to be a family history storyteller.
In her new book Lamlash Street, Jill talked about how her uncle often shared his stories of fighting in World War II. I asked her what she thinks the value is of passing family stories like these from one generation to the next. Jill described how sharing family stories can often form connections between family members that previously couldn’t exist. By re-telling the past, we can learn how families can move stronger into the future. We can learn more about family decision making. Jill gained a sense of peace about turbulent times in her childhood from learning more about why her mum and dead did what they did, such as moving from Lamlash St. to Kent.
Jill’s uncle was a talented storyteller and I asked her if she had been one before writing the book. While she was emphatic that as an academic in her career she did not consider herself a storyteller, ultimately the experience of writing the book was “one of the most rewarding things I’ve done.”
Jill now takes comfort from her mum’s stories, and feels that they connect her more with her family. Writing and publishing your family’s history can help you learn even more about it because it so often generates even more connection and conversation within the family. That was certainly Jill’s experience, although she found her family very skeptical about the book project at first!
Lisa: Were there any tangible things you did to hone your skills as a storyteller and writer?
Jill: “I told myself ‘yes, you can do this!’”
How to Get Started Writing Your Family History Book
Just do it
The more you write the better you get at it.
The more you tell the stories, you better you get at the storytelling
Don’t think on day one that you should be able to write a great massive novel. Take it a piece at a time.
5 Strategies for Writing a Compelling Family History Book
Jill started by just writing down a list of the stories she could remember. Then she could add to it and go ask more questions of family members. Her advice: ‘Focus on just getting the stories down.”
To turn your family history book into a page-turner, create a “washing line”. Jill started by printing all her stories and then spreading them out. She says that individual stories are the article of clothing you pin on the story line. The washing line is the way you string them together.
Look for a common theme. Jill also used a single year as a theme and then string the stories to the events of the year. She would look at the remaining stories to see how she could combine them with what she had.
You should always have some romance in your stories. Jill decided to include a childhood crush.
Bookend the story by starting and ending with something consistent or thematic. Jill chose Christmas. The circumstances between Christmas 1962 and Christmas 1963 were dramatic, and provided contrast to the consistency of the familiar holiday.
Lisa’s tool suggestions:
Scrivener
Powerpoint slides
Paper, sticky notes, index cards
Jill’s Encouragements for Writing Your Story:
Don’t be overwhelmed by it.
Just stick with your family’s stories.
Don’t worry about stringing everything together until you have collected all your stories.
“Just take it a piece at a time.” You have to find what works for you.
How to Ask Relatives for Stories
I asked Jill if she ever anybody who resisted sharing their stories when she asked. Did she have any special techniques to warm things up?
Jill’s tips for gathering stories from reluctant relatives:
You have to be sensitive that there will always be stories people don’t want shared.
Keep things on the light side.
Remember you don’t have to include everything. Jill didn’t.
“I didn’t push it. Because we don’t know the details. We don’t know what happened at that time, why it’s such a sensitive area. And I really wanted something that the family would be warm and positive towards.”
Consider ways to make it less controversial. Jill felt that the fact that her book was about a 10 year old made it less controversial. “The whole point of this was to celebrate the family, not to cause division.” Some authors opt to do so. It’s your decision.
Publishing Your Book
Jill decided to self-publish her book because it gave her more control over the process and the outcome. It’s also an affordable option. However, she didn’t shy away from asking for help. She was very happy with the experience.
She used a full-service self-publishing company called Book Launchers. They hand-help her through the process of self-publishing and promotion. You can also go with more do-it-yourself print-on-demand services like Lulu, Book Baby, or Create Space. Need more references? Try talking to a local printer in your town.
Avoiding Self-Publishing Pitfalls
If you get easily overwhelmed with decisions and details a hand-holding self-publishing company is a good way to go.
Speak to someone who has been through the process before.
Understand that it’s much more complex than you can imagine.
Find an online self-publishing support group.
Relax and realize that the process of self-publishing takes a lot longer than you think it will.
Secrets for Turning Family History into an Entertaining and Compelling Book
Drop little breadcrumbs along the storyline to keep people anticipating and engaged.
Keep the sections within the stories short.
Include a variety of perspectives, locations etc. when you can.
Help the reader visualize the scenes with great descriptions and details.
Don’t get too involved in very long scenes.
Resist going over and over something. It doesn’t drive the idea home – it makes it boring!
Lisa mentioned the use of linguistics in tracing heritage. You can hear Lisa’s conversation with forensic linguist Dr. Robert Leonard in Episode 89 and Episode 90 of The Genealogy Gems Podcast.
About the Book: Lamlash Street by J.M. Phillips
(A portrait of 1960s post war London through one family’s story) Explore a world that can’t be visited anymore—South East London, 1963. On Lamlash Street, Cockney families have more life and character than money, living among the bombed out and condemned buildings. Post WWII London will evolve swiftly into the era of The Beatles, Twiggy, and modern, swinging London.
Please use this link if you decide to pick up a copy of the book.
Experience the lively true story of a girl on her way to being a young woman, coming-of-age at a moment in London’s history unlike any other. Jill Phillips tries to capture her first kiss while navigating a world turning upside down and the trauma that her parents and uncle experienced during the war.
It’s a time when a local factory shutting down could mean more than just job loss. As families are torn apart, they rely on questionable yet quirky neighbors and find inventive ways to survive—like pay cigarette machines in the house and Christmas presents “special ordered” for a fraction of the cost.
Seen-but-not-heard by the adults in her life, Jill looks for young love and how to define herself. Stories of Nazi aircraft on the walk home from school, watching Doodle bugs (flying bombs) drop on London from rooftop perches, and her uncle’s many unsettling stories of war as young merchant mariner give her a unique lens of the world and what a better future could look like for her family.
Learn a Little Cockney with Author Jill Phillips
Apples and Pears rhymes with Stairs Bonnet Fair rhymes with Hair
So her mum would say: “Jill, can you go up the apples and comb your bonnet?”
Trouble and Strife is your (rhyming) Wife Plates of Meat is your (rhyming) Feet If your dogs are barking it means your feet are aching!
Google offers a variety of ways to help you find and search for images. In fact, there are so many different ways it can get a little confusing. In this video and article I’m going to show you how to find images and photographs that apply to your family history. Who knows, we may even find an ancestor’s photo. I’m also going to show you how you can use Google Images to even help identify some of the images and photos you have in your family scrapbooks. These are my best image search strategies and they come my book The Genealogist’s Google Toolbox.
Follow along in the show notes below. The step-by-step instructions are available in an ad-free show notes cheat sheet which is downloadable in the Resources section at the end of these show notes. (Premium Membership required.)
How to Find Photos and Images with Google Images
When it comes to searching for images, part of the confusion comes from the fact that the search experience on desktop and mobile are a bit different. So, let’s start with running a basic image search on computer desktop. There are actually two ways to do that.
#1 Google search for images at Google.com on desktop:
Go to Google.com
Run a search
Click Image results
#2 Search for images at Google Images on desktop:
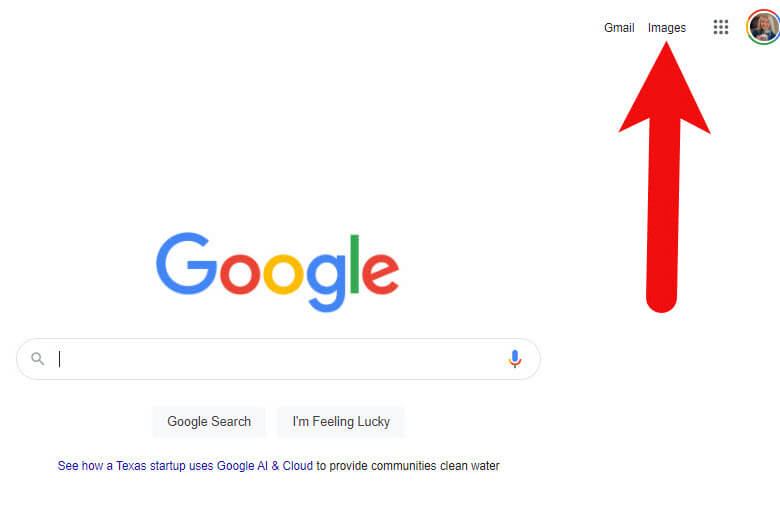
Go to https://images.google.com or go to Google.com and click Images in the top right corner (Image 1)
Image 1: How to get to Google Images from Google.com
Run a text search: Example: John Herring
Images results will be presented
If I’m in a hurry, I’ll usually just search from Google.com because I’m probably over there anyway. But if I really want to find the best image, or I expect to do some digging, I go directly to Google Images.
How to Get the Best Google Images Results
Searching for a name is fine, but chances are there are and have been many people with that name. You’ll need to narrow things down and provide Google with more specific information about what you want.
There are a several excellent ways to refine and dramatically improve your results. The best place to start is by using a few powerful search operators.
The first search operator is quotation marks. By putting quotation marks around a word or a phrase you are telling Google that it must:
Be included in each search result,
Be spelled the way you spelled it,
And in the case of a phrase, the words must appear in the order you typed them.
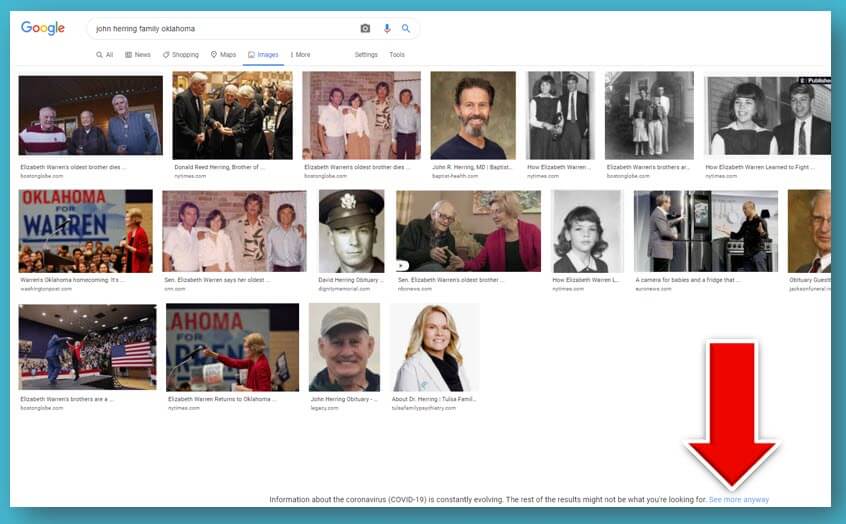
You can also use an asterisk to hold the spot for a middle initial or middle name. This is important because without it, Google may pass over these since the name was presented in quotation marks which means its to be searched exactly as typed.
Notice in the following screen shot how this refined search appears. The search operators have made quite an improvement in the image results. I’ve located four photos of my great grandfather! (Image 2)
(Image 2) Google Images found photos of my great grandfather
Google might restrict how many images it shows you. Click See more anyway at the bottom of the screen to reveal all the results. (Image 3)
(Image 3) Click to see more image results
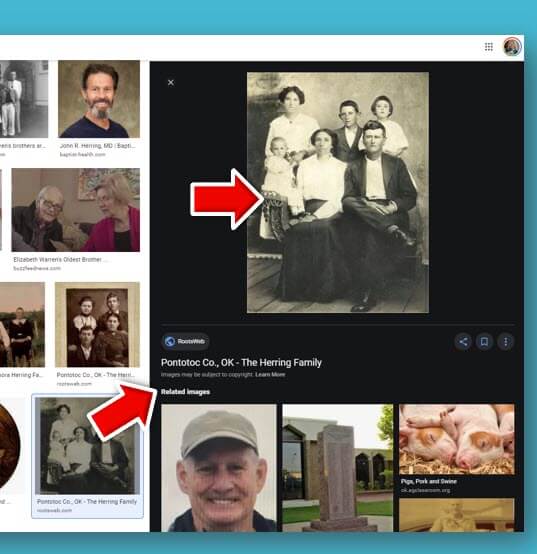
You may need to scroll down to see even more results. Click an image to preview it. (Image 4)
(Image 4) Click to preview Google Image results
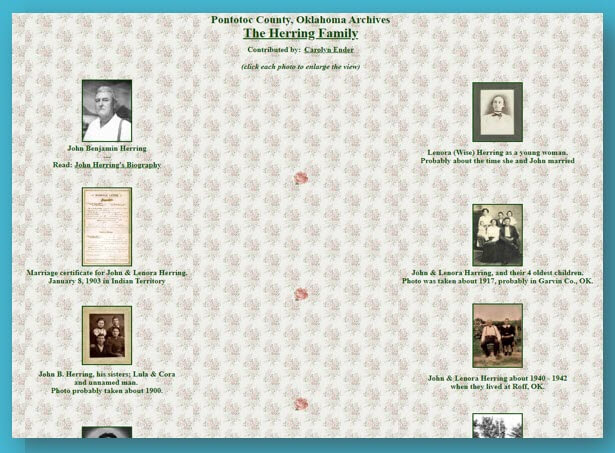
Click the enlarged preview image again to visit the website where it is hosted. I’ve got my fingers crossed that since this website is hosting a photograph of my ancestors, it just might have more. And indeed, it does – genealogy happy dance! (Image 5)
(Image 5) Old family photos found on this web page
How to Narrow Down an Image Search to Old Photos
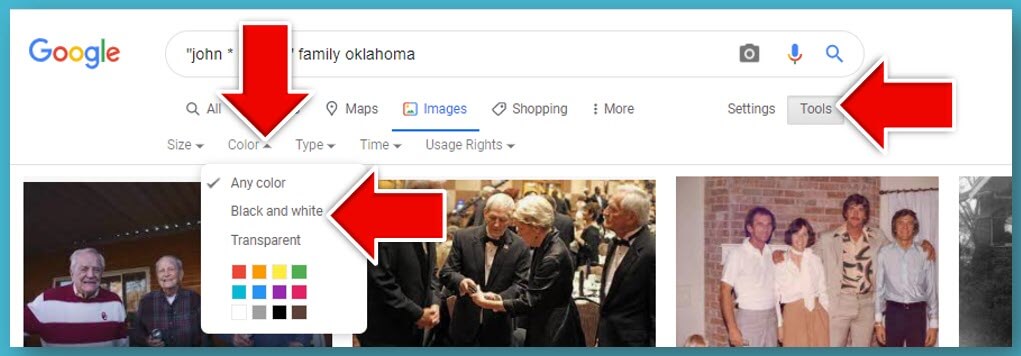
One of the ways you can zero in on old photos is by filtering down to only Black and White images. This makes sense because most of our older family photos are black and white.
On the Google Images search results page click the Tools button. This will cause a secondary menu to drop down. Click the Any Color menu and select Black and White. (Image 6)
(Image 6) How to filter Google Image results
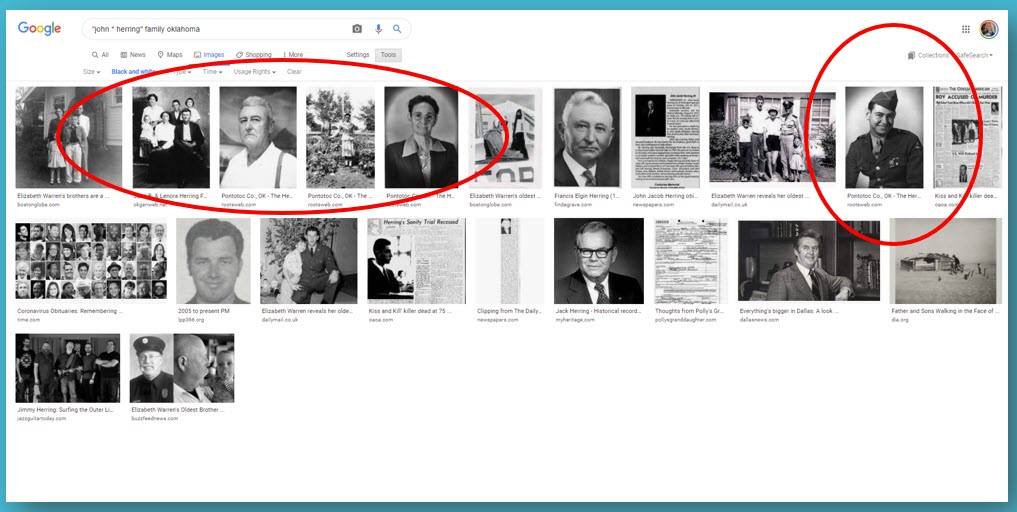
Now all of your image results will be black and white. It’s easy to tell that most of these are older photos. (Image 7)
(Image 7) Filtered image results
Permission to Use Images Found with Google Images
If you want to use any of the photos you find, you’ll need to ensure that you have permission to do so. Start with the FAQ at Google Search Help. This page will help guide you through issues like Fair Use and how usage rights work. In the end, the best thing to do when in doubt is to contact the person who posted the photo and explore any requirements they may have regarding use of the image.
How to Use Google Images to Identify Images and Photos
Do you have unidentified photographs, old postcards or other images in your family scrapbooks or photo albums? Google Images just might be able to help!
Start by first digitizing the image (I use a flatbed scanner) and saving it to your computer hard drive. Then head to Google Images on your computer and click the camera icon in the search field. This will give you two options:
Paste URL (we’ll get to that in just a bit)
Upload an image (this is the one you want – click it)
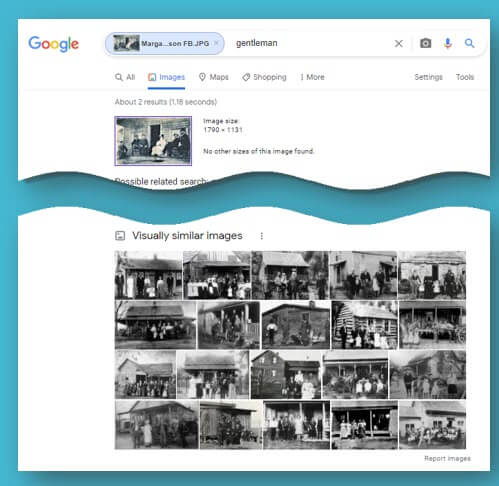
Click Choose File and grab the photo you saved to your computer. Google Images will search the Web for that image. It may find an exact copy, or it may deliver visually similar images.
Notice on the Google Images search results page that Google has added keywords to the search field at the top of the page. You’ll also see a tiny version of the image you searched. The keywords may be rather generic such as gentleman, family, etc. Try replacing these words with more specific words about the photos and what you are looking for. For example, you could replace the word gentleman with your ancestor’s name in quotation marks, or replace the word family with the family surname and the town where they lived. Experiment and try different variations to see what provides the best results.
How to Upload an Image to Google Image Search (Reverse Search):
Navigate to and select the digitized photo you saved to your computer.
Google will attempt to find that exact image. If not the closest visually. You will see words in the search field along with your photo. These words describe what Google AI noted about the photo. For example, when I upload a photo of Margaret Scully sitting in her rocking chair, Google note “sitting” and delivered old photo of people sitting. When I upload a photo of the John Herring family Google notes “family” and provides old photos of family groups. Neither Margaret nor the Herrings are well-known, so this isn’t a surprise. If I upload a postcard from an ancestor’s scrapbook of a well-known or famous location, Google will likely find additional copies on the web and provide background information on the location and a website address for it if there is one.
You can revise this search by replacing the words that Google noted (i.e. family) with the person’s name of the surname. In the case of the John Herring group photo, I replaced family with Herring and then John Herring.
Remember the option to Paste URL? Use this when you find a photo on a website, (or if you have posted a photo on your own website or blog) and you want to find more like it. Right-click (PC – or Control Click on a Mac) on the image and Copy Image Address. Next, head back to Google Images, click the camera icon and paste the URL. Google will use that image to run your image search.
How to Search an Online Photo with Google Images (Reverse Search):
Right-click on a PC (Control Click on a Mac) on the image on the web page.
In the pop-up menu select Copy Image Address.
Go to Google Images.
Click the camera icon in the search field.
Paste the image URL that you copied to your computer clipboard (on a PC use Control V on your keyboard.)
Click the Search by Image button to run your search.
Searching with your own image or an image you find online can help you discover many more website that have the visual content you need. In this episode I searched using an Elevenses with Lisa viewer’s old photo and revised the search with the name of the town. This resulted in a wonderful assortment of websites to look at that also hosted photos from the same town and timeframe.
The initial Google Image results added the keyword gentleman to the search field. But you can see by the visually similar images it found that it was able to target photos that included more similarities than just gentleman. These photos also matched in other important ways (Image 8):
House
Porch
Multiple People
White dress
Old photo
(Image 8)
Who might have photos online of your family? Here’s just a short list of possibilities:
Archives
Libraries
Historical Societies
Newspapers
Genealogy Websites
Cousins
Social Media
How to Use Google Image Search on Mobile
The Google Images camera icon allows you to conduct reverse image searches. However, whether you use a browser app like Safari or Chrome to go to Google Images or you use the Google search app, you won’t find the Google Images camera icon in the search field. Google Images is different on mobile than it is on computer desktop. The main difference is that there is no camera icon for uploading images to search. However, there’s a little secret for getting around that problem.
On an iPhone / iPad you can switch your settings for the Safari app so that it behaves more like a desktop computer. And for our purposes, that means getting the camera icon in Google Images.
How to Search Your Own Image Using Google Images on an iPhone or iPad
Open the Settings app
Scroll down and tap the Safari app
Scroll down and tap Request Desktop Website
Tap the slide to activate All Websites
Close the Settings app
Open Safari
Go to Google.com – if you’re signed into your account you can tap the apps icon (9 dots) and open Images or just google Google Images
Now you have the camera icon in your search bar ready to reverse search images!
How to Reverse Search a Web Image on an iPhone or iPad (Reverse Search Images)
When you find a photograph on a website in Safari, press and hold the image
Tap Copy
Go to Google Images (after changing your settings to Desktop Website)
Tap the camera icon
In the Paste URL field press and hold and tap Paste
The web image URL will appear in the search field.
Tap the Search by Image button to run your search.