Author Nathan Dylan Goodwin (The Sterling Affair) joins Lisa Louise Cooke for a conversation about writing, DNA, Criminal Cold Cases, and his new book The Chester Creek Murders.
This audio comes from my YouTube video series Elevenses with Lisaepisode 47.
Listen to the Podcast Episode
To Listen click the media player below (AUDIO ONLY):
04:41 How Nathan Dylan Goodwin researches his books
11:07 Golden State Killer Case & what he learned from Barbara Venter
Don’t miss the Bonus audio for this episode. In the app, tap the gift box icon just under the media player. Get the app here.
Get the Free Genealogy Gems Newsletter
The Genealogy Gems email newsletter is the best way to stay informed about what’s available with your Premium eLearning Membership. Sign up today here.
Doing genealogy research generates a wide variety of research notes: typed and handwritten, audio, photos, video, and screenshots of information on websites. If you want one tool to pull together your current research projects, Evernote might just be the answer. In this video and article you’ll learn the role that Evernote can play, what it is and how to set it up, and your options for using for free or as a subscriber.
Evernote for Genealogy Video Tutorial
In this video and article Lisa Louise Cooke will discuss:
What Evernote is and the role Evernote can play in your genealogy research
Use it for free or upgrade to get all the bells and whistles like OCR and use on all your devices. (We will be compensated if you use our affiliate link. Thank you for supporting this free show.)
Show Notes
In my recent videos on how to avoid research rabbit holes that keep you from your genealogy goals, I mentioned that I use Evernote to capture BSOs or bright shiny objects that are interesting but not what I’m working on at the moment. So in this video I’m going to explain what Evernote is, and how to get started using it.
Evernote puts all your notes in one place and offers an incredibly fast and easy way to retrieve them.
Evernote is a:
website
software program for your computer (Win & Mac) that you download for free from their website
mobile app (iOS & Android): search for Evernote in your device’s app store
a web clipper for your computer’s web browser
Benefits
Genealogy can get a big messy. Information can be gathered from countless sources and in a variety of forms. You could funnel things through a cloud service like Dropbox. However, because Evernote is a note taking app, it offers unique and super helpful features:
Create all types of notes
From all of your devices. Thanks to Cloud synchronization you can take a note on any device and always have access to the most current version. (Free mobile app)
Web clipping – It allows you to clip items from the Internet (rather than saving entire bulky web pages),
OCR technology makes notes (such as newspaper articles) keyword searchable (subscription)
Data like URLs and the date you created the note is automatically included
No total storage limit, just monthly upload
You can use it for free, and upgrade for all the bells and whistles.
Install the software on your desktop computer (Windows & Mac)
Download the web clipper to your browser (app store or Google it)
Download the free Evernote app to your mobile devices from the iTunes App Store or Google Play
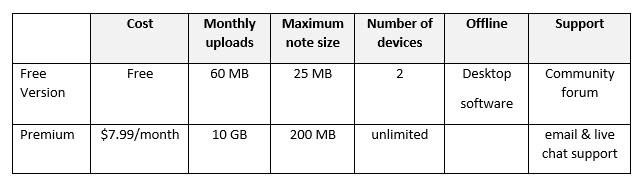
Features & Costs
(Subject to change. Visit evernote.com/compare-plans)
Evernote pricing plans comparison Sept. 2021 – See the website for the most current offer.
Software Home Layout
Evernote’s Home view gives you a summary of what you’ve got going on in Evernote. If Home is new to you and you don’t see it, simply head to the left Navigation menu and click Home.
Home gives you a place to sort of summarize what you’ve got going on in Evernote. It also allows you to add more personalization.
A fun way to personalize Evernote is by adding a background image. Click Customize in the upper right corner, and then click the Change Background button. Here you can add a preset image or add your own.
By default, Home comes with widgets such as:
Notes (highlighting your most recent notes, and Suggested notes based on your activity)
A Scratch Pad
Recently Captured items by type (web clips, images, documents, audio and emails)
While you’re in Customize mode, you’ll see additional available widgets like:
Calendar (allowing you to sync your Google calendar with Evernote)
Filtered Notes
Notebooks
Pinned Notes
An additional Scratch Pad
Shortcuts
Tags
Tasks
We’ll explore some of these further in a moment. But first, let’s create our first note!
All Notes View – SnippetView:
Left column = your files and organization
Center column = search for notes
Right column = the note you are currently working on
Change the layout by clicking the View Options icon (in SnippetView it appears at the top of the search column). This will give you a variety of layout options.
Change what appears or is hidden from view, and whether the view is dark or light by clicking View in the menu.
Notetaking 101
Create a note by clicking the New Note(+) button at the top of the screen.
Creating a new note is as simple as starting to type. Evernote saves your work instantly and without any extra effort on your part. Notes are saved in “the Cloud” on Evernote’s servers. This means all of your notes are automatically backed up. In addition, all of your notes will sync across all of your various computing devices. And Evernote facilitates sharing notes with others for research collaboration.
Click the Info icon at the top of the note to see the meta-data for that note. You can add and edit this information.
Types of Notes:
Typed
Sketched
Photos
Attachments
Video
Audio
Note Info has changed and can now be found by pressing Control + Shift + I on your keyboard, or clicking the More Actions (3 dots icon) in the upper right corner of the note and selecting Note Info.
Tagging is the Key to Organization
Add a tag based on important keywords associated with the note.
Examples of tags for genealogy:
Surnames (Cooke, Moore)
Record types (birth, census, land)
Locations (Indiana, Germany)
Time frames (1900-1909, 1910-1919)
Tasks (pending, add to database, follow up, etc.)
To tag a note, click Add Tag at the top of the note and select a tag from your list or add a new tag. Tags will appear in the left column. Click any tag in the left column to retrieve all notes with that tag.
Evernote Tasks
In June of 2021 Evernote added a Tasks feature. It operates just a little differently than how I’ve been using tasks. Evernote tasks are:
To Do Items
Note Specific (versus a tag which can retrieve all notes with that task)
Often Deadline Driven
Assignable to Others
Searchable
Where is the Trash?
You will find Evernote’s Trash bin at the bottom of the Navigation bar on the left.
Notebooks
Notebooks take organization a step further. I create notebooks sparingly. I use them to divide Evernote up into workspaces: Genealogy, Personal, Business, etc. I also use them for long-term and collaborative research projects that I may want to share with others. You can drag and drop notebooks on top of each other to create Stacks, although Evernote only allows one level of stacking.
How to create a new notebook:
In the menu select: File > New Notebook
Name the new notebook in the pop-up window
Select notebook type – usually you would set it up to synchronize, but you do have the option to have the notebook reside only on the computer it was created by selecting Local
The Cloud and Synchronization
Notes are saved on your computer and in the Cloud on Evernote’s servers. This means all of your notes are automatically backed up, and also accessible from your account on their website. Your notes will sync across all of your computing devices that have Evernote installed. There’s no need to manually sync with the new version. It happens automatically whenever you’re connected to the internet.
Web Clipping
As you visit webpages, you can clip just the portion of the page that you want to remember and keep rather than printing the page or bookmarking it. You can type the source citation directly into the note. Clippings appear as images in the note.
How to clip a screenshot using the computer software:
Right-click on the Evernote icon in your computer task bar.
Select Clip Screenshot.
Use the cross-hairs to draw a box around the desired content.
Release you mouse and you will see a quick flash on the screen indicating the content has been saved as a note in Evernote.
In Evernote click on the note to type additional information if desired.
How to download the free Evernote web clipper for your web browser:
Go to: evernote.com/webclipper
The download page will detect the browser that you are using and offer the correct web clipper. Click the download button.
The Evernote web clipper will install in your web browser (look in the upper right corner of your browser for the elephant icon.)
Sign into your Evernote account in the clipper.
Using the Browser Web Clipper:
When you visit a web page and find something that you want to clip, click the Evernote Web Clipper (elephant) icon in your web browser. The browser web clipper can save:
a full page (even the parts out of view)
an article
a simplified article (removing unwanted graphics and text not pertaining to the article)
a screenshot (where you precision clip with cross hairs)
a bookmark
As you clip you can select which notebook to file the note in and add any desired tags. It will also include the URL in the note header.
Search and Retrieval
Type a keyword into the search box and Evernote will locate and display notes that contain the keyword in the center column. This includes typed text from a website clipping or image, as in the example above. With a subscription, OCR technology makes it possible for you to search for words in Evernote to retrieve notes that include those words, both on the clipped image and in printed handwritten text.
This week we’re going to revisit two more early episodes of Elevenses with Lisa that will help you be more productive and organized no matter what device you using for your genealogy research. I’m bringing these episodes out from behind the Premium Membership paywall and making them available for free this week. These will be presented back-to-back as Live Video Premieres on my Genealogy Gems YouTube channel. Part 1 and part 2 of this short series can be found in episode 68. In part 1 we covered what makes us vulnerable to getting distracted, and how a research plan can help. In part 2 we talked about how to deal with BSOs (bright shiny objects!) In this episode 69 we will cover parts 3 (Mobile Organization) and 4 (Online Productivity Strategies).
How Alice the Genealogist Avoids the Rabbit Hole Continued…
Part 1 and part 2 of this short series can be found in episode 68. In part 1 we covered what makes us vulnerable to getting distracted, and how a research plan can help. In part 2 we talked about how to deal with BSOs (bright shiny objects!)
Part 3
In episode 68 we covered:
1. Use a Cloud-Notetaking Service
Get a free Cloud note-taking tool and use it consistently. (Examples include Evernote, OneNote, and Google Keep.)
Use the website, software, and/or app to capture unexpected finds while researching. Both Evernote and OneNote work on all platforms.
Your notes in your account will synchronize between your devices (depending on the program and plan you choose.) You can add to your notes or work with them anytime, anywhere.
2. Schedule BSO Time
I use Google Calendar to stay organized and schedule my BSO time. Create a BSO calendar, and then schedule BSO time on your calendar. These will help you remember to follow up. Knowing you have set aside time in the future to explore the BSO helps you mentally let them go and stay on track with your research plan.
In this episode:
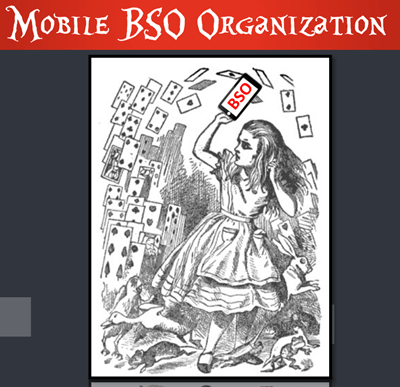
3. Mobile BSO Organization
Success comes from pairing your research plan and process with a great supportive research environment. We have a variety of “environments” we work within such as:
On paper at our desk
On our mobile devices
On our computer
Mobile Genealogy Organization
Let’s look at how we can set up a workflow for BSOs while mobile computing. My two favorite methods for capturing BSOs on a smartphone or tablet are 1) Cloud Notetaking, and 2) Home Screen “Bookmark Apps”.
Option 1: Cloud Notetaking
I’ll be using Evernote on an iPhone as an example. (You may see slight variations in the instructions depending on the service you use and your device.)
Evernote is a great choice if you want to easily sync and use your notes on all devices including your desktop computer and / or laptop computer.
Before you begin, you’ll need a free Evernote account at evernote.com. You’ll also need to download the free Evernote app from your device’s app store, and log into your account.
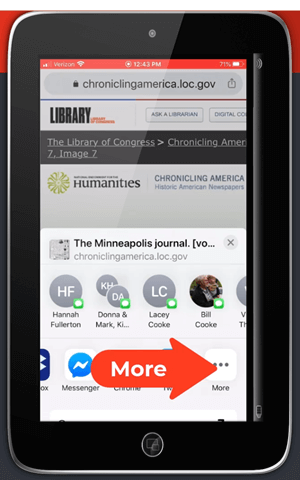
When you come across a BSO while researching online in a web browser (such as the Chrome or Safari app), here’s how to capture it:
Tap the Share icon on the web page.
Select Evernote from the menu. If you don’t see it tap More for the complete menu of available apps. If you still don’t see it, make sure you have downloaded the app.
Tap More to find the Evernote app
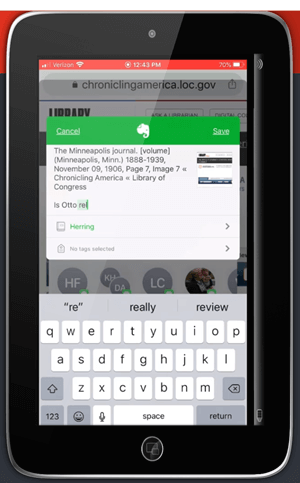
The app will open and should open a new note. Edit the note as desired.
Edit the BSO note
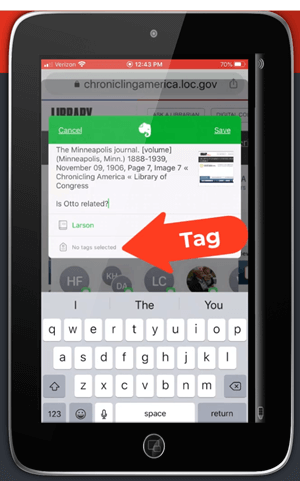
Tag the note with the “BSO” tag, as well as any other tags you find helpful.
Tag with the BSO tag
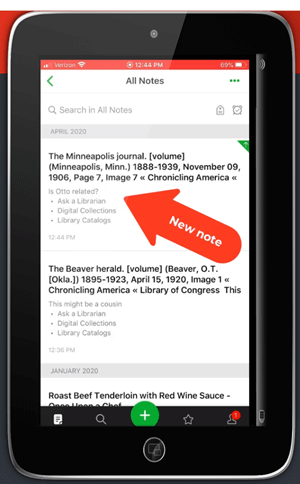
Tap Save.
The note is now saved to Evernote. If you are on WiFi, Evernote will synchronize so that the note will be available from any device signed into your Evernote account.
The BSO tagged note
Option 2: Home Screen “Bookmark Apps”
Keep in mind that these aren’t the same as “Bookmarks” found in your web browser apps. I call them “Bookmark Apps” because they do save a particular web page, and they look just like apps. In the menu this feature is called “add to home screen.” (see image)
Bookmark Apps are best for when you plan to do your BSO follow up on the same mobile device.
How to capture a BSO as a Bookmark App:
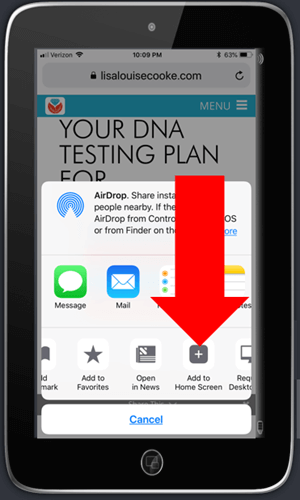
In your browser app, when you come across a BSO web page, tap the share icon.
Tap Add to Home Screen.
Tap Add to Home Screen
Edit the title so it will be easy to remember why you wanted to follow up on it.
Tap Add (iOS – this may be different on Android, or different browsers)
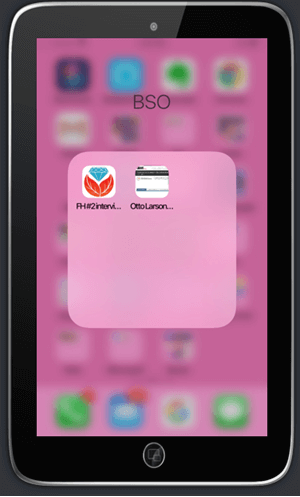
The web page “bookmark app” is now on your home screen.
Once you have created at least two BSO bookmark apps, you can then create a folder.
How to create a folder:
Move the bookmark app by pressing and holding it until it shakes.
Keep your finger on it and drag it onto the other BSO bookmark. This will create a folder.
Name the folder “BSO”.
Press the home button to save.
Bookmark apps in the BSO folder
Now whenever you have some spare time you can tap the BSO folder and get back to one of those items that previously caught your eye.
How Alice the Genealogist Avoids Falling Down the Rabbit Hole Part 4
Creating a Supportive Computing Environment
The following tools are available for your computer desktop or laptop.
Restore Tabs
In addition to using Ctrl+Shift+T (Win) or Cmd+Shift+T (Mac) to restore a closed browser tab, you can also right-click on the new tab plus sign and select Reopen closed tab from the pop-up menu. You can do this multiple times and web pages will continue to open in the reverse-order that they were closed.
Turn Multiple Tabs into One and Save Memory with OneTab
Online genealogy research can leave you with a lot of open web browser tabs. While using multiple tabs allows you to jump back and forth between web pages and records, they can take up valuable computer memory.
You can dramatically reduce your memory usage with the OneTab extension available for both the Chrome and Firefox browsers. With one click, OneTab will combine your open tabs into a clickable list in one browser tab. You can even export the list for future reference.
Get OneTab in the Chrome Web Store here.
Get OneTab in the Firefox Web Store here.
Reduce Email Distractions
Gmail now has a Snooze feature which allows you to temporarily file an email until the date and time you select.
Snoozed emails will reappear in your Inbox at the scheduled time.
Retrieve snoozed emails at any time by clicking “Snoozed” in the menu on the left.
Get Back on Track with MyActivity
When you are signed into your Google account, MyActivity tracks the searches you conduct and the websites you visit. By visiting your MyActivity, you can search for and return to any previous activity. You can also turn it off. Go to MyActivity and click Activity Controls from the menu. Switch the slider to the off position. Visit MyActivity at https://myactivity.google.com/myactivity
Save Time by Previewing Your Google Search Results
Rather than clicking on each search result and loading the page (which also takes you away from the rest of your search results), use the Google Results Previewer web extension for Chrome. Once installed you can simply hover your mouse over a result link to reveal a preview of the page. Then you can decide whether to click through or preview additional results.
Click here to get the Google Results Previewer web extension for Chrome.
We all need reminders now and then to work smart and stay focused. This week we’re going to revisit two early episodes of Elevenses with Lisa that will help you do just that. I’m bringing them out from behind the Premium Membership paywall and making them available for free this week. We’ll cover concrete strategies for staying focused on what matters most, while not losing track of opportunities that present themselves. You’ll also learn about free tech tools that you can put in place to give you peace of mind, take back those lost hours, and help you be more productive.
These will be presented back-to-back as Live Video Premieres on my Genealogy Gems YouTube channel. In part 1 we’ll cover what makes us vulnerable to getting distracted, and how a research plan can help. In part 2 we’ll talk about how to deal with BSOs (bright shiny objects!)
How Alice the Genealogist Avoids the Rabbit Hole Part 1
Don’t let unexpected genealogical finds send you down a rabbit hole any longer. We’ll cover concrete strategies for staying focused on what matters most, while not losing track of opportunities that present themselves. You’ll also learn about free tech tools that you can put in place to give you peace of mind, take back those lost hours, and help you be more productive.
Vulnerability to Rabbit Holes
In order to improve in anything, you have to know your vulnerabilities. When it comes to falling down a genealogical rabbit hole I’ve identified 5 of the most common vulnerabilities:
Not having a crystal-clear research question
Not having your next steps mapped out
Not having a specific method for dealing with BSOs (bright shiny objects)
Not implementing that method consistently
No muscle to stick with your plan
We’re going to tackle 1, 2, and 3 above. With these in place I believe you’ll feel confident and take care of 4 & 5!
1. Write a Research Question
Before beginning your research, take a moment to write out your research question or statement. It will help guide you and keep you on task.
Think about what you want to specifically accomplish. State your goal in specific terms:
“Identify the village in Germany where Louise Nikolowski and her family were from so I can locate church records.”
Effective Research Questions
(Per the Board of Certification of Genealogists)
Genealogy Standards #10:
“Questions underlying research plans concern aspects of identity, relationship, events, and situations. The questions are sufficiently broad to be answerable with evidence from relevant places and times. They are sufficiently focused to yield answers that may be tested and shown to meet or not meet the Genealogical Proof Standard.”
Genealogical-research questions:
clearly describe a unique person, group, or event as the focus of the question
clearly state what kind of information that you’re hoping to discover, such as an identity, relationship, event, or biographical detail.
Keep this research question in front of you by:
printing it out and setting it in front of your monitor
putting it on a “sticky” note on your computer’s desktop (virtually or physically!)
writing it at the top of your physical or virtual notebook.
2. Map Your Next Moves
Break your primary research question down into smaller, individual research questions.
According to Elizabeth Shown Mills, after analyzing the existing data:
“we prepare a research plan that defines:
the resources to be explored
the strategies to be applied
the individuals who are to be included in that search
any special circumstances that will affect the project.”
Example Question: Where is the birthplace of Gustav Sporowski (father of Alfreda) who resided in Gillespie, Illinois in 1910-1918?
Actionable Steps
Here are examples of questions to be answered that support the research question:
Question 1 – Did he apply for citizenship? If so, what is listed? Question 2 – Find passenger list: what place of origin is listed? Question 3 – What was listed for other passengers accompanying him? (If any) Question 4 – Where are other Sporowskis from that are listed in passenger lists?
For each question above, make a list of the resources (records) you need to find to answer these questions, and where you plan to look for them. Track the outcome.
“we prepare a research plan that defines:
the resources to be explored
the strategies to be applied
the individuals who are to be included in that search
any special circumstances that will affect the project.”
Part 2 Video and Show Notes
Don’t let unexpected genealogical finds send you down a rabbit hole any longer. In this episode I cover concrete strategies for staying focused on what matters most, while not losing track of opportunities that present themselves. You’ll also learn about free tech tools that you can put in place to give you peace of mind, take back those lost hours, and help you be more productive.
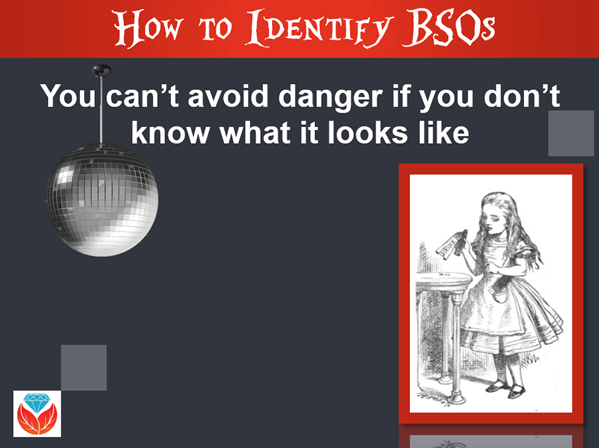
Identify BSOs (Bright Shiny Objects)
You can’t avoid danger (to your current research plan) if you don’t know what it looks like! My test will help you determine if what has caught your eye while researching online is a BSO.
How Alice identifies a BSO
Take the BSO Test:
Does this get me closer to answering my research question?
On a scale of 1 – 10 how potentially critical is this to my research?
Am I willing to give up finding the answer to my research question to pursue this?
Once you’ve identified BSOs, it’s time to implement a process for dealing with them so you can stay focused on our research question, as well as return to the BSO to explore its potential.
5 Ways to Capture & Return to BSOs
1. Use a Cloud Note-taking Service
Get yourself a free Cloud note-taking tool (Evernote, OneNote, Google Docs, etc.) and use it consistently. Use the website, software, and/or app to capture unexpected finds while researching.
I happen to use Evernote. If you’re new to Evernote, here’s a quick video that will help explain it to you.
Here’s an example of how I use Evernote to capture BSOs:
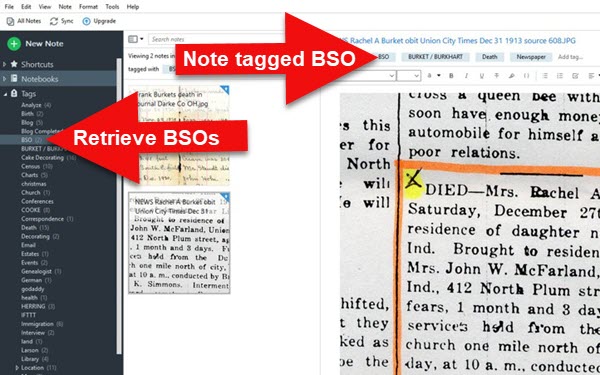
Create a tag in Evernote called BSO.
Each time you come across something that tempts you to deviate from your current focus, clip it and tag it with the BSO tag. This will allow you to move on with your research plan with confidence, knowing that it will be easy to locate and pursue the BSO later.
Add additional tags if desired to help you remember what it was about or why it interested you, such as a surname tag.
Evernote notes can have multiple tags, so use them.
Annotate the note to provide additional information as to why the BSO caught your eye, and what you plan to follow up on later.
Evernote will attach a link to the page where you clipped the item to the note. This means with one click you can return to the original source.
Notes tagged in Evernote
The benefit of using a Cloud-based note-taking tool is that your notes will be available to you on all your devices (depending on whether you have a free or subscription plan.) You can add additional information to your notes, and work with them anytime, anywhere.
Use Snagit to do Your Screen Clipping
You can also use Snagit to do your screen clipping and annotations. Automatically send the completed image to Evernote via the Share feature, or Copy and Paste it into a new note.
Learn more about this powerful screen clipping tool: Elevenses with Lisaepisode 61– How to use Snagit for genealogy Elevenses with Lisa episode 67– Advance clipping techniques with Snagit
Use coupon code: GENEALOGY15 to save 15% on Snagit. Thank you for usingmy link for purchasing your copy of Snagit. (We will be compensated at no additional cost to you, which makes the free Elevenses with Lisa show and notes possible.) Don’t worry if it initially shows as Euros in the cart. When you enter your address including country, it will convert the currency appropriately.
Save 15 % with my exclusive discount code.
2. Schedule BSO Time
One of the main reasons we get side-tracked by BSOs while working online is that we are afraid if we don’t look at it right now we’ll lost it or never go back to it. By scheduling time specifically for working on tagged BSOs, you will feel more confident about letting them go while you are working on a research plan.
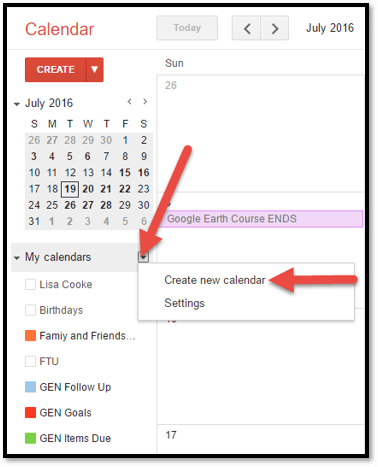
I schedule my time in the free Google calendar. You can have several different calendars (i.e. categories of types of things you schedule.) Create a “BSO” calendar and color code it so it’s easy to spot. Schedule BSO time and follow up items as future events on your calendar. Set Notifications and Email Reminders for each item.
Create a “BSO” calendar
Scheduling BSO times means you can mentally let them go for now!
Don’t miss the Bonus audio for this episode. In the app, tap the gift box icon just under the media player. Get the app here.
Get the Free Genealogy Gems Newsletter
The Genealogy Gems email newsletter is the best way to stay informed about what’s available with your Premium eLearning Membership. Sign up today here.