These show notes feature everything we cover in this episode. Premium Members: download this exclusive ad-free show notes cheat sheet PDF. Not a member yet? Learn more and join the Genealogy Gems and Elevenses with Lisa family here.

The places where your ancestors lived can tell you a lot about their lives. I’m going to show you a free and easy technique for plotting land in Google Earth.
episode 67
Would you like to be able to find your ancestor’s property on a map today? Keep reading and watch the video to learn how. We’re going to take U.S. government survey legal land descriptions found in sources such as Federal Land Patents and quickly and easily plot the boundaries in Google Earth Pro. I’ll also show you an easy way to do it for property in Canada too.
(PREMIUM MEMBERS: Get your ad-free PDF cheat sheet for this episode in the Resources section at the bottom of this page. Not a member yet? Click here to join the Genealogy Gems family and get all the benefits.)
In the video I show you how to plot the boundaries of a piece of land in Google Earth. We’re going to take U.S. government survey legal land descriptions found in sources such as Federal Land Patents and quickly and easily plot the boundaries in Google Earth Pro. I’ll also show you an easy way to do it for property in Canada too. These strategies come from my book The Genealogist’s Google Toolbox,
These days there are actually three versions of Google Earth:
All are free, but they are not the same. The app and web browser versions are sort of “Google Earth lite.” The software is what you want because it has all the bells and whistles that will allow you to do all the things I’m going to show you today.
Plotting legal land descriptions in Google Earth has its advantages. If you’re plotting the land of your ancestors, you’ll be able to see what the area looks like today and what the current street names are. In Google Earth you’ll also have access to additional tools that you can use in conjunction with the boundaries you’re going to create, such as historic maps, area photos, and a wide range of data sets that provide more information about the area.
The first thing to do is check to make sure you have the most current version of Google Earth on your computer. Again, we’re using the software so you need to do this on your desktop or laptop computer. You want to make sure you have Google Earth Pro – LINK – A tell tale sign that you don’t is if the Google Earth globe icon on your desktop is grey and not blue. Open it and in the menu go to Help > About Google Earth. Here it should say Google Earth Pro and you can see the version number.
Check the current version number here, and if you don’t already have the program, go ahead and download it.
Now that you have it on your computer, open it up and leave it running in the background. You’ll need a decent internet connection for it to run.
Next pull up the legal land description that you want to plot. Here’s one that I have for some property owned by George Burket. I found this at the Bureau of Land Management Government Land Office Records website. This free website is where you can search for land patent that your ancestors once held.
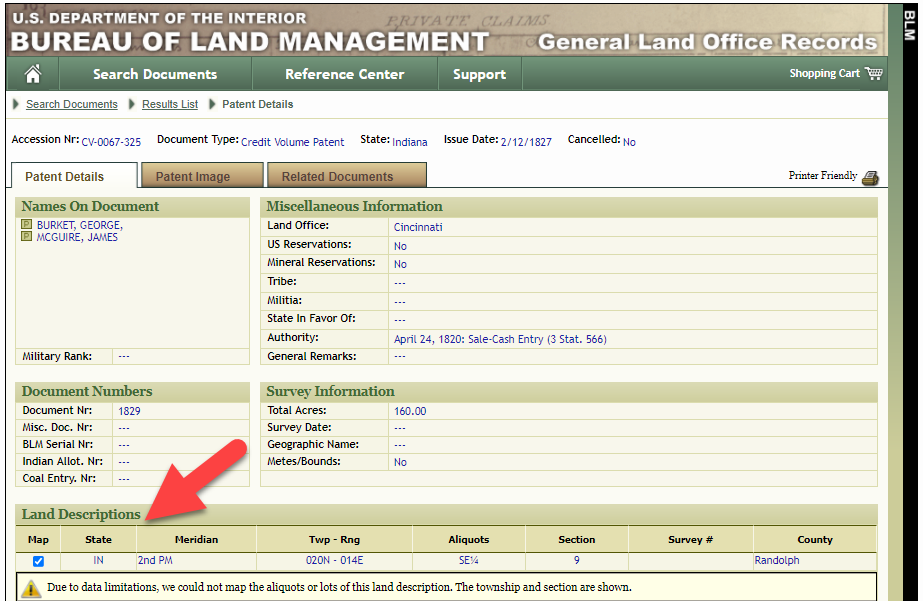
Legal land description at GLO
Even though the Bureau of Land Management places it on the map on their website, you can’t download this or add to it. The advantage of plotting this in Google Earth is that you will have access to much more geographic data, you can add many more details to the map, you can use it in conjunction with other related mapping work that you’re doing, and you can save and share it.
This description gives us the exact coordinates of the property. Jot down the land description or keep it open in your browser tab so you can refer to it.
In a new browser tab, we’re going to type in http://www.earthpoint.us. This will take us to the Earth Point website.
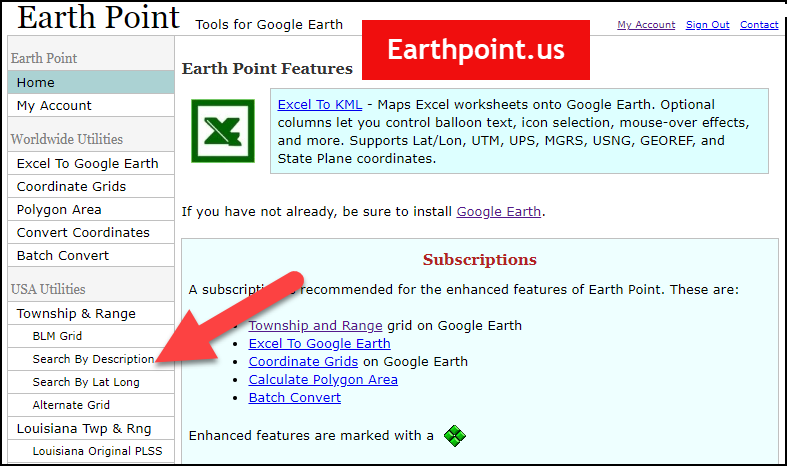
Search by legal land description at Earth Point
This website is free, although some of the features are available only with a paid subscription. Thankfully, the tool for plotting your ancestor’s land patent is free. Some of the free features do require that you sign up for a free account. The feature we are going to use currently does not.
On the Township and Range – Search by Description page you will see a field for each piece of information found in the land description. It’s important to enter this information in the order presented starting with the State. Select the state from the drop-down menu. Pause a moment to allow the fields to recalculate. This allows the appropriate data to be loaded into the next field based on your selection.
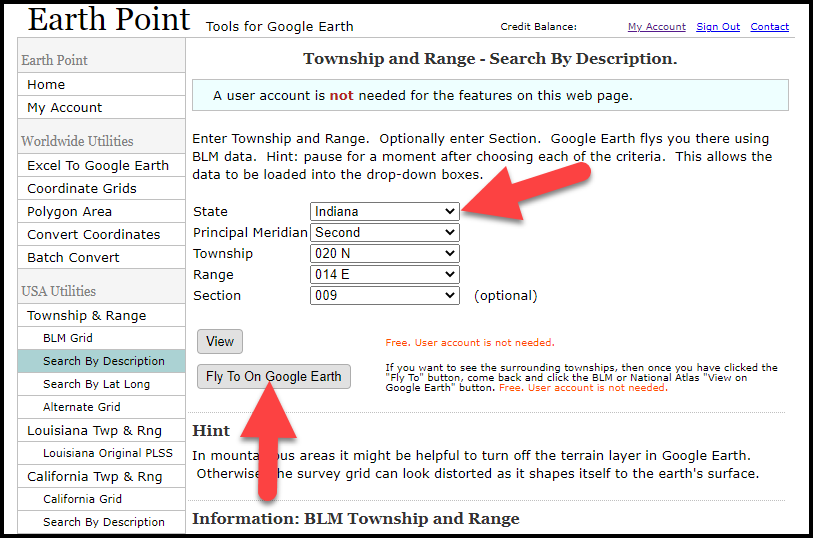
Entering data at Earth Point
After you have made each selection, click the Fly to on Google Earth button. This will generate a KML file which can be saved to your computer. KML stands for Keyhole Markup Language, which is the file type that Google Earth uses and understands. KMZ are zipped KML files which also are used by Google Earth.
Save the file to the desired location on your hard drive. Then click the file to open it. It will automatically open in Google Earth (which you already have open). The KML file is now located in your Temporary Places folder in the Places panel. The land is has now been automatically plotted on the map.
The orange outline is the township. In this example it is township T20N R14E. Click the orange ball in the center of the township for details. In the details you’ll find the total number of acres in the township, the latitude and longitude coordinates for the center of the township and corners.
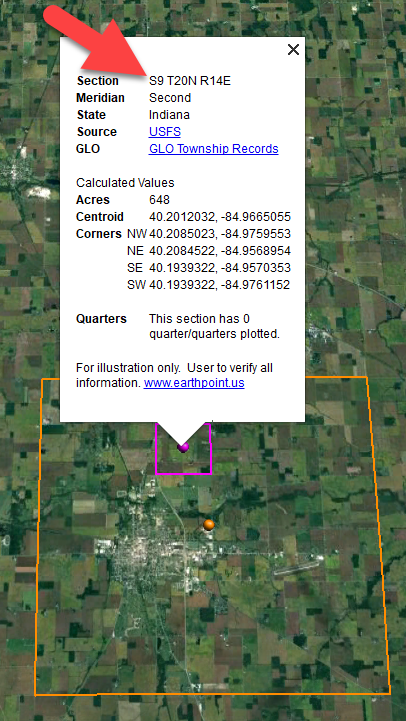
Township in Google Earth
The pink / magenta outline is the Section where the property is. Click the pink center dot for the details:
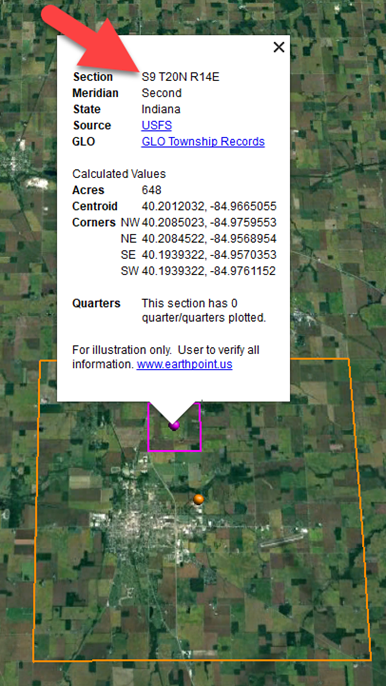
Land section in Google Earth
In this example Section 9 consists of 648 acres.
Notice that Earth Point was able to plot the land down to the Section level. However George Burket did not own the entire section. We must return to the land description for the Aliquots.
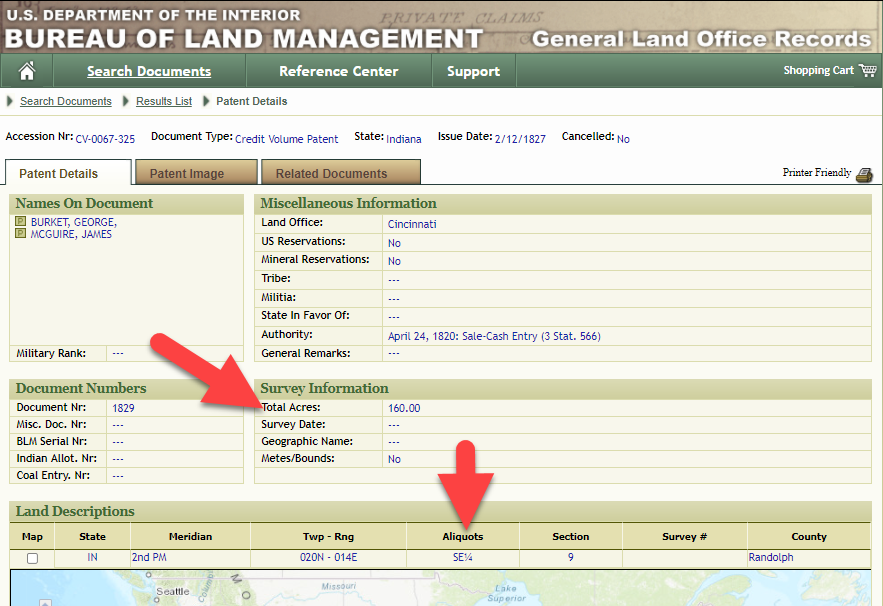
Aliquots in Legal Land Description
In this example, the land was the southeast quarter (SE1/4) of section 9. The land was a total of 160 acres.
We can use the Polygon tool in Google Earth to plot the 160 acres. In the toolbar, click the Polygon tool. This will open the New Polygon dialog box. Type a title, description and source citation.
As you hover your mouse over the map you will notice that the cursor is now a square shape. Click the screen on each of the four corners one at a time in order to set the four corners of the property – in this case the southeast quarter of the section. Once you have drawn the shape you can click on the handle on any corner to adjust precisely.
Click the Style / Color tab in the New Polygon dialog box to adjust the color and opacity of the acreage polygon. You can add color and thickness to the outline, and color and opacity to the fill of the shape. When you have it set the way you want it, click OK to close the New Polygon box. The Polygon is now set.
On the left side of the Google Earth screen you will see a series of panels: Search, Places and Layers. At the bottom of the Places panel is the Temporary folder. This is where the KML file was placed when it was opened. However, like its name implies, this is a temporary location. If you want to keep it, you’ll need to move it to a filed location within the Places panel. This will not change the position of the polygon on the map, only where it is filed and saved in the Places panel.
To file a polygon, click on the file in the Places panel, drag it to the desired location, and drop it. Next, go the main menu and click File > Save My Places. This will save your work so that when you close the program it will not be lost. Google Earth doesn’t auto-save.
The polygon plotting the acreage will be visible on the map when the box is checked in the Places panel. If you uncheck the box for the polygon it will still be there, but it will not be visible on the map. This allows you to create and save many items of interest without always having to have them displayed and cluttering up the map in Google Earth.
After your land polygon has been set, you may want to rename it. There are two ways to do this:
You can also restyle the polygon and edit the text. Start by going to the Places panel and click the arrow pointing at the Polygon’s globe icon. This will open it and show the nested content. Click to select the Polygon. Now you can right-click it (PC) and select Properties – OR – go to the menu under Edit > Properties. Either way it will reopen the Polygon dialog box so that you can make the desired changes. When you’re done, click the OK button to close the Polygon.
Snagit is the tool I used to capture the various views of the land I plotted in Google Earth. Learn more about Snag it by watching my videos and reading the show notes for episode 61 (for beginners) and episode 66 (advanced).
Although the Earth Point website doesn’t plot Canadian land, the Legal Land Description Converter website does. It can help you find land in Western Canada (British Columbia, Alberta, Saskatchewan & Manitoba) subdivided by the Dominion Land Survey (DLS) and the Alberta Township System (ATS).
These show notes feature everything we cover in this episode. Premium Members: download this exclusive ad-free show notes cheat sheet PDF. Not a member yet? Learn more and join the Genealogy Gems and Elevenses with Lisa family here.
Gwynn: I would like to know how to match plat with GPS coordinate/ current street address.
Answer: I cover how to overlay a plat map in Google Earth and discover the current street address in my book The Genealogist’s Google Toolbox.
Roger D: How exact do you need to be in picking points? Does Google snap to mid-points of lines?
Answer: Try to be as exact as you can, however as I showed in the video you can reposition them as needed. Google Earth doesn’t snap.
Lyn: Can I do this with English tithe maps?
Answer: There isn’t a website converter that I know of. However I do cover how to overlay digitized maps in Google Earth in my book The Genealogist’s Google Toolbox.
The manufacturer price is going up August 31, 2021. Now’s the perfect time to get your official Elevenses with Lisa mug.
You can also find them through the menu: Premium > Premium Videos > Elevenses with Lisa.
Original air date: 10/1/20
Join me for Elevenses with Lisa, the online video series where we take a break, visit and learn about genealogy and family history.
Google Lens with Lisa Louise Cooke
Google Lens is a free technology that Google says helps you ”search what you see.” It uses the latest in Optical Character Recognition (OCR) and artificial intelligence to accomplish tasks.
In this video and article we’ll discuss where you can get Google Lens and how to use it for a wide variety of tasks.
Hang on tight to your phone and let’s jump in!
Google Lens is doing much of the work in Google Photos. It can detect the faces in your photos, and allow you to search by face. It can also detect objects and text, making it a super fast way to search the photos and images you store in Google Photos.
If you’re not interested in storing all of your photos on Google Photos, that’s OK. As a genealogist, you could still use it for more strategic purposes. You could use it just for family history photos and related genealogical images like documents and photos of tombstones. All of the content you add can then be quickly and easily searched for and found. It can even help you identify a known ancestor in other photos where you may not have recognized it was the same person.
We will talk about specific ways to use Google Lens in Google Photos. But first, let’s talk about all of the ways you can get your hands on Google Lens.
Google Lens is available on most mobile devices but not all. Some Samsung devices don’t currently support it. Here’s where you can find Google Lens.
Google Lens is built into Google Photos – Download the Google Photos app to your phone. Pull up one of your photos and look for the Lens icon at the bottom of the screen. If it is there, your phone supports Google Lens.
Google Lens in the Google Search app – You will see the Lens icon in the search bar if your phone supports Google Lens.
The Google Lens app – On Android devices look for the Google Lens app in the Google Play app store.
Google Lens is primarily a mobile tool although Google Lens is built into the functionality of Google Photos. (It works behind the scenes – you won’t find a Google Lens icon.)
However, you can use your phone to user Google Lens to capture text and then send it to the Chrome browser on your desktop computer.
To use Google Lens on your photos in the Google Photos app, you’ll first need to give the app permission to receive the photos you take with your phone. You can then open the Google Photos app and select a photo. In this episode I used the example of a potted plant (Image A below).
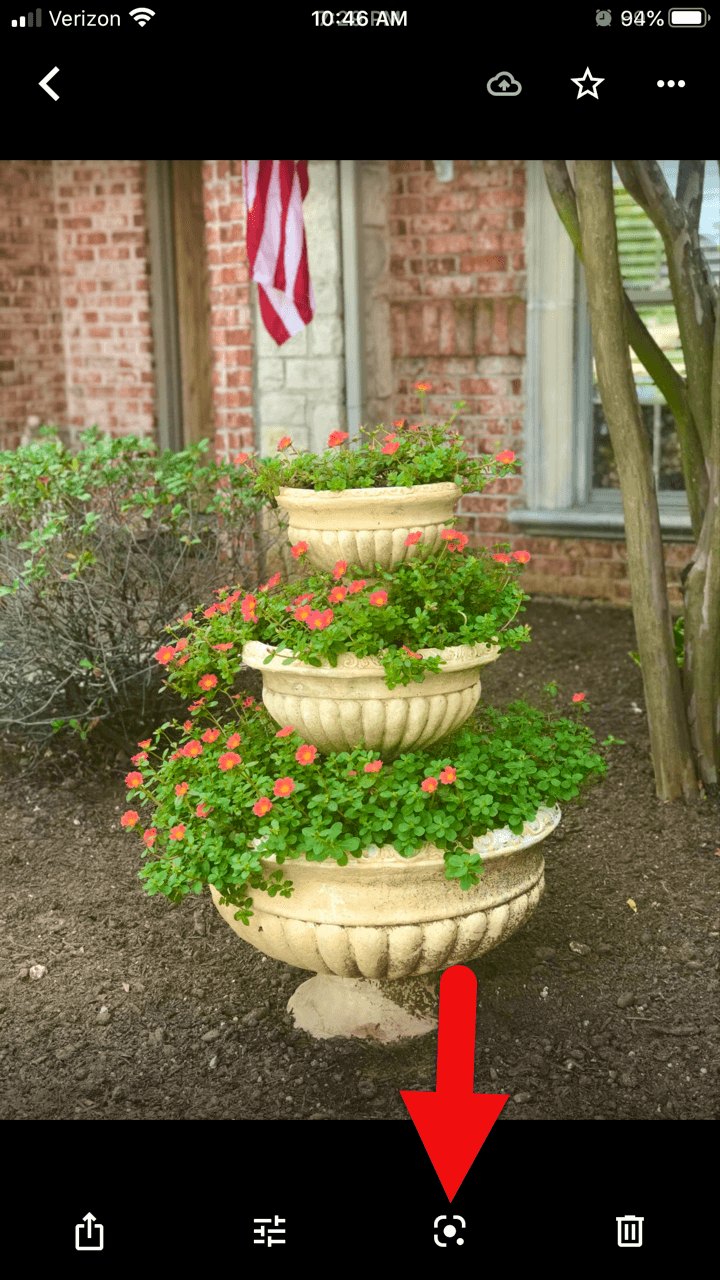
(Image A) Google Lens in the Google Photos app
Tap the Google Lens icon at the bottom of the screen and you will receive search results that include the name of the plant, photo examples of the same plant, possible shopping options, and web pages providing more information about that plant.
Here’s another way you can use the Google Lens feature in the Google Photos app:
On many mobile devices such as the iPhone (but not all devices) the Google Lens icon will appear in the search bar. If you’re not sure if you already have the Google Search app on your phone, go to the app store app on your phone and search for “Google Search.” You will see the app listed with a button that either says “Open” (because it is already on your phone) or “Install” (because it is not yet on your phone.)
You can also check to see if they app is on your phone by searching for “Google Search” in the search bar of your phone.
Here’s what the Google Search app looks like on a phone (Image B below):
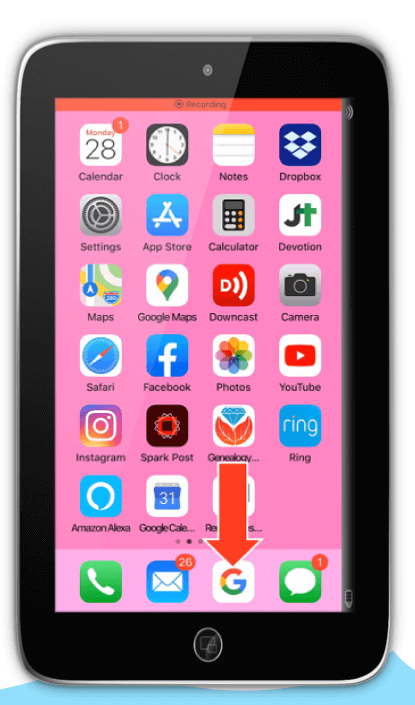
(Image B) Look for the Google Search app on your phone.
If you have an Android phone, search the Google Play store for the Google Lens app. Here’s what the app looks like (Image C below):
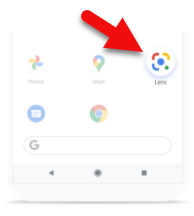
(Image C) Android users with phone’s supporting Google Lens will find the app in the Google Play app store.
Once you start using Google Lens the possibilities for its use can seem endless. Here’s a list of the kinds of things Google Lens can do:
Before you buy that next history book or go through the trouble of requesting it through inter-library loan, why not let Google Lens determine if it is already available for free online? This next tip works really well for old books that are likely to be in the public domain or printed before 1924.
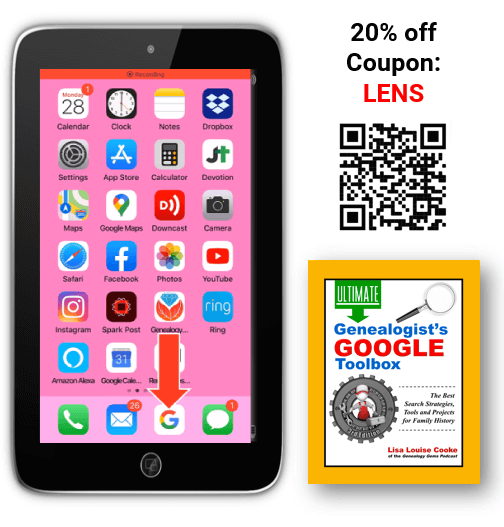
(Image D) Point your phone’s camera or Google Lens at the QR code
Open the camera on your phone and point it at the QR code above (Image D) to be taken to the book in the Genealogy Gems store.
Use coupon code LENS to get 20% off!
Premium Video & Handout: Solving Unidentified Photo Album Cases. (This video features using Google Photos.)
Book: The Genealogist’s Google Toolbox by Lisa Louise Cooke. (Includes search strategies, Google Photos, and Google Translate.)
Bonus Download exclusively for Premium Members: Download the show notes handout
One of the advantages of tuning into the live broadcast of each Elevenses with Lisa show is participating in the Live Chat and asking your questions.
From Rosalyn: Lisa are the old photos hanging on your wall the originals or copies? They are very nice.
Lisa’s Answer: I always put copies in frames when I hang them on the wall because light can fade originals. They are all my family.
From Jn Rollins: Does it do the same identification for birds?
Lisa’s Answer: I haven’t snapped a photo of a bird, but I’m sure it could. I used it on a photo of a bird, and it identified it perfectly.
From Susan: I have to download an app to get the lens icon?
Lisa’s Answer: If you have an Android phone, you may be able to download the free Google Lens app from your app store. Otherwise, you will find the icon in the Google Search app or the Google Photos app on supported devices.
From Patriva: Is Google Go the same as Google Search?
Lisa’s Answer: Google Go is a “lighter faster” search app. I think it may be geared more toward Samsung devices. I have a Samsung Tab and it doesn’t support Google Lens.
From Carrie: Does this work with the Google Chrome app?
Lisa’s Answer: The Chrome app doesn’t have the Google Lens icon.
From Jn Rollins: I installed Lens a while ago on my Android phone, but when I open Google search the lens icon doesn’t appear next to the microphone icon. How can I change that?
Lisa’s Answer: Some Android devices (like Samsung phones) don’t support Google Lens so you won’t see the icon. Check the app store to see if they offer the Google Lens app for your phone. However, I’m guessing it probably won’t be offered since it sounds like your phone doesn’t support Google Lens.
From Christine: I love this technology for speeding up research! But I have some reservations—what privacy are we giving away? How will Google use our search history?
Lisa’s Answer: I would not use Google Lens for anything I consider “sensitive.” Go to the privacy settings in your Google MyActivity to learn more.
From Lynnette: Can you put the text into Evernote easily?
Lisa’s Answer: Absolutely! Tap to copy the detected text, open an Evernote note, press your finger in the note and tap Paste to paste the text.
From Colleen: I see you are google searching. Does doing this with photos allow others to access my google photos when searching for an item? For example, the example you used with the purse?
Lisa’s Answer: To the best of my knowledge your photos are not searchable by others online. However, it is possible that Google uses the image internally to “train” the machine learning. Go to the privacy settings in your Google MyActivity to learn more.
From Christine: Lisa, can this be used to compare photos to determine if they are the same person? Thanks for sharing all your wisdom!
Lisa’s Answer: Yes! Watch my Premium membership video called Solving Unidentified Photo Album Cases.
From Caryl: Don’t know what a symbol is on a headstone? Now this would be oh so helpful!!
Lisa’s Answer: Yes, indeed!
From Susan: I quickly took a photo of the book cover, so now I can get your book! Is it better to buy directly from you or go to Amazon?
Lisa’s Answer: The book is available exclusively at my website: https://www.shopgenealogygems.com
From Debbie: Will FamilySearch’s app be independent, or will it work / integrate with Google?
Lisa’s Answer: FamilySearch would not be integrated. However, as handwriting technology is developed I’m sure you’ll find it in use in both places.
I really want to hear from you. Did you enjoy this episode? Do you have a question? Please leave a comment on the video page at YouTube or call and leave a voice mail at (925) 272-4021 and I just may answer it on the show!
If you enjoyed this show and learned something new, will you please share it with your friends? Thank you for your support!
Live show air date: September 3, 2020
Join me for Elevenses with Lisa, the online video series where we take a break, visit and learn about genealogy and family history.

Have you thought about using Google Photos but just weren’t sure how it worked or where to start? This video webinar will answer your questions and give you the confidence to use it effectively. In this introductory tour to Google Photos we will answer the questions:
Watch the video and follow along here with the show notes. Genealogy Gems Premium Members can download a PDF handout of these notes in the Resources section below.
Google Photos is a free Cloud-based photo and video sharing and storage service. You can use the website on your computer and download the Google Photos app to all of your mobile devices.
Visit the website, and download the mobile app.
Log in to each device with your Google account. If you don’t have a Google account, you can set it up for free. You will use this same account with all Google tools and products.
It’s understandable to be concerned about the privacy of your photos and videos. Here’s what you need to know about Google Photos privacy:
There are a wide range of great features, some of which may not be obvious at first. Google Photos features include:
You have two options when it comes to your Google Photos storage plan:
Let’s take a closer look at these two storage plan options.
Visit Google One to get all the latest information about plans and features.
High Quality versus Original Quality can be a bit confusing to remember. It may help to think of it this way:
High Quality (FREE)
compressed but still high quality and printable.
Original Quality ($ Storage)
Stored at original size. Larger sizes take up more storage space.
Considering the volume of photos and videos we take these days with our phones, and the volume of old family photos we have digitized, storage is a pressing issue. Google Photos can help because:
I strongly believe it is important to have multiple backups. So while I see Google Photos as one of my backups, all of my important photos and videos are on my computer which is backed up to the cloud. I use the Cloud backup service Backblaze and have for many years. If you decide to try them (and they usually offer a 15 day free trial here) , I do appreciate it if you use my link. We are compensated at no additional cost to you, and that helps make this free show and show notes possible.
There are two ways to add photos from your computer:
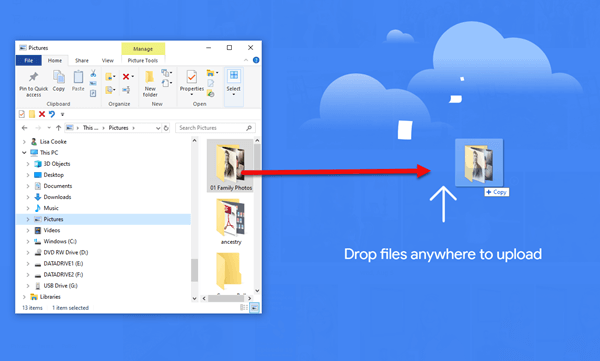
Drag and drop photos into Google Photos
When using the Google Photos App on a mobile device:
Also in the Settings you will find Manage device storage. You can opt to have the original photos and videos removed from your device once they are uploaded to Google Photos. This will free up space and manage the amount of storage the app uses on your device.
You can search your photos and videos for:
For example, type the word Selfie into the search field and Google Photos will retrieve all of the photos that were taken as selfies.
You can also search your photos and videos for:
After initial set up your backup, Google Photos starts to identify and group faces that are the same.
Check your Settings to ensure the feature is activated: Settings > Group similar faces > slide the Face Grouping button to the “on” position. It might take a few hours or a few days from your initial setup for this feature to activate. It depends on number of photos and your WiFi connection.
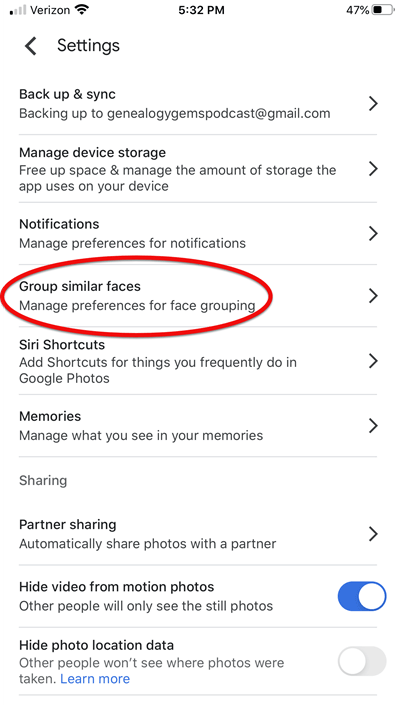
Group similar faces in Google Photos
Searching for photos and videos that include certain people (faces) is very easy to do.
You can Show and Hide Faces and include or exclude Pet Faces in the Settings.
Keep in mind that facial recognition, and object and text search aren’t (and realistically can’t be) perfect. However, it improves every day thanks to machine learning. The Google Photos of today is more accurate than when the service was first launched.
You can help train Google Photos to more accurately identify faces in photos by adding names to the faces that you know. You can also answer the questions that Google Photos poses regarding whether two faces are the same or different person.
You can search for objects that appear in your photos and videos. Simply type in the word that represents the object. The example I used in this video was: Wedding Dress
Notice that this search retrieved content that included weddings and dresses. In order to narrow in on strictly content where someone is wearing a wedding dress, I put quotation marks around the phrase: “Wedding Dress”
I also searched for Typewriter. This retrieved content that featured a typewriter predominately and even when a typewriter simply appeared in the background. It also found videos where a typewriter appeared briefly.
Searching for words will retrieve any photo or video in Google Photos that mention that word. There are countless uses for this as a genealogist. In the example I showed in the video, photos of tombstones can be retrieved simply by searching for the surname that appears on the tombstone. This text recognition applies to all types of text including newspaper articles, signs and more. Again, we must keep in mind that Google Photos isn’t perfect and will have difficulty reading text that is unclear.
Google Photos creates fun projects and content using the photos and videos in your account including:
The content Google Photos creates can only be seen by you. It is not public. You decide whether to keep it, share it or delete it.
I show an example in this session of creating a video by selecting a theme, and a face. Google Photos did the rest by retrieving and assembling the photos chronologically and adding appropriate music! You can download these projects to your computer, and share links too.
Premium Members: Download the show notes handout
Premium Members: Watch the Premium Video Solving Unidentified Photo Album Cases available with your Genealogy Gems Premium Membership.
From Debra H: “Your topic is so on track with me. I have been scanning old photos. What a great delight to see your Solving Unidentified Photo album Cases. It was perfect. Thanks!!”
Recommended reading: The Genealogist’s Google Toolbox by Lisa Louise Cooke (chapter 10 Google Photos)

Available in the Genealogy Gems Store
From Gwynn: Does Google Photos have a way to share with a link?
Answer: Yes. In the video you can see how to do on a computer. On an iPhone: tap the photo, tap the Share icon, tap Share to, then tap Create link
Question: If you share the link on social media they can’t change it (the photo) right?
Answer: Correct.
From Kathy: With photos in the Cloud with Google Photos, can you tell the phone’s iCloud to disregard backing up your photos since you already have them in Google Photos?
Answer: Look at Settings > General > iPhone Storage> Disable iCloud Photos
Kelli: If I delete a photo on my phone does it delete from Google photo?
Answer: It depends exactly what you mean. If you delete the photo from your phone’s camera roll, no, it does not remove it from Google Photos. If you remove it from the Google Photos app on your phone, then yes it will remove it from Google Photos on your computer as well.
From Retta: Can you put a PDF on google photos?
Answer: No
From John: What add-on do you use to highlight your cursor? (in the video)
Answer: I use this software.
From Kathy: Is this good for sharing albums with family?
Answer: Yes!
From Natalie: Is there a limit of how many photos you can put in an album?
Answer: Currently 20,000 photos and videos.
From C: Synchronize means it downloads to all devises?
Answer: Yes, the photos and videos will be available through all of the devices in which you are signed into the same Google Photos account.
From GeneBuds: How do I access archive?
Answer: On a computer: You’ll find Archive on the left side of the screen under Library. On a phone: Tap Library in the menu at the bottom of the screen and then tap Archive.
Sarah: Somehow I have several copies of the same photo. Will Google photos help me sort those out so I can delete duplicates?
Answer: My understand is that Google Photos can detect identical duplicate images. If you already uploaded a photo to Google Photos, it will not re-upload the same photo. It will skip uploading that photo. It may look like Google Photos is uploading the photo again, but it isn’t. It’s just running it through identical duplicate detection.
From John: Where in Settings is “Group Similar Photos”? Does it vary by provider (like AT&T, Verizon)?
Answer: Look for Group Similar Faces in the Settings.
From Cindy: So if it recognizes faces at all ages, how might you use to help see if your unknown pics are who you might think they are?
Answer: I cover this in depth in my video Solving Unidentified Photo Album Cases available to those with Genealogy Gems Premium Membership. I also cover it in my book The Genealogist’s Google Toolbox.
From Karen: What about trying to identify unknown photos of ancestors from an old album? Can you put them on a google search that goes out on the internet to see if anyone else has identified that person? In addition to my previous answer, watch the free YouTube video How to Use Google Chrome to Identify Old Photos and Images for Genealogy and Family History.
From Kelli: If they are on google photos only, how do you print them, say at Costco?
Answer: You can order prints from the For You section of Google Photos. Check the Costco website because I think they can coordinate with Google Photos.
From Cathy: Can I give one person more than 1 name? Like Lucy Haley and Mother Cline?
Answer: In the same name field. You can’t assign two completely separate names. If you include both names in the field you will be able to search for either one and retrieve the photo.